You're viewing the support pages for our Legacy Tooling and, as such, the information may be outdated. Now is a great time to check out our new and improved tooling, and make the move to Questionnaire Builder 2 and Task Builder 2! Our updated onboarding workshop (live or on-demand) is a good place to start.
Welcome to the Task Builder Zones Tooling Reference Guide.
Here you can find out information on how and when to use a particular Task Builder Zone. There are over 50 Zones available - browse the list of Zones in the menu on the left to find out more information about each one.
The most fundamental building blocks of Tasks are Zones. Each screen in a Task Builder display is made up of a number of zones.
Most Tasks consist of Content Zones, along with 'active' and 'passive' Response Zones which you can use to collect Reaction Time Data from your participants. There are also Feedback Zones, Control Zones, and Advanced Zones which can enrich your tasks and provide additional experimental control.
By using combinations of Zone types you can create complex tasks to measure your participants behaviour.
For all Zones you can:
If you are looking for more information on Tasks in general take a look at our 'How To: Task Builder' Guide.
For each Task Builder Zone listed you will find a description of the Zone, the Zone identifier icon and an image example. This will be followed by a configuration settings box (like the one below) which will list and explain all available configuration settings for the selected Zone.
General Zone Settings Information
Each Zone will have a number of different setting options which appear as grey setting boxes like this: (setting)
Click on any (setting)'s box to bring up the setting's content menu. Here you input your setting content as well as choosing the content type ( StaticSpreadsheetManipulationSpreadsheet-Manipulation). Just like you would with the Zone content itself.
In this guide, for quick reference, the options available for a particular setting will be written in the setting box. See the example below for demonstration.
You can find out more about Zones in the How To: Task Builder Guide
Go To Zone Configuration Settings example:
Go To
By default, a task will always advance to the next screen in a display.
When the screen is complete, advance to screen (text)
Setting (text): Type a screen name from the current display.
When the current screen is finished, Gorilla will advance to the named screen within your current display.
Click the Tutorial icon to view a Tutorial which demonstrates how you can use the selected Task Builder Zones.
Click the Example icon to view an example of a Sample Task which makes use of the selected Task Builder Zones.
Click the Demo icon to view an Experiment which makes use of the selected Task Builder Zones.
Preview a task to experience the Zone in action. Inspect the task structure to see how a Zone is used.
You're viewing the support pages for our Legacy Tooling and, as such, the information may be outdated. Now is a great time to check out our new and improved tooling, and make the move to Questionnaire Builder 2 and Task Builder 2! Our updated onboarding workshop (live or on-demand) is a good place to start.
Many Response Zones are considered Active Responses meaning that, when they are clicked or tapped on by a participant, their response is processed and recorded immediately.
When you use one or more of these Response Zones on a Screen, you will be presented with a single set of Configuration Settings under the heading Active Response.
These Configurations Setting will apply to all Response Zones on that screen.
The best way to set up Active Response Zones in 3 steps!
First, Link each Response Zone to a separate spreadsheet column e.g.'button1', 'button2'. (Remember to set the Zone content type to be Spreadsheet).
Now, add another spreadsheet column to your Task's Spreadsheet called 'Answer'; containing the correct answer for each trial.
Finally, set Setting-1 of the 'Active Response' Configuration Settings (see below) be the same name as this new column i.e. 'Answer' (Content Type = Spreadsheet).
This way Gorilla will automatically score whether trials are answered correctly or incorrectly.
Active Response
1) If a response's value matches (text), it represents the correct answer
Setting (text): Type a name of the correct answer (Static Content), or, correct answer column name (Spreadsheet Content).
Default = none; No correct answer is set, all answers will be listed as 'incorrect' in your metrics.
If set answers matching this value will be marked as 'correct' in your metrics.
2) If (1 or 0), enable sudden death (first answer recorded only). Note: Setting-1 must be set in order to use this setting.
Setting (1 or 0): Type 1 to turn setting on, Type 0 to turn setting off.
Default = 0 (off); If the participant selects an incorrect answer the option is removed until the correct answer is chosen, at which point the participant will advance to the next screen.
If Sudden Death is set to 1 (on) the participant is only allowed a single response. Once the participant has responded the next screen is shown regardless of whether the response was correct or incorrect.
3) If (1 or 0), only score the first answer as correct Note: Setting-2 must be set to 0 for this setting to apply.
Setting (1 or 0): Type 1 to turn setting on, Type 0 to turn setting off.
Default = 0; the trial will be marked as 'correct', even if it was not the first response given.
If set to 1, trial will be marked as correct if and only if this was the first answer given.
4) Record a timeout as (text) Note: This setting only applies if a Timelimit (screen) Zone is present.
Setting (text): set the text you wish to see recorded in the metrics when the timelimit for the screen is reached before a correct response is given.
Default = none; if the timelimit is reached before a response is received, the 'response' column of your metrics will be blank.
If text is set, and the timelimit is reached before a response is received, the text is recorded under the 'response' column of your metrics.
Branching Settings
5) If correct, advance to screen (text) Note: Setting-1 must be set in order to use this setting.
Setting (text): Type a screen name from the current display.
Upon receiving a correct response, Gorilla will advance the task to the named screen within your current display.
6) If incorrect, advance to screen (text) Note: Setting-1 must be set in order to use this setting.
Setting (text): Type a screen name from the current display.
Upon receiving an incorrect response, Gorilla will advance the task to the named screen within your current display.
7) If timeout, advance to screen (text) Note: Setting-1 must be set in order to use this setting.
Setting (text): Type a screen name from the current display.
If there is a timelimit set and this expires before a response is received, Gorilla will advance the task to the named screen within your current display.
For worked examples and further guidance on within-task branching, see our dedicated Troubleshooting Page.
Embedded Data Settings
For a general guide to storing and using embedded data, see our walkthrough.
8) Store most recent answer as embedded data called (text)
Setting (text): Type a key-name for the embedded data.
Default = none; No key is created, no embedded data is stored.
If set, this creates an embedded data key with the given name, this key will store the value of the most recent answer given.
You can then retrieve this value later using this key name and display it in text and rich text nodes, or use it in the tree to implement conditional branching.
9) Store correct answers as embedded data called (text)
Setting (text): Type a key-name for the embedded data.
Default = none; No key is created, no embedded data is stored.
If set, this creates an embedded data key with the given name, this key will store the value of the 'count of all correct responses'.
You can then retrieve this value later using this key name and display it in text and rich text nodes, or use it in the tree to implement conditional branching based on performance.
10) Store incorrect answers as embedded data called (text)
Setting (text): Type a key-name for the embedded data.
Default = none; No key is created, no embedded data is stored.
If set, this creates an embedded data key with the given name, this key will store the value of the 'count of all incorrect responses'.
You can then retrieve this value later using this key name and display it in text and rich text nodes, or use it in the tree to implement conditional branching based on performance.
11) Store total answer count as embedded data called (text)
Setting (text): Type a key-name for the embedded data.
Default = none; No key is created, no embedded data is stored.
If set, this creates an embedded data key with the given name, this key will store the value of the 'count total of all responses (whether correct, incorrect or timed-out)'.
You can then retrieve this value later using this key name and display it in text and rich text nodes, or use it in the tree to implement conditional branching based on performance.
12) Store percentage correct answers as embedded data called (text)
Setting (text): Type a key-name for the embedded data.
Default = none; No key is created, no embedded data is stored.
If set, this creates an embedded data key with the given name, this key will store the value of the 'percentage of all responses that were correct out of all total (correct, incorrect and timed-out) answers'. This value will be an integer between 0 and 100.
You can then retrieve this value later using this key name and display it in text and rich text nodes, or use it in the tree to implement conditional branching based on performance.
You're viewing the support pages for our Legacy Tooling and, as such, the information may be outdated. Now is a great time to check out our new and improved tooling, and make the move to Questionnaire Builder 2 and Task Builder 2! Our updated onboarding workshop (live or on-demand) is a good place to start.
Some input types, such as sliders and dropdown menus, do not have an obvious point at which the response is triggered - they can't be considered 'clicked' or 'pressed' in the same way as a button or keyboard key can.
Gorilla treats these input types as passive responses, meaning that their responses are collected when the screen is advanced.
While passive responses will always be collected when the screen advances, there are two common ways to implement them:
You're viewing the support pages for our Legacy Tooling and, as such, the information may be outdated. Now is a great time to check out our new and improved tooling, and make the move to Questionnaire Builder 2 and Task Builder 2! Our updated onboarding workshop (live or on-demand) is a good place to start.
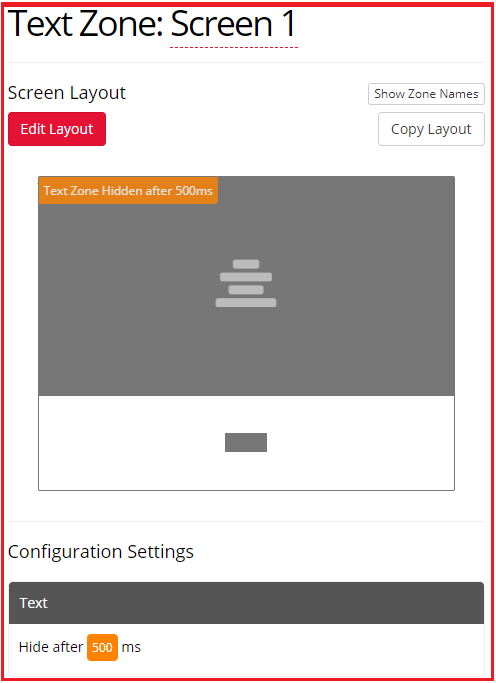
A Text Zone displays a single string of simple unformatted text.
The text will auto-resize to fit the Zone's area and be centred within the Zone area.
Use the Text Zone to contain the unformatted text you wish to display. The Text Zone is typically used to display text stimuli.
Text Zone Icon:
1) Text colour (setting)
Setting (colour): Type either a named colour (in lowercase) or a hex code to change the text colour.
Default = black.
Advanced Settings
2) Hide after (number) ms
Setting (number): Type a time, as a number of milliseconds (ms), to represent the total duration for which the stimuli will be displayed. After this time has elapsed the stimuli will be hidden.
Default = no display time limit; The stimuli will be displayed the entire time the participant is viewing the screen containing this zone.
If set, the stimuli will be displayed until the set time has elapsed. At which point the stimuli will be hidden and no longer visible to the participant - Note: the participant will remain on the screen containing this zone until they advance to the next screen* e.g. via a Passive Response Zone.
Click to view an Example of a Sample Task which makes use of the Text Zone.
You're viewing the support pages for our Legacy Tooling and, as such, the information may be outdated. Now is a great time to check out our new and improved tooling, and make the move to Questionnaire Builder 2 and Task Builder 2! Our updated onboarding workshop (live or on-demand) is a good place to start.
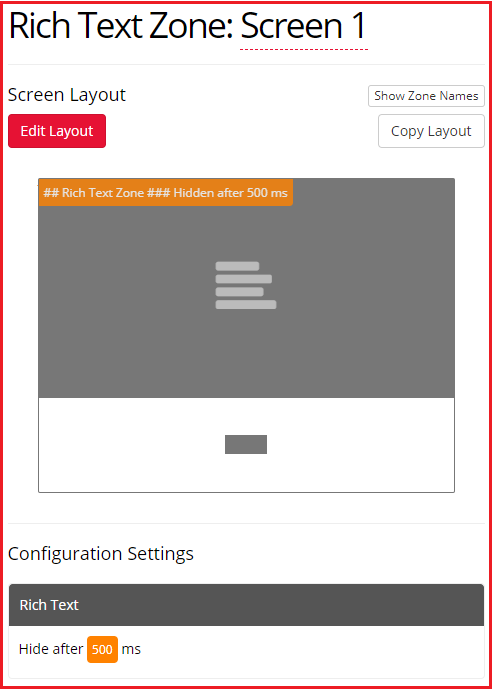
A Rich Text Zone allows you to format your text. Text can be formatted using both Markdown and HTML. However, if you want to include a significant amount of HTML formatting, you may prefer to use the dedicated HTML Zone.
The text will auto-resize to fit the Zone's area and will be centred within the Zone area. For more on text scaling in Gorilla, see our Scaling Guide.
Use the Rich Text Zone to contain the formatted text you wish to display. The Rich Text Zone is typically used to display formatted instructions or introduction text. You can also use it in conjunction with embedded data to show participants their responses or scores. Find out more about using embedded data here.
Rich Text Zone Icon:
In the example below, the Rich Text Zone has been set-up to hide the text stimuli after 500 ms (Setting 1). Once 500ms has passed the text in the Rich Text Zone will be hidden and no longer visible to the participant. The Participant will remain on this screen until they press the available 'Passive Response Zone' (the Continue Button).
Advanced Settings
1) Hide after (number) ms
Setting (number): Type a time, as a number of milliseconds (ms), to represent the total duration for which the stimuli will be displayed. After this time has elapsed the stimuli will be hidden.
Default = no display time limit; The stimuli will be displayed the entire time the participant is viewing the screen containing this zone.
If set, the stimuli will be displayed until the set time has elapsed. At which point the stimuli will be hidden and no longer visible to the participant - Note: the participant will remain on the screen containing this zone until they advance to the next screen e.g. via a Passive Response Zone.
Click to view a Tutorial of the Rich Text Zone.
Click to view a Classic Semantic Priming Example of a Sample Task which makes use of the Rich Text Zone.
You're viewing the support pages for our Legacy Tooling and, as such, the information may be outdated. Now is a great time to check out our new and improved tooling, and make the move to Questionnaire Builder 2 and Task Builder 2! Our updated onboarding workshop (live or on-demand) is a good place to start.
The HTML Zone is a fully customisable zone which allows you to insert your own HTML content into a task. You can use it to add custom formatting to text or images, or to embed videos. The HTML Zone doesn't include any default formatting from Gorilla, so text will not be automatically centred as it is in the Text Zone and the Rich Text Zone.
-- No Settings --
You're viewing the support pages for our Legacy Tooling and, as such, the information may be outdated. Now is a great time to check out our new and improved tooling, and make the move to Questionnaire Builder 2 and Task Builder 2! Our updated onboarding workshop (live or on-demand) is a good place to start.
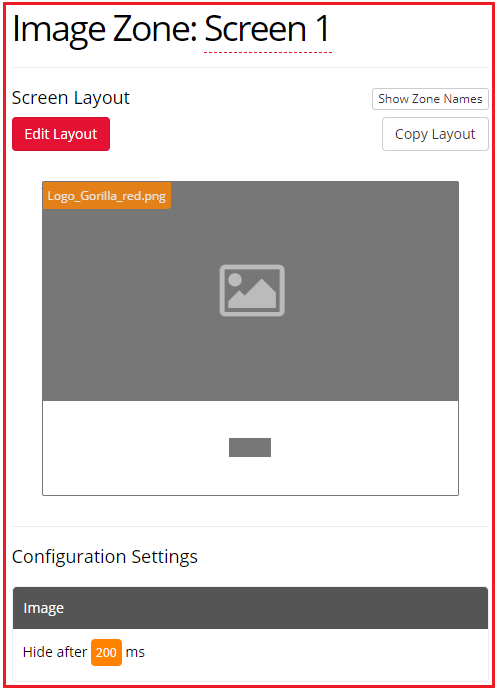
The Image Zone allows you to display a single uploaded image on your screen.
You must first upload the image in the Stimuli Tab of the Task Builder. Then type the full stimuli name (including file type) within the Image Zone or relevant spreadsheet column.
The image will auto-resize to fit the Zone's area and be centred within the Zone area. This means the image will be displayed as large as possible within the Zone's area, but will not be stretched or enlarged above its natural, uploaded, size. For more on image scaling in Gorilla, see our Scaling Guide.
Supported Image types: .png, .jpg, .jpeg, and .gif including repeating GIFs. Non-repeating GIFs are not recommended.*
File Size: We recommend that each individual image file you upload to your task be no larger than 50KB. For more guidance on file sizes, see our Technical Checklist.
Use the Image Zone to contain the Image you wish to display. The Image Zone is typically used to present image stimuli.
Image Zone Icon:
In the example below, the Image Zone has been set-up to hide the image stimuli after 200 ms (Setting 1). Once 200ms has passed the text in the Image Zone will be hidden and no longer visible to the participant. The Participant will remain on this screen until they press the available 'Passive Response Zone' (the Continue Button).
Advanced Settings
1) Hide after (number) ms
Setting (number): Type a time, as a number of milliseconds (ms), to represent the total duration for which the stimuli will be displayed. After this time has elapsed the stimuli will be hidden.
Default = no display time limit; The stimuli will be displayed the entire time the participant is viewing the screen containing this zone.
If set, the stimuli will be displayed until the set time has elapsed. At which point the stimuli will be hidden and no longer visible to the participant - Note: the participant will remain on the screen containing this zone until they advance to the next screen e.g. via a Passive Response Zone.
2) If (setting) always show image at it's actual size.
If set, this will always display the image at its natural pixel size, rather than constraining it to the size of its containing zone. This ensures a consistent size, but may cause it to overlap other elements.
3) Set Image width to (setting) cm.
4) Set Image width to (setting) visual degrees.
Click to view an Example of a Sample Task which makes use of the Image Zone.
More Information about GIFs
Gorilla pre-loads task material in advance of participants seeing it, so that when participants reach a new screen all page elements are ready to be displayed.
In the case of non-repeating GIFs there is no way to tell a GIF when to 'start' playing. A non-repeating GIF will play through once and then stop on the last frame. As such by the time a participant reaches the GIF it may already have played through once and be sitting static on the last frame of the GIF. To avoid this we recommend:
You're viewing the support pages for our Legacy Tooling and, as such, the information may be outdated. Now is a great time to check out our new and improved tooling, and make the move to Questionnaire Builder 2 and Task Builder 2! Our updated onboarding workshop (live or on-demand) is a good place to start.
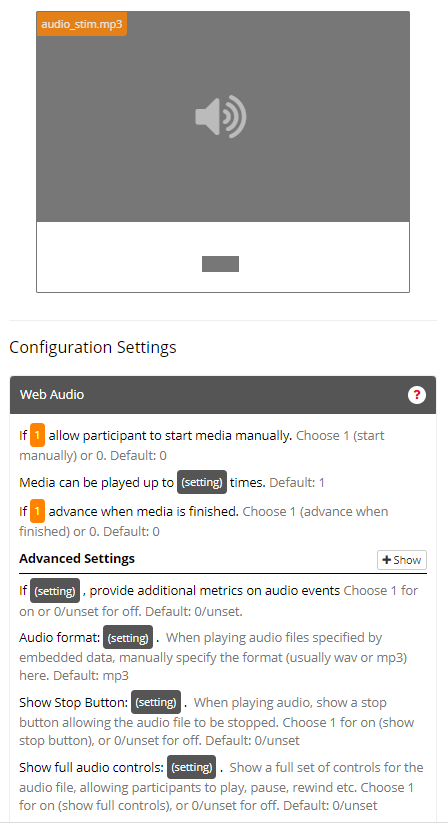
The Web Audio Zone allows you to add a single uploaded audio (sound) file to your screen. It is designed to work well with autoplay. As long as the participant has interacted with the task in some way, such as by making a click, the Web Audio Zone will be able to autoplay.
You must first upload the audio file in the Stimuli Tab of the Task Builder. Then type the full stimuli name (including file type extension) within the Web Audio Zone or relevant spreadsheet column.
Supported audio file types: .mp3, .ogg.
We recommend using the .mp3 format for audio files. This is the most widely supported audio file format and the de facto standard for audio on the web.
Please Note: .wav files are not widely supported for online use and we highly recommend you convert all .wav files to mp3 before uploading them as stimuli, in order to avoid issues and variation in browser playback performance. Upon uploading a .wav file a warning message will appear.
To learn more about .wav and .mp3 audio files, and why .mp3 format is preferred, have a look at this blog post. You can also listen to a variety of audio files in both .wav and .mp3 format, and compare the audio files for yourself. If you are worried about using .mp3 audio files in your experiment, it is important to note that even if .wav files were widely supported online, it is unlikely that participants' headphone quality and environment will enable them to hear any differences between the two filetypes.
File Size: We recommend that audio files you upload to your task be less than 2MB per minute. For more guidance on file sizes, see our Technical Checklist.
Use the Web Audio Zone to contain the audio media you wish to present. The Web Audio Zone is typically used to present audio stimuli.
If you are presented with a ‘Media error message’ when previewing your task view the Media Error Message troubleshooting guide for further help.
Note: the autoplay function may run into issues if a participant refreshes their browser page in the middle of a trial, but this should be a relatively rare occurrence.
Web Audio Zone Icon:
In the example below, the Web Audio Zone has been set-up to be started manually by the participant (Setting1) and will play once (Setting2). When the audio has finished playing it will auto-advance (Setting3) to the next screen.
The Web Audio Zone produces specific metrics in 4 columns within your Data Spreadsheet.
You can view an example of the metrics produced by the Web Audio Zone in the image below:
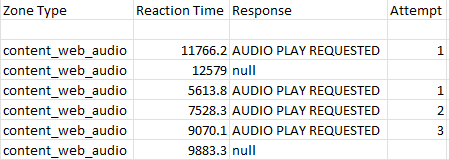
Note that some metric columns have been hidden for presentation purposes.
| Column Name | Row Entry | Description |
|---|---|---|
| Zone Type | content_web_audio | This is the Zone 'Type' identifier for the Web Audio Zone. |
| Reaction Time | [Number] | This is the reaction time in milliseconds (ms). If the Response column contains the text 'AUDIO PLAY REQUESTED', this represents the time, in ms, that Gorilla requested the audio start playing (either automatically, or in response to a participant pressing the Play button, depending on how the Web Audio Zone has been set up). If the Response column contains the text 'null', this represents the time, in ms, at which the zone finished playing and the screen advanced. |
| Response | [null] or "AUDIO PLAY REQUESTED" | 'AUDIO PLAY REQUESTED' means Gorilla has requested the audio start playing, either automatically or triggered by the participant pressing the Play button. If the Web Audio Zone has been set up to be started manually and the repeat functionality has been enabled, then you will gain an additional row entry with this value each time the participant presses the Play button. 'null' means the zone finished playing and the screen has advanced. This will only appear if setting 'advance when media is finished' is set to 1. |
| Attempt | [Number] | This indicates the number of times the participant has pressed to play the media. If the Web Audio Zone has been set up to be started manually and the repeat functionality has been enabled, then this is the number of times the participant has opted to play the audio. This column will appear blank/empty otherwise. |
1) If (1 or 0) allow participant to start media manually
Setting (1 or 0): Type 1 to turn setting on, Type 0 to turn setting off.
Default = 0 (off); the audio will play automatically when the participant arrives at the screen of the Web Audio Zone.
If set to 1 (on) a play button will be shown allowing the participant to manually start the media playback.
While autoplay of audio in some browsers is no longer permitted, the Web Audio zone features improved capabilities for handling this. Provided you have at least one clickable button in a screen or display prior to your audio file being played, you participants are less likely to experience disruption from Autoplay restrictions.
2) Media can be played up to (number) times
Setting (number): Type the number of times you wish the media to be re-playable.
Default = 1; the audio will play once. Note: Setting-1 must be turned on (1) in order to use this setting.
Set any number (numerical value) to limit the participant to this many plays.
If they are allowed to replay the media, a Replay button will be shown once the media has finished playing fully.
If set to 0, the media will be infinitely replayable, i.e. there is no limit to the number of times a participant can repeat this media.
3) If (1 or 0) advance when media is finished.
Setting (1 or 0): Type 1 to turn setting on, Type 0 to turn setting off.
If set to 1 (on), the screen will automatically advance once the media has finished playing.
Advanced Settings
4) If (setting), provide additional metrics on audio events
Choose 1 for on or 0/unset for off. Default: 0/unset.
5) Audio format: (setting)
When playing audio files specified by embedded data, manually specify the format (usually wav or mp3) here. Default: mp3
6) Show Stop Button: (setting)
When playing audio, show a stop button allowing the audio file to be stopped. Choose 1 for on (show stop button), or 0/unset for off. Default: 0/unset
This zone can be localised if you want to run your study in another language. For more information visit our Web Audio localisation guide.
Click to view an Example of a Sample Project which makes use of the Web Audio Zone.
Check out a Gorilla Academy case study that features the Web Audio Zone in the context of a real experiment, including tips on how to test your audio and how to configure the right settings for your study.
For insights and top tips from real researchers, check out our Gorilla Presents webinar on running audio and speech perception studies online!
You can also read Dr Rachel Theodore's tutorial on running speech perception experiments online using Gorilla.
You're viewing the support pages for our Legacy Tooling and, as such, the information may be outdated. Now is a great time to check out our new and improved tooling, and make the move to Questionnaire Builder 2 and Task Builder 2! Our updated onboarding workshop (live or on-demand) is a good place to start.
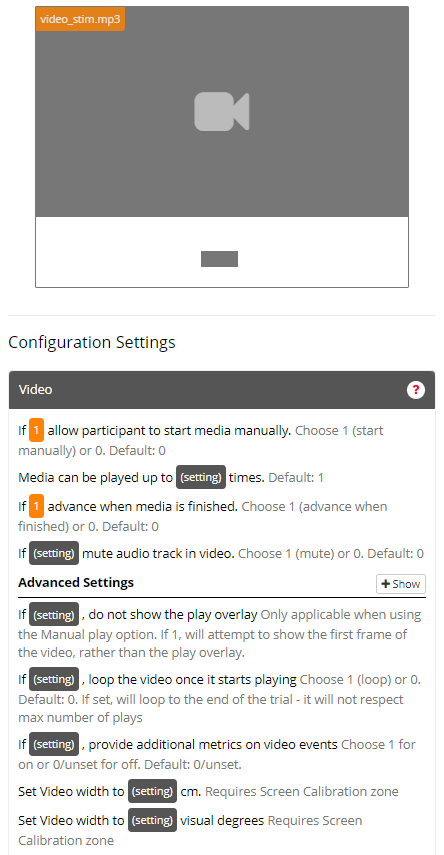
The Video Zone allows you to add a single uploaded video file to your screen.
You must first upload the video file in the Stimuli Tab of the Task Builder. Then type the full stimuli name (including file type extension) within the Video Zone or relevant spreadsheet column.
.mp4 file types are supported.
On some occasions, older .mp4 files with out-of-date encoding can cause issues. Handbrake is an open source tool that can be used to convert older video files to a modern, widely supported format.
Please Note: .mov files are not supported. You will need to convert your .mov files to .mp4 before uploading them as video stimuli.
File Size: We recommend that video files you upload to your task be less than 2MB per minute. For more guidance on file sizes, see our Technical Checklist.
Use the Video Zone to contain the video media you wish to present. The Video Zone is typically used to present short video stimuli.
If you are presented with a ‘Media not found’ message when previewing your task:
If you are presented with a ‘Media error message’ when previewing your task view the Media Error Message troubleshooting guide for further help.
Video Zone Icon:
In the example below, the Video Zone has been set-up to be started manually by the participant (Setting1) and will play once (Setting2). When the video has finished playing it will auto-advance (Setting3) to the next screen.
The Video Zone produces specific metrics in 4 columns within your Data-Spreadsheet. If you opt to allow participants to start playing the media manually (or be able to repeat playing the media) you will also produce an additional row in your Data Spreadsheet for the time when the participant started the video.
You can view an example of the metrics produced by the Video Zone in the image below:
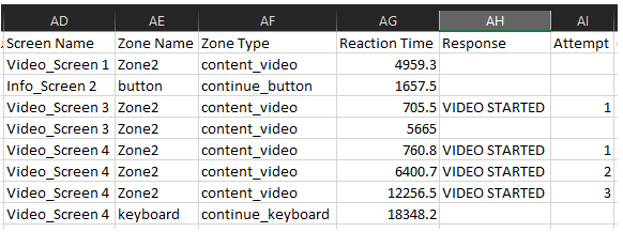
Note that some metric columns have been hidden for presentation purposes.
| Column Name | Row Entry | Description |
|---|---|---|
| Zone Type | content_video | This is the Zone 'Type' identifier for the Video Zone. |
| Reaction Time | [Number] | This is the reaction time in milliseconds (ms). 1. If the Video Zone has been set up to play automatically and then also advance automatically this number represents the time, in ms, at which the zone finished playing and the screen advanced. 2. If the Video Zone has been set up to be started manually (and if the repeat functionality has been enabled) then this number will represent the reaction-time, in ms, at which the participant pressed to play the video media. (see 'Response' column below) |
| Response | [Blank] or "VIDEO STARTED" | This indicates if the participant has pressed to play the media. 1. If the Video Zone has been set up to be started manually (and if the repeat functionality has been enabled) then you will gain an additional row entry with the response entry: 'VIDEO STARTED'. This indicates the reaction time (see above) at which the participant pressed to play the video media. 2. This column will appear blank/empty otherwise. |
| Attempt | [Number] | This indicates the number of times the participant has pressed to play the media. 1. If the Video Zone has been set up to be started manually (and if the repeat functionality has been enabled) then this is the number of times the participant has opted to play the media. 2. This column will appear blank/empty otherwise. |
1) If (1 or 0) allow participant to start media manually
Setting (1 or 0): Type 1 to turn setting on, Type 0 to turn setting off.
Default = 1 (on); the participant can manually start the media playback by clicking on the video.
If set to 0 (off); the video will play automatically when the participant arrives at the screen of the Video Zone.
Autoplay of video in some browsers is no longer permitted! To learn more about these changes and how they may affect you, review this article: Autoplay Changes
2) Media can be played up to (number) times
Setting (number): Type the number of times you wish the media to be re-playable.
Default = 1; the video will play once. Note: Setting-1 must be turned on in order to use this setting.
Set any number (numerical value) to limit the participant to this many plays.
If they are allowed to replay the media, the media can be replayed by clicking on the video once it has finished playing fully.
If set to 0, the media will be infinitely replayable, i.e. there is no limit to the number of times a participant can repeat this media.
3) If (1 or 0) advance when media is finished
Setting (1 or 0): Type 1 to turn setting on, Type 0 to turn setting off.
Default = 0 (off); the screen must be advanced manually by the participant via a Response Zone.
If set to 1 (on), the screen will automatically advance once the media has finished playing.
4) If (1 or 0) mute audio track in video
Setting (1 or 0): Type 1 to turn setting on, Type 0 to turn setting off.
Default = 0 (off); the video will not play muted.
If set to 1 (on), the video will play muted.
Note: Autoplay settings on some browsers will prevent videos with sound from playing automatically. If the video has no sound, some browsers will fail to recognise this and prevent the video from playing. If the video is explicitly muted, browsers will be less likely to prevent autoplay.
Advanced Settings
5) If (setting) , do not show the play overlay
Only applicable when using the Manual play option. If 1, will attempt to show the first frame of the video, rather than the play overlay.
6) If (setting) , loop the video once it starts playing
Choose 1 (loop) or 0. Default: 0. If set, will loop to the end of the trial - it will not respect max number of plays
7) If (setting) , provide additional metrics on video events
Choose 1 for on or 0/unset for off. Default: 0/unset. The VIDEO STARTED and VIDEO PLAYING EVENT FIRED metrics are both associated with events where the browser has either requested or thinks that the video has started playing. Following our own internal tests, we could see that this is not always the true start point for the video. ADJUSTED START TIME based on TIMEUPDATE EVENT is the true starting point for the video.
Once you turn on the additional metrics for the Video Zone, you should also receive a VIDEO ENDED EVENT FIRED metric which indicates the end of the video. However, at the moment, you have the Recording Zone advancing the screen so it could be that the video isn't actually ending.
8) Set Video width to (setting) cm
Requires Screen Calibration zone
9) Set Video width to (setting) visual degrees
Requires Screen Calibration zone
This zone can be localised if you want to run your study in another language. For more information visit our Video localisation guide.
Click to view an Example of a Sample Project which makes use of the Video Zone.
Check out a Gorilla Academy case study that features the Video Zone in the context of a real experiment, including tips on how to configure the right settings for your study.
You're viewing the support pages for our Legacy Tooling and, as such, the information may be outdated. Now is a great time to check out our new and improved tooling, and make the move to Questionnaire Builder 2 and Task Builder 2! Our updated onboarding workshop (live or on-demand) is a good place to start.
The Embedded YouTube Zone allows you to present a single YouTube video on your screen.
You must first copy the link of the YouTube video you wish to Embed. Then paste link into the Embedded YouTube Zone or relevant spreadsheet column.
For the link you can use any of the following:
Use the Embedded YouTube Zone to contain the video media you wish to present. The Embedded YouTube Zone is typically used to present short YouTube video stimuli.
Note: Be sure that any YouTube video you are linking with your Embedded YouTube Zone is listed on YouTube as Public or Unlisted. While videos listed as Private may run for you when you preview your Task they will not work for your participants.
This zone is incompatible with some mobile and tablet devices. If you are allowing participants to undertake your experiment on mobile phones or tablets, we do not recommend using the Embedded YouTube Zone. Instead use the Gorilla Video Zone to host your videos. This is because the functionality provided by YouTube to embed their hosted videos is not compatible and will not work with all mobile and tablet devices.
If you wish to take make the switch to using the Gorilla Video Zone you will need to follow these steps:
If you are not planning to allow participants on mobile or tablets, we strongly recommend using the limit device type setting in your Experiment Requirements to ensure only participants on desktops or laptops can take part in your experiment.
Important Note on Autoplay:
Since the changes made to Autoplay which came to the web in March 2018, most browsers will not allow autoplay of any media (video or audio). This led to problems with media playback which prevented some participants from viewing any autoplay video content and advancing within tasks.
To ensure participants can complete your Task, without experiencing any autoplay problems, we've added an autoplay safety feature. This means embedded youTube videos will now automatically revert to the manual play method in cases where they would otherwise have been blocked by autoplay.
How does the autoplay safety feature work? The autoplay safety feature is used if you have set up your embedded youTube videos to play automatically but autoplay is blocked locally by the participants browser. After 5 seconds if Gorilla detects that your embedded youTube video has not begun to autoplay the standard youtube manual play button will appear in the center of the youTube video. The video will then begin to play as soon as and the participant interacts with it. All other functionality of the embedded youTube zone (such as repetition or auto-advance) should then work as expected.
You can read more about the changes to auto-play and the consequences to online experimentation in our article: Changes to AutoPlay functionality in the web.
Embedded YouTube Zone Icon:
In the example below, the Embedded YouTube Zone has been set-up to be started manually by the participant (Setting1) and will play up to twice (Setting2). When the video has finished playing it will auto-advance (Setting4) to the next screen.
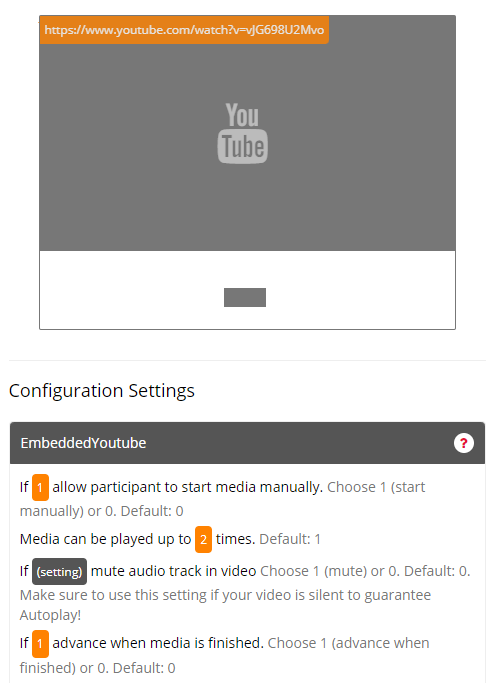
1) If (1 or 0) allow participant to start media manually
Setting (1 or 0): Type 1 to turn setting on, Type 0 to turn setting off.
Default = 0 (off); the video will play automatically when the participant arrives at the screen of the Embedded YouTube Zone.
If set to 1 (on) the participant can manually start the media playback by clicking on the video.
Note: If participant browser blocks autoplay then after 5 seconds the video will revert to manual play (1) method automatically.
For more details read the section 'Important Note on Autoplay' above.
2) Media can be played up to (number) times
Setting (number): Type the number of times you wish the media to be re-playable.
Default = 1; the video will play once. Note: Setting-1 must be turned on in order to use this setting.
Set any number (numerical value) to limit the participant to this many plays.
If they are allowed to replay the media, the media can be replayed by clicking on the video once it has finished playing fully.
If set to 0, the media will be infinitely replayable, i.e. there is no limit to the number of times a participant can repeat this media.
3) If (setting) mute audio track in video
Setting (1 or 0): Type 1 to mute audio track, 0 to let audio track play.
Default = 0; the video will play with audio if you do not configure this setting.
If your video is silent, set this setting to 1 to ensure that your video will be able to autoplay.
4) If (1 or 0) advance when media is finished
Setting (1 or 0): Type 1 to turn setting on, Type 0 to turn setting off.
Default = 0 (off); the screen must be advanced manually by the participant via a Response Zone.
If set to 1 (on), the screen will automatically advance once the media has finished playing.
This zone can be localised if you want to run your study in another language. For more information visit our Embedded YouTube localisation guide.
Click to view an Example of a Sample Task which makes use of the Embedded YouTube Zone.
You're viewing the support pages for our Legacy Tooling and, as such, the information may be outdated. Now is a great time to check out our new and improved tooling, and make the move to Questionnaire Builder 2 and Task Builder 2! Our updated onboarding workshop (live or on-demand) is a good place to start.
The Embedded Vimeo Zone allows you to present a single Vimeo video on your screen. You must first copy the link of the Vimeo video you wish to Embed. Then paste link into the Embedded Vimeo Zone or relevant spreadsheet column.
For the link you can use any of the following:
Use the Embedded Vimeo Zone to contain the video media you wish to present. The Embedded Vimeo Zone is typically used to present short Vimeo video stimuli.
Embedded Vimeo Zone Icon:
-- No Settings --
You're viewing the support pages for our Legacy Tooling and, as such, the information may be outdated. Now is a great time to check out our new and improved tooling, and make the move to Questionnaire Builder 2 and Task Builder 2! Our updated onboarding workshop (live or on-demand) is a good place to start.
Continue Button Zone Icon:
The Continue Button Zone adds a simple 'continue' button to your screen. For a participant, clicking the button will allow them to progress to the next screen. The reaction time is recorded in the metrics at this point.
The Continue Button Zone label defaults to 'Next'. You can change the default by editing the Zone content. The button will appear as centred in the Zone's area and will be resized to fit the label.
Use the Continue Button Zone to allow participants to manually advance to the next screen. The Continue Button Zone is typically used on instructions and debrief material screens - where you wish the participant to advance to the next screen in their own time.
Click to view a Tutorial of the Continue Button Zone.
You're viewing the support pages for our Legacy Tooling and, as such, the information may be outdated. Now is a great time to check out our new and improved tooling, and make the move to Questionnaire Builder 2 and Task Builder 2! Our updated onboarding workshop (live or on-demand) is a good place to start.
Response Button (Text) Zone Icon:
The Response Button (Text) Zone adds a simple clickable button containing text to your screen.
The button's size and placement will match the Zone area you set for it. Any text entered into the Response Button (Text) Zone will be resized and centred to ensure it fits within the button area.
Use the Response Button (Text) Zone when you want participants to select a correct answer via a set of text buttons. The Response Button (Text) Zone is typically used to ask participants to 'select' a response, or 'correct answer', from a set of other button options.
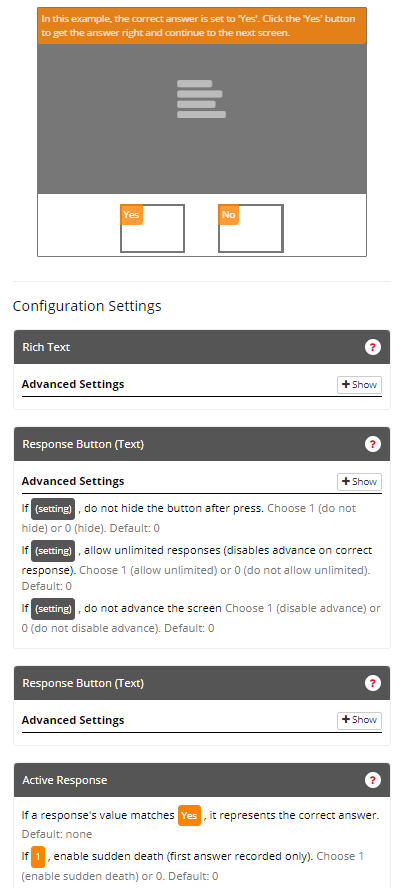
In the example below, the Response Button (Text) Zone has been set up so that the correct answer is set, as static content, to 'Yes' (Active Response Setting 1). Sudden Death has also been turned on (Active Response Setting 2), which means once the participant has clicked on either button, their answer is recorded and they will advance to the next screen. None of the zone-specific settings have been used for either button.
You can view an example of the metrics produced by the Response Button (Text) Zone in the image below:

Note that some metric columns have been hidden for presentation purposes.
Each Response Button (Text) Zone adds 1 row of new data to your metrics spreadsheet, when the button is pressed by the participant:
| Column Name | Row Entry | Description |
|---|---|---|
| Zone Type | response_button_text | This is the Zone Type name used to identify a Response Button (Text) Zone press within your metrics. |
| Reaction Time | [Number] | This is the reaction time (in ms), as measured from the start of the screen, at which the participant pressed the Response (Text) Button . |
| Response | Text presented on the selected Response Button (Text) Zone | This is the text that was contained in the Response Button (Text) Zone. For example, if you labelled your button 'yes', then the text in this response column will also read 'yes'. |
| Attempt | [Number] | This integer represents the attempt number for this response. The attempt number is shared across all Response Zones on a given screen. This metric is most relevant when using multiple response zones on a screen with Active Response setting 'sudden death' turned off, (or unlimited response setting turned on). Example: If, on a given screen, the participant has 4 button options and selects button 'A' second, the attempt number next to response 'A' for this button will be '2'. |
| Correct | Integer number, either 1 (correct) or 0 (incorrect) | If a correct answer has been set using the Active Response Settings, and the response selected represents the correct answer, this column will contain the value 1. If an incorrect answer is selected, this column will contain a 0. Note: If a correct answer has not been set, then this column will always contain '0's'. |
| Incorrect | Integer number, either 1 (incorrect) or 0 (correct) | If a correct answer has been set using the Active Response Settings, and the response selected represents the correct answer, this 'Incorrect' column will contain the value 0. If an incorrect answer is selected this column will contain a 1. Note 1: If a correct answer has not been set then this column will always contain '1's'. Note 2: Continue buttons and other advancement zones are automatically marked as incorrect. |
The Response Button (Text) Zone is an Active Response Zone. Find out more about active responses and their corresponding 'Active Response' Configuration Setting Options here
1) If (1 or 0) , do not hide the button after press
Setting (1 or 0): Type 1 to turn setting on, Type 0 to turn setting off.
Default = 0 (Hide button on press); When the button is pressed, the button will be hidden and the participant will no longer be able to select this button as a response.
If set to 1 (Do not hide button on press); When the button is pressed, the button will not be hidden. Instead the button will remain on the screen and can be selected again by the participant.
Note: When set to 1, all the normal rules regarding Active Response Zones will still apply to this button. For example, if Active Response Setting(2) 'Sudden death' is set, the participant will still advance to the next screen after one response.
2) If (1 or 0) , allow unlimited responses (disables advance on correct response)
Setting (1 or 0): Type 1 to turn setting on, Type 0 to turn setting off.
Default = 0 (off); Participant will advance to the next screen as you have specified in the Active Response Settings.
If set to 1 (on); Participants can make unlimited responses. A correct answer (Active Response Setting-1) will not advance the participant to the next screen. Instead you must use a Continue Button or Timelimit (Screen) Zone (or a different active response zone (without unlimited responses) to advance the participant to the next screen.
Note: If this setting is turned on (set to 1) you must also turn setting-1 (do not hide button) on as well. If you do not also turn on setting-1 then the buttons will hide on first press and the participant will not be able to make unlimited responses.
3) If (setting) , do not advance the screen
Choose 1 (disable advance) or 0 (do not disable advance). Default: 0
Click to view an Example of the Response Button (Text) Zone.
You're viewing the support pages for our Legacy Tooling and, as such, the information may be outdated. Now is a great time to check out our new and improved tooling, and make the move to Questionnaire Builder 2 and Task Builder 2! Our updated onboarding workshop (live or on-demand) is a good place to start.
Response Text Paragraph Zone Icon:
The Response Text Paragraph Zone (previously called Response Button Paragraph (Text) Zone), adds a simple clickable button containing a unformatted text paragraph to your screen.
Note: If you wish to add styling to your paragraph use the Response Rich Text Paragraph Zone instead.
The button's size and placement will match the Zone area you set for it. Any text entered into the Response Button (Text) Zone will be resized and centred to ensure it fits within the button area.
Use the Response Text Paragraph Zone when you want participants to select a correct answer via a set of text buttons which contain a large amount of text. The Response Text Paragraph Zone is typically used to ask participants to 'select' a response, or 'correct answer', from a set of other similar button options.
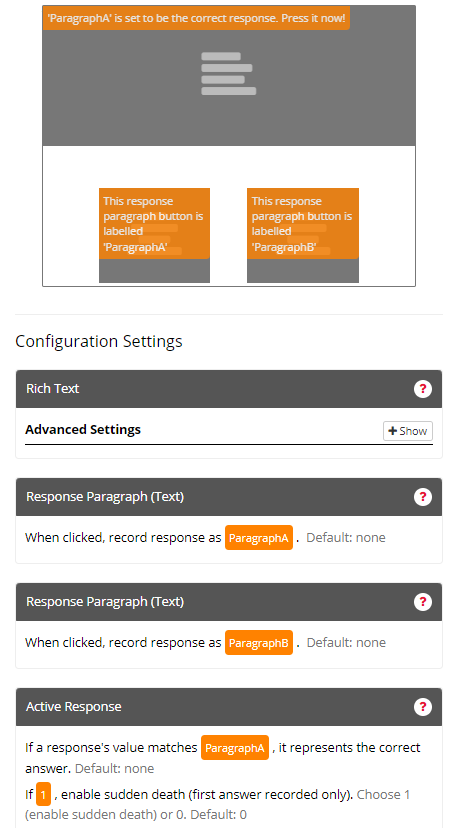
In the example below, the Response Text Paragraph Zone, has been set up so that responses are recorded as 'ParagraphA' and 'ParagraphB' respectively (Setting-1). The correct answer is set, as static content, to 'ParagraphA' (Active Response Setting 1). Sudden Death has been turned on (Active Response Setting 2) which means once the participant has clicked on either button, their answer is recorded and they will advance to the next screen.
You can view an example of the metrics produced by the Response Text Paragraph Zone in the image below:

Note that some metric columns have been hidden for presentation purposes.
Each Response Text Paragraph Zone adds 1 row of new data to your metrics spreadsheet, when the button is pressed by the participant:
| Column Name | Row Entry | Description |
|---|---|---|
| Zone Type | response_paragraph | This is the Zone Type name used to identify a Response Text Paragraph Zone press within your metrics. |
| Reaction Time | [Number] | This is the reaction time (in ms), as measured from the start of the screen, at which the participant pressed the Response Text Paragraph. |
| Response | Text configured in Setting-1 of the selected Response Text Paragraph Zone | This is the text that was configured in Setting-1 of the Response Text Paragraph Zone. For example, if you configured your Response Text Paragraph Zone to record the response as 'ParagraphA', then the text in this response column will also read 'ParagraphA'. |
| Attempt | [Number] | This integer represents the attempt number for this response. The attempt number is shared across all Response Zones on a given screen. This metric is most relevant when using multiple response zones on a screen with Active Response setting 'sudden death' turned off, (or unlimited response setting turned on). Example: If, on a given screen, the participant has 4 Response Text Paragraph options and selects paragraph 'A' second, the attempt number next to response 'A' for this paragraph will be '2'. |
| Correct | Integer number, either 1 (correct) or 0 (incorrect) | If a correct answer has been set using the Active Response Settings, and the response selected represents the correct answer, this column will contain the value 1. If an incorrect answer is selected, this column will contain a '0'. Note: If a correct answer has not been set, then this column will always contain '0's'. |
| Incorrect | Integer number, either 1 (incorrect) or 0 (correct) | If a correct answer has been set using the Active Response Settings, and the response selected represents the correct answer, this 'Incorrect' column will contain the value 0. If an incorrect answer is selected this column will contain a 1. Note 1: If a correct answer has not been set then this column will always contain '1's'. Note 2: Continue buttons and other advancement zones are automatically marked as incorrect. |
The Response Text Paragraph Zone is an Active Response Zone. Find out more about active responses and their corresponding 'Active Response' Configuration Setting Options here.
1) When clicked, record response as (text) (Mandatory)
Setting (text): Type the name-label you wish to be assigned as the recorded response identifier.
Default = none; the reaction time response will be recorded but there will be no response identifier recorded.
If set this name-label is what will be recorded in the metrics, if this button is selected as a response by a participant. This is also the label used for the purpose of determining whether the clicked button represents a correct or incorrect answer (setting-1 of Correct Answer Settings).
Click to view an Example of the Response Text Paragraph Zone.
You're viewing the support pages for our Legacy Tooling and, as such, the information may be outdated. Now is a great time to check out our new and improved tooling, and make the move to Questionnaire Builder 2 and Task Builder 2! Our updated onboarding workshop (live or on-demand) is a good place to start.
Response Rich Text Paragraph Zone Icon:
The Response Rich Text Paragraph Zone, (previously called Response Button Paragraph (Rich Text) Zone), adds a simple clickable button containing a rich text paragraph to your screen. This Zone is identical to the Response Text Paragraph Zone except that the text can be formatted using Markdown and HTML.
The button's size and placement will match the Zone area you set for it. Any text entered into the Response Rich Text Paragraph Zone will be resized and centred to ensure it fits within the button area. **This is true unless these defaults are overwritten by Markdown or HTML used within the Zone content.
Use the Response Rich Text Paragraph Zone when you want participants to select a correct answer via a set of text buttons which contain a large amount of formatted text. The Response Rich Text Paragraph Zone Zone is typically used to ask participants to 'select' a response, or 'correct answer', from a set of other similar button options.
In the example below, the Response Rich Text Paragraph Zone has been set up so that responses are recorded as 'ParagraphA' and 'ParagraphB' respectively (Setting-1). The correct answer is set, as static content, to 'ParagraphA' (Active Response Setting 1). Sudden Death has been turned on (Active Response Setting 2) which means once the participant has clicked on either button, their answer is recorded and they will advance to the next screen.
You can view an example of the metrics produced by the Response Rich Text Paragraph Zone in the image below:

Note that some metric columns have been hidden for presentation purposes.
Each Response Button Rich Text Paragraph Zone adds 1 row of new data to your metrics spreadsheet, when the button is pressed by the participant:
| Column Name | Row Entry | Description |
|---|---|---|
| Zone Type | response_markdown | This is the Zone Type name used to identify a Response Rich Text Paragraph Zone press within your metrics. |
| Reaction Time | [Number] | This is the reaction time (in ms), as measured from the start of the screen, at which the participant pressed the Response Rich Text Paragraph. |
| Response | Text configured in Setting-1 of the selected Response Rich Text Paragraph Zone | This is the text that was configured in Setting-1 of the Response Rich Text Paragraph Zone. For example, if you configured your Response Rich Text Paragraph Zone to record the response as 'ParagraphA', then the text in this response column will also read 'ParagraphA'. |
| Attempt | [Number] | This integer represents the attempt number for this response. The attempt number is shared across all Response Zones on a given screen. This metric is most relevant when using multiple response zones on a screen with Active Response setting 'sudden death' turned off, (or unlimited response setting turned on). Example: If, on a given screen, the participant has 4 Response Rich Text Paragraph options and selects paragraph 'A' second, the attempt number next to response 'A' for this paragraph will be '2'. |
| Correct | Integer number, either 1 (correct) or 0 (incorrect) | If a correct answer has been set using the Active Response Settings, and the response selected represents the correct answer, this column will contain the value 1. If an incorrect answer is selected, this column will contain a '0'. Note: If a correct answer has not been set, then this column will always contain '0's'. |
| Incorrect | Integer number, either 1 (incorrect) or 0 (correct) | If a correct answer has been set using the Active Response Settings, and the response selected represents the correct answer, this 'Incorrect' column will contain the value 0. If an incorrect answer is selected this column will contain a 1. Note 1: If a correct answer has not been set then this column will always contain '1's'. Note 2: Continue buttons and other advancement zones are automatically marked as incorrect. |
The Response Rich Text Paragraph Zone is an Active Response Zone. Find out more about active responses and their corresponding 'Active Response' Configuration Setting Options here.
1) When clicked, record response as (text) (Mandatory)
Setting (text): Type the name-label you wish to be assigned as the recorded response identifier.
Default = none; the reaction time response will be recorded but there will be no response identifier recorded.
If set this name-label is what will be recorded in the metrics, if this button is selected as a response by a participant. This is also the label used for the purpose of determining whether the clicked button represents a correct or incorrect answer (setting-1 of Correct Answer Settings).
Click to view an Example of a Task which makes use of the Response Rich Text Paragraph Zone.
You're viewing the support pages for our Legacy Tooling and, as such, the information may be outdated. Now is a great time to check out our new and improved tooling, and make the move to Questionnaire Builder 2 and Task Builder 2! Our updated onboarding workshop (live or on-demand) is a good place to start.
The Response Button (Image) Zone adds a clickable button containing an uploaded image to your screen.
You must first upload the image in the Stimuli Tab of the Task Builder. Then type the full stimuli name (including file type) within the Response Button (Image) Zone itself or relevant spreadsheet column.
There are three sections to the Response Button (Image) Zone.
Edit the 'Active Response' Configuration Settings, to set how the button(s) will function when a participant clicks on it.
Supported Image types: .png, .jpg, and .jpeg, and .gif.
File Size: We recommend that each individual image file you upload to your task be no larger than 50KB. For more guidance on file sizes, see our Technical Checklist.
Use the Response Button (Image) Zone when you want participants to select a correct answer via a set of Image buttons. The Response Button (Image) Zone is typically used to ask participants to 'select' a response, or 'correct answer', from a set of other button options.
Response Button (Image) Zone Icon:
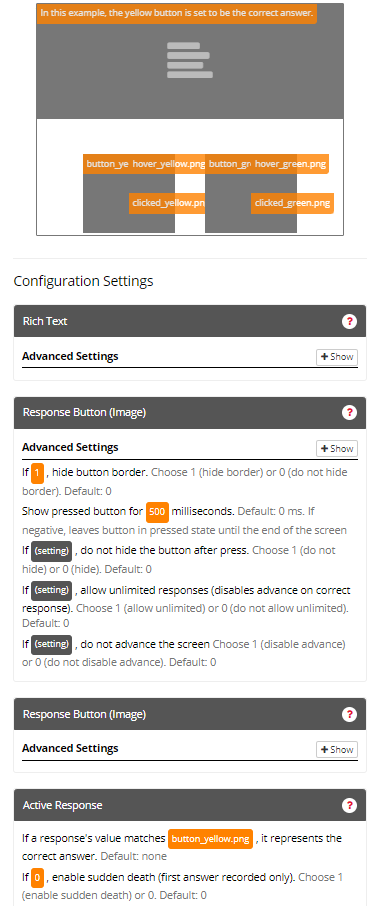
In the example below, there are two Response Button (Image) Zones. Both Zones have image content set for the 'main button' (left-side of Zone), 'hover button' (top-right-side of Zone) and 'pressed button' (bottom-right-side of zone). The expanded settings for the first Response Button show that the border around the image will be hidden (Setting-1) and the pressed button image will display for 500ms (Setting-2). In the Active Response Settings, the yellow button (Zone on the right) is set to be the correct answer (Active Response Setting-1) and Sudden Death has been turned off (Active Response Setting-2).
You can view an example of the metrics produced by the Response Button (Image) Zone in the image below:

Note that some metric columns have been hidden for presentation purposes.
Each Response Button (Image) Zone adds 1 row of new data to your metrics spreadsheet, when the button is pressed by the participant:
| Column Name | Row Entry | Description |
|---|---|---|
| Zone Type | response_button_image | This is the Zone Type name used to identify a Response Button (Image) Zone press within your metrics. |
| Reaction Time | [Number] | This is the reaction time (in ms), as measured from the start of the screen, at which the participant pressed the Response (Image) Button. |
| Response | Filename of image presented on the selected Response Button (Image) Zone | This is the filename of the image shown in the Response Button (Image) Zone. For example, if your image button used the image named 'Orange.PNG', then the text in this response column will also read 'Orange.PNG'. |
| Attempt | [Number] | This integer represents the attempt number for this response. The attempt number is shared across all Response Zones on a given screen. This metric is most relevant when using multiple response zones on a screen with Active Response setting 'sudden death' turned off, (or unlimited response setting turned on). Example: If, on a given screen, the participant has 4 button options and selects button 'Orange.PNG' second, the attempt number next to response 'Orange.PNG' for this button will be '2'. |
| Correct | Integer number, either 1 (correct) or 0 (incorrect) | If a correct answer has been set using the Active Response Settings, and the response selected represents the correct answer, this column will contain the value 1. If an incorrect answer is selected, this column will contain a '0'. Note: If a correct answer has not been set then this column will always contain '0's'. |
| Incorrect | Integer number, either 1 (incorrect) or 0 (correct) | If a correct answer has been set using the Active Response Settings, and the response selected represents the correct answer, this 'Incorrect' column will contain the value 0. If an incorrect answer is selected, this column will contain a 1. Note 1: If a correct answer has not been set then this column will always contain '1's'. Note 2: Continue buttons and other advancement zones are automatically marked as incorrect. |
The Response Button (Image) Zone is an Active Response Zone. Find out more about active responses and their corresponding 'Active Response' Configuration Setting Options here.
1) If (any), hide button border
Setting (any): Type any value name or number.
Default = 'empty' (off); The image button will have a border.
If any content is set (on), hide the border usually displayed around the button.
To re-enable the border once content has been added to this setting: Press the 'Clear Settings' button on this settings menu.
2) Show pressed button for (number) milliseconds Note: Pressed Button Image content must be uploaded and set in order to use this setting.
Setting (number): Type the number of milliseconds you wish the 'pressed button image' to be displayed for.
Default = 0; regardless of whether a 'Pressed Button Image' is set in the Zone content, it will not be displayed.
If set the 'pressed button image' will be shown for the set number of milliseconds, upon being pressed by the participant. This means that if the button would normally advance to the next screen, or else would normally disappear, there will be a delay of the set number of milliseconds while the 'pressed image' is shown.
3) If (1 or 0) , do not hide the button after press
Setting (1 or 0): Type 1 to turn setting on, Type 0 to turn setting off.
Default = 0 (Hide button on press); When the button is pressed, the button will be hidden and the participant will no longer be able to select this button as a response.
If set to 1 (Do not hide button on press); When the button is pressed, the button will not be hidden. Instead the button will remain on the screen and can be selected again by the participant.
Note: When set to 1, all the normal rules regarding Active Response Zones will still apply to this button. For example, if Active Response Setting(2) 'Sudden death' is set, the participant will still advance to the next screen after one response.
4) If (1 or 0) , allow unlimited responses (disables advance on correct response)
Setting (1 or 0): Type 1 to turn setting on, Type 0 to turn setting off.
Default = 0 (off); Participant will advance to the next screen as you have specified in the Active Response Settings.
If set to 1 (on); Participants can make unlimited responses. A correct answer (Active Response Setting-1) will not advance the participant to the next screen. Instead you must use a Continue Button or Timelimit (Screen) Zone (or a different active response zone (without unlimited responses) to advance the participant to the next screen.
Note: If this setting is turned on (set to 1) you must also turn setting-1 (do not hide button) on as well. If you do not also turn on setting-1 then the buttons will hide on first press and the participant will not be able to make unlimited responses.
5) If (setting) , do not advance the screen
Choose 1 (disable advance) or 0 (do not disable advance). Default: 0
Click to view an Example of a Task which makes use of the Response Button (Image) Zone.
Using Hover Images on Touch Devices
We do not recommend using Hover images if you wish to launch your study on Touch Devices (Mobiles & Tablets).
The concept of 'Hover' does not translate for mobile devices and this feature is specifically meant for computer based studies which have mouse interaction. Touch devices interpret hover in the only way they know how - as a separate 'press' action. Thus when clicking an image button with a 'hover' image, on a touch device, your participant will need to press twice in order to select the option.
If you do choose to use the hover image on a mobile or wish to accept mobile users for a predominantly computer based study be aware that, on touch devices, a participant will need to click twice on an image button with hover image enabled in order to progress. Therefore you can expect slightly longer reaction times from mobile/tablet users in this set-up.
You're viewing the support pages for our Legacy Tooling and, as such, the information may be outdated. Now is a great time to check out our new and improved tooling, and make the move to Questionnaire Builder 2 and Task Builder 2! Our updated onboarding workshop (live or on-demand) is a good place to start.
The Rating Scale/Likert (Passive) Zone adds a simple set of Likert boxes to your screen.
Participants can select one option from the Rating Scale/Likert, but their selection will not automatically record their reaction time nor advance the participant to the next screen.
Instead the participant must be provided with either a continue button, so they can manually advance the screen, or a Timelimit (Screen) Zone so the participant is advanced automatically. Alternatively, the Rating Scale/Likert (Active) Zone can be used instead.
The Rating Scale/Likert (Passive) Zone will appear as centred in the Zone's area. The width of each Likert box will resize to fit the text content.
Use the Rating Scale/Likert (Passive) Zone to allow participants to select an option from a discrete range.
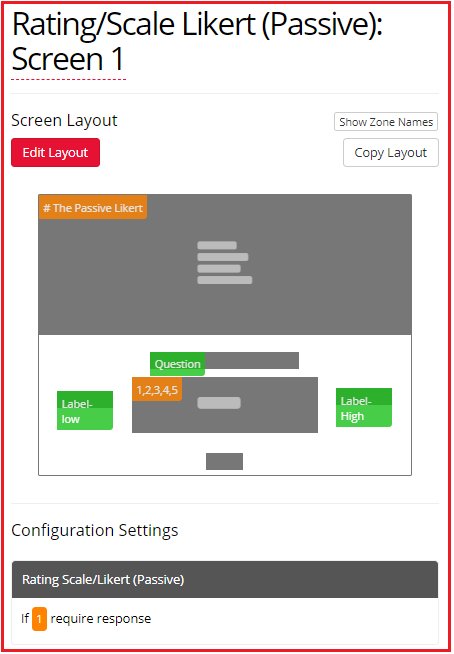
In the example below, the Rating Scale/Likert (Passive) Zone has been set up with Require Response turned on (Setting 1). This means that the participant much make a selection on the Likert before they will be allowed to advance to the next screen.
You can view an example of the metrics produced by the Rating Scale/Likert (Passive) Zone in the image below:
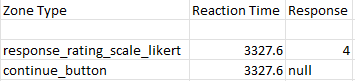
Note that some metric columns have been hidden for presentation purposes.
Each Rating Scale/Likert (Passive) Zone adds 1 row of new data to your metrics spreadsheet, when the participant selects a rating and then presses Continue:
| Column Name | Row Entry | Description |
|---|---|---|
| Zone Type | response_rating_scale_likert | This is the Zone Type name used to identify a Rating Scale/Likert (Passive) Zone press within your metrics. |
| Reaction Time | [Number] | This is the reaction time (in ms), as measured from the start of the screen, at which the participant pressed the Continue button after selecting a rating in the Rating Scale/Likert (Passive) Zone. |
| Response | Text shown on the selected box of the Rating Scale/Likert (Passive) Zone | This is the text displayed on the box of the Rating Scale/Likert (Passive) Zone that the participant selected. For example, if the scale has boxes 1-5 and the participant clicked the box labelled 4, then the text in this response column will also be the number 4. |
The Rating Scale/Likert (Passive) Zone is a Passive Response Zone. Find out more about Passive Responses here.
1) If (1 or 0) require response
Setting (1 or clear (blank)): Type 1 to turn setting on, Press Clear Setting button to turn setting off.
Default = setting clear; Response is not required. Participant can advance to the next screen without submitting an answer.
If set to 1; Response is required. Participant cannot leave the Rating Scale/Likert unanswered. Participant must select an answer before continuing to next screen via a continue button etc.
Click to view a Example of a Task that uses the Rating Scale/Likert (Passive) Zone.
You're viewing the support pages for our Legacy Tooling and, as such, the information may be outdated. Now is a great time to check out our new and improved tooling, and make the move to Questionnaire Builder 2 and Task Builder 2! Our updated onboarding workshop (live or on-demand) is a good place to start.
The Rating Scale / Likert (Active) Zone adds a simple set of Active Response Likert boxes to your screen.
Participants can select one option from the Rating Scale/Likert.
The Rating Scale / Likert (Active) Zone will appear as centred in the Zone's area. The width of each Likert box will resize to fit the text content.
Use the Rating Scale / Likert (Active) Zone to allow participants to select an option from a discrete range.


Note that some metric columns have been hidden for presentation purposes.
Each Rating Scale/Likert (Active) Zone adds 1 row of new data to your metrics spreadsheet, when the participant selects a rating and then presses Continue:
| Column Name | Row Entry | Description |
|---|---|---|
| Zone Type | response_rating_scale_likert_active | This is the Zone Type name used to identify a Rating Scale/Likert (Active) Zone press within your metrics. |
| Reaction Time | [Number] | This is the reaction time (in ms), as measured from the start of the screen, at which the participant selected a rating in the Rating Scale/Likert (Active) Zone. |
| Response | Text shown on the selected box of the Rating Scale/Likert (Active) Zone | This is the text displayed on the box of the Rating Scale/Likert (Active) Zone that the participant selected. For example, if the scale has boxes 1-5 and the participant clicked the box labelled 4, then the text in this response column will also be the number 4. |
| Attempt | [Number] | This integer represents the attempt number for this response. The attempt number is shared across all Response Zones on a given screen. This metric is most relevant when using multiple response zones on a screen with Active Response setting 'sudden death' turned off, (or unlimited response setting turned on). Example: If, on a given screen, the participant has options 1-5 and selects option 4 second, the attempt number next to response 4 for this button will be '2'. |
| Correct | Integer number, either 1 (correct) or 0 (incorrect) | If a correct answer has been set using the Active Response Settings, and the response selected represents the correct answer, this column will contain the value 1. If an incorrect answer is selected, this column will contain a '0'. Note: If a correct answer has not been set then this column will always contain '0's'. |
| Incorrect | Integer number, either 1 (incorrect) or 0 (correct) | If a correct answer has been set using the Active Response Settings, and the response selected represents the correct answer, this 'Incorrect' column will contain the value 0. If an incorrect answer is selected, this column will contain a 1. Note 1: If a correct answer has not been set then this column will always contain '1's'. Note 2: Continue buttons and other advancement zones are automatically marked as incorrect. |
The Rating Scale / Likert (Active) Zone is an Active Response Zone. Find out more about active responses and their corresponding 'Active Response' Configuration Setting Options here.
1) If (1 or 0) allow unlimited responses (disables advance on correct response)
Setting (1 or 0): Type 1 to turn setting on, Type 0 to turn setting off.
Default = 0; Participant will advance to the next screen as you have specified in the Active Response Settings.
If set to 1; Participants can make unlimited responses. A correct answer (Active Response Setting-1) will not advance the participant to the next screen. Instead you must use a Continue Button or Timelimit (Screen) Zone (or a different active response zone) to advance the participant to the next screen.
Note:
Click to view a Example of a Task that uses the Rating Scale/Likert (Active) Zone.
You're viewing the support pages for our Legacy Tooling and, as such, the information may be outdated. Now is a great time to check out our new and improved tooling, and make the move to Questionnaire Builder 2 and Task Builder 2! Our updated onboarding workshop (live or on-demand) is a good place to start.
Response Slider Zone Icon:
The Response Slider Zone adds a simple slider to your screen. The participant can drag the slider to a value within the range you set. The range defaults to 0 - 100.
The Slider will appear as centred in the Zone's area and the slider width will match the Zone width. If desired add labels for your slider using Text or Image Content Zones.
Use the Response Slider Zone to allow participants to select a value from a range. The Response Slider Zone is typically used when you wish a participant to rate an answer on a scale that does not require an Active Response. If an Active Response is required we recommend you use the Rating Scale/Likert (Active) Zone instead.
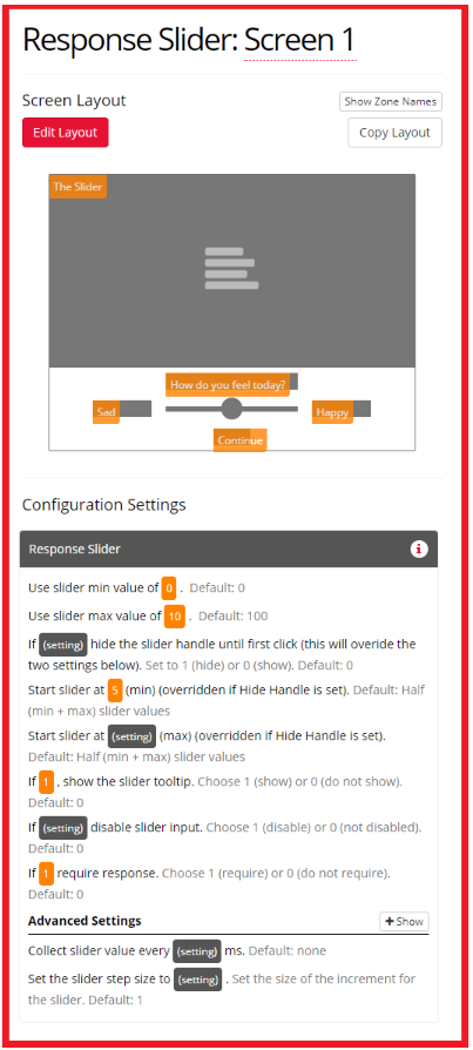
In the example below, the Response Slider Zone has been set up with a minimum value of 0 (Setting 1) and a maximum value of 10 (Setting 2). The slider will start at 5 (Setting 4) and the tooltip is turned on (Setting 6) meaning the slider value will be shown to the participant as they choose a response. Setting 8, 'require response', has been turned on (set to 1) this means the Participant will be required to interact with the slider to submit a response, before they can advance the task screen via the continue button.
You can view an example of the metrics produced by the Response Slider Zone in the image below:
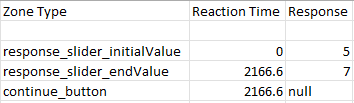
Note that some metric columns have been hidden for presentation purposes.
Each Response Slider Zone adds 1 row of new data to your metrics spreadsheet, when the participant selects a rating and then presses Continue:
| Column Name | Row Entry | Description |
|---|---|---|
| Zone Type | response_slider_initialValue | This is the Zone Type name used to identify the initial value of a Response Slider Zone within your metrics. |
| Zone Type | response_slider_endValue | This is the Zone Type name used to identify the final value of a Response Slider Zone, i.e., the value of the slider when the Continue button is pressed, within your metrics. |
| Reaction Time | [Number] | This is the reaction time (in ms), as measured from the start of the screen, at which the participant pressed the Continue button after selecting a rating in the Response Slider Zone. |
| Response | [Number] | This is the currently selected number on the Response Slider Zone. For example, if the participant moves the Response Slider to 50 and then presses Continue, then the text in this response column will also be the number 50. |
The Response Slider Zone is a Passive Response Zone. Find out more about Passive Responses here.
1) Use slider min value of (number)
Setting (number): Type a number to set the minimum value of the slider.
Default = 0
Set the minimum value for the slider (i.e. the value at the leftmost end).
2) Use slider max value of (number)
Setting (number): Type a number to set the maximum value of the slider.
Default = 100
Set the maximum value for the slider (i.e. the value at the rightmost end).
3) If (1 or 0), hide the slider handle until first click (this will override the two settings below)
Setting (1 or 0): Type 1 to turn setting on, Type 0 to turn setting off.
Default = 0
If set to 1; there is no visible 'handle' marking the start value of the slider. Settings-2 & setting-3 will be overwritten and the actual default starting value will be 0.
4) Start slider at (number) (min)
Setting (number): Type a number to set the minimum start value for the slider.
Default = 50
To start the slider at a single point; set only the minimum value for the starting position of the slider.
To start the slider at a random position within a range, use both setting-2 (min) and setting-3 (max) to define the range.
5) Start slider at (number) (max)
Setting (number): Type a number to set the maximum start value for the slider.
Default = none
To start the slider at a single point; set only setting-1 (min).
To start the slider at a random position within a range, use both setting-2 (min) and setting-3 (max) to define the range.
6) If (1 or 0), show the slider tooltip
Setting (1 or 0): Type 1 to turn setting on, Type 0 to turn setting off.
Default = 0
If set to 1, shows a tooltip with the current slider value, allowing your participants to see the exact value they are entering.
7) If (1 or 0), disable slider input
Setting (1 or 0): Type 1 to turn setting on, Type 0 to turn setting off.
Default = 0
If set to 1, disables any slider input, so the slider merely displays a value, rather than allowing the participant to enter a response.
This setting is typically used to present a slider as a stimuli used to influence a users subsequent response.
8) If (1 or 0), require response
Setting (1 or 0): Type 1 to turn setting on, Type 0 to turn setting off.
Default = 0
If set to 1, prevents participants from progressing to the next screen without moving the slider (giving a response).
Advanced Settings
9) Collect slider value every (number) ms
Setting (number): Type a number to collect
Default = No Default, when no number is set, the value of the slider is collected when the screen advances.
If set to a number, the slider value will be collected every x number of milliseconds, unless the value of the slider has not changed.
The minimum collection interval allowed is 100ms.
10) Set the slider step size to (number)
Setting (number): Type a number for the slider to be incremented in.
Default = 1
If set to a number, the slider value can be increased or decreased in minimum increments of that number.
Click to view a Tutorial for the Response Slider Zone.
Click to view an Example of a Sample Task which makes use of the Response Slider Zone.
Check out a Gorilla Academy case study featuring the Response Slider Zone in the context of a real experiment, including tips on how to configure the right settings for your study.
You're viewing the support pages for our Legacy Tooling and, as such, the information may be outdated. Now is a great time to check out our new and improved tooling, and make the move to Questionnaire Builder 2 and Task Builder 2! Our updated onboarding workshop (live or on-demand) is a good place to start.
The Effort Button zone adds a button that needs to be clicked by a participant a desired number of times before progressing.
Exemplary use of this zone could be to:
In the example below, the Effort Button Zone has been set up to require 5 presses to fulfil the required amount of effort (Setting 1). The button border is also hidden (Setting 2).
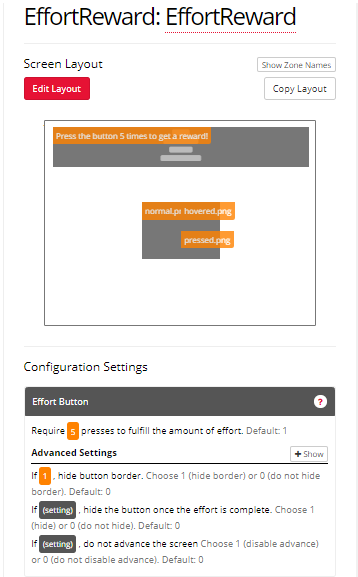
You can view an example of the metrics produced by the Effort Button Zone in the image below:

Note that some metric columns have been hidden for presentation purposes.
Each Effort Button Zone adds 1 row of new data to your metrics spreadsheet, when the participant selects a rating and then presses Continue:
| Column Name | Row Entry | Description |
|---|---|---|
| Zone Type | effort_button | This is the Zone Type name used to identify Effort Button Zone presses within your metrics. |
| Reaction Time | [Number] | This is the reaction time (in ms), as measured from the start of the screen, at which the participant made their final click on the Effort Button Zone. |
| Response | [Number] | Number of times the participant pressed the Effort Button. For example, if the participant clicked the Effort Button 5 times, then the text in this response column will be the number 5. |
| Correct | Integer number, either 1 (correct) or 0 (incorrect) | If the Effort Button was pressed at least the number of times specified in Configuration Setting-1, this column will contain the value 1. If the Effort Button was pressed fewer times than this, this column will contain a 0. |
| Incorrect | Integer number, either 1 (incorrect) or 0 (correct) | If the Effort Button was pressed at least the number of times specified in Configuration Setting-1, this column will contain the value 0. If the Effort Button was pressed fewer times than this, this column will contain a 1. |
The Effort Button is an Active Response Zone. Find out more about active responses and their corresponding 'Active Response' Configuration Setting Options here.
1) Require (setting) presses to fulfil the amount of effort.
Default: 1
Setting (any): specify the number of times you require the participant to click the Effort Button in order to continue.
Advanced Settings
2) If (setting) , hide button border.
Default: 0. Choose 1 (hide border) or 0 (do not hide border).
If set to 1, the border surrounding the response Effort Button will be hidden. If set to 0, the border surrounding the response Effort Button will remain (default setting).
3) If (setting) , hide the button once the effort is complete.
Default: 0. Choose 1 (hide) or 0 (do not hide).
If set to 1, the response Effort Button will be hidden after participants click it the required number of times (i.e. complete the effort). If set to 0, the response Effort Button will remain on the page after the effort is complete (default setting).
4) If (setting) , do not advance the screen.
Default: 0. Choose 1 (disable advance) or 0 (do not disable advance).
If set to 1, the response Effort Button screen will not advance the screen. If set to 0, the response Effort Button will advance the screen on completion (default setting).
Click to view an Example of the Effort Button Zone used in three different ways in a Task.
You're viewing the support pages for our Legacy Tooling and, as such, the information may be outdated. Now is a great time to check out our new and improved tooling, and make the move to Questionnaire Builder 2 and Task Builder 2! Our updated onboarding workshop (live or on-demand) is a good place to start.
Dropdown Zone Icon:
The Dropdown Zone adds a simple dropdown menu to your screen, from which the participant can select one answer from the set of options you provide.
The Dropdown menu will appear as centred in the Zone's area and the menu width will match the Zone width.
Use the Dropdown Zone to allow participants select an answer from a list of options you have provided. The Dropdown Zone is typically used when you wish the participant to select an answer to a question from a set of pre-defined options and does not require an Active Response. If an Active Response is required we recommend you use the Rating Scale/Likert (Active) Zone instead.
You can view an example of the metrics produced by the Dropdown Zone in the image below:
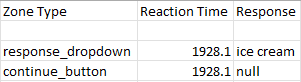
Note that some metric columns have been hidden for presentation purposes.
Each Dropdown Zone adds 1 row of new data to your metrics spreadsheet, when the participant selects a rating and then presses Continue:
| Column Name | Row Entry | Description |
|---|---|---|
| Zone Type | response_dropdown | This is the Zone Type name used to identify the response to a Dropdown Zone within your metrics. |
| Reaction Time | [Number] | This is the reaction time (in ms), as measured from the start of the screen, at which the participant pressed the Continue button after selecting a response in the Dropdown Zone. |
| Response | Option selected from Dropdown Zone | This is the option the participant selected from the Dropdown Zone. For example, if the participant selected the option 'ice cream', then the text in this response column will also read 'ice cream'. |
The Dropdown Zone is an Passive Response Zone. Find out more about Passive Responses here.
-- No Settings --
Click to view an Example of a Sample Task which makes use of the Dropdown Zone.
You're viewing the support pages for our Legacy Tooling and, as such, the information may be outdated. Now is a great time to check out our new and improved tooling, and make the move to Questionnaire Builder 2 and Task Builder 2! Our updated onboarding workshop (live or on-demand) is a good place to start.
Keyboard Response (Single) Zone Icon:
The Keyboard Response (Single) Zone adds a single keyboard response option to your screen.
Use the Keyboard Response (Single) Zone when you want participants to respond via their keyboard to select a correct answer. The Keyboard Response (Single) Zone, is typically used to ask participants to 'select' a response, or 'correct answer', from a set of other Keyboard response options.
You can use multiple Keyboard Response (Single) Zones on the same screen. For example, if you need 4 keyboard options, use 4 Keyboard Response (Single) Zones on a Screen.
In the example below, 2 Keyboard Response (Single) Zones have been set up so that keys 'e' and 'i' are mapped to responses 'Correct' and 'Incorrect' respectively. The correct answer is set as static content 'Correct' (Active Response Setting 1).
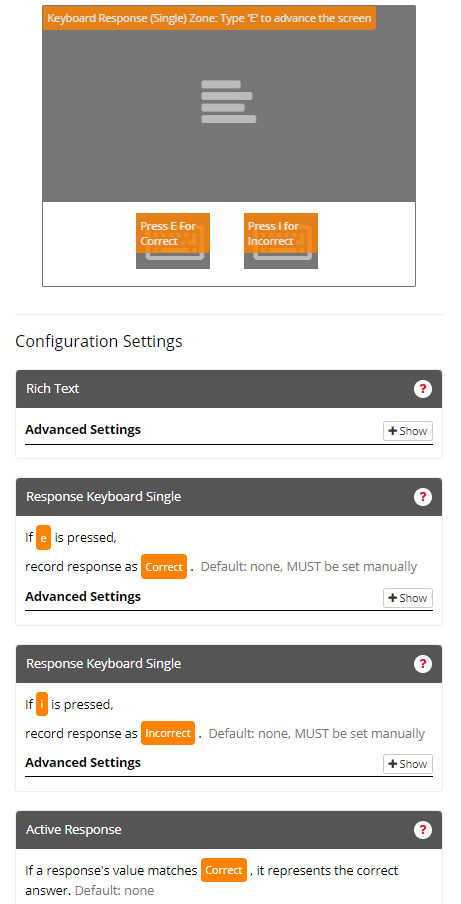
You can view an example of the metrics produced by the Keyboard Response (Single) Zone in the image below:

Note that some metric columns have been hidden for presentation purposes.
Each Keyboard Response (Single) Zone adds 1 row of new data to your metrics spreadsheet, when the participant presses the key defined in the Configuration Settings:
| Column Name | Row Entry | Description |
|---|---|---|
| Zone Type | keyboard_response_single | This is the Zone Type name used to identify a Keyboard Response (Single) Zone press within your metrics. |
| Reaction Time | [Number] | This is the reaction time (in ms), as measured from the start of the screen, at which the participant pressed the key recorded by the Keyboard Response (Single) Zone. |
| Response | Text set as response in the Configuration Settings | This is the text set in the Configuration Settings for the Keyboard Response (Single) Zone as the response for the key that was pressed. For example, if the response for the key 'e' is set as 'Correct' and the participant presses 'e', then the text in this response column will be 'Correct'. |
| Attempt | [Number] | This integer represents the attempt number for this response. The attempt number is shared across all Response Zones on a given screen. This metric is most relevant when using multiple response zones on a screen with Active Response setting 'sudden death' turned off, (or unlimited response setting turned on). Example: If, on a given screen, the participant can press multiple keys and presses 'e' second, the attempt number next to the response for 'e' will be '2'. |
| Correct | Integer number, either 1 (correct) or 0 (incorrect) | If a correct answer has been set using the Active Response Settings, and the response selected represents the correct answer, this column will contain the value 1. If an incorrect answer is selected, this column will contain a 0. Note: If a correct answer has not been set then this column will always contain '0's'. |
| Incorrect | Integer number, either 1 (incorrect) or 0 (correct) | If a correct answer has been set using the Active Response Settings, and the response selected represents the correct answer, this 'Incorrect' column will contain the value 0. If an incorrect answer is selected, this column will contain a 1. Note 1: If a correct answer has not been set then this column will always contain '1's'. Note 2: Continue buttons and other advancement zones are automatically marked as incorrect. |
The Keyboard Response (Single) Zone is an Active Response Zone. Find out more about active responses and their corresponding 'Active Response' Configuration Setting Options here.
1) If (key) is pressed
Setting (key): Type the key mapping to be used for the response.
Default = None; No key is mapped to the Response Zone.
To map a key to a response: Enter the letter of the key you wish to detect (e.g. a for the A key). Alternatively, use any of the following special key mappings:
2) record response as (text) (Mandatory)
Setting (text): Type the name-label you wish to be assigned as the recorded response identifier.
Default = None; No response will be recorded in the metrics.
When set, this name-label (identifier) is what will be recorded in the metrics, if this key response is selected by the participant. This is also the label used for the purpose of determining whether the clicked button represents a correct or incorrect answer (setting-1 of Correct Answer Settings).
Advanced Settings
3) If (1 or 0) allow unlimited responses (disables advance on correct response)
Setting (1 or 0): Type 1 to turn setting on, Type 0 to turn setting off.
Default = 0; Participant will advance to the next screen as you have specified in the Active Response Settings.
If set to 1; Participants can make unlimited responses. A correct answer (Active Response Setting-1) will not advance the participant to the next screen. Instead you must use a Continue Button or Timelimit (Screen) Zone (or a different active response zone) to advance the participant to the next screen.
Note:
Click to view an Example of a Sample Task which makes use of the Keyboard Response (Single) Zone.
You're viewing the support pages for our Legacy Tooling and, as such, the information may be outdated. Now is a great time to check out our new and improved tooling, and make the move to Questionnaire Builder 2 and Task Builder 2! Our updated onboarding workshop (live or on-demand) is a good place to start.
Keyboard Response (Multi) Zone Icon:
The Keyboard Response (Multi) Zone is identical in function to the Keyboard Response (Single) Zone except that it adds two keyboard response options to your screen.
Any text entered into the Keyboard Response (Multi) Zone will be unformatted and centred within the Zone area.
The Keyboard Response (Multi) Zone, is typically used when you want participants to respond via their keyboard to select a correct answer between 2 different options.
You can use multiple Keyboard Response (Multi) Zones on the same screen. For example, if you need 4 keyboard options, use 2 Keyboard Response (Multi) Zones on a Screen.
In the example below, the Keyboard Response (Multi) Zone has been set up so that left-arrow and right-arrow keys are mapped to responses 'Left' and 'Right' respectively. The correct answer is set as static content 'Right' (Active Response Setting 1). Sudden death is turned on (Active Response Setting 2): once the participant gives either key response, they will advance to the next screen.

You can view an example of the metrics produced by the Keyboard Response (Multi) Zone in the image below:

Note that some metric columns have been hidden for presentation purposes.
Each Keyboard Response (Multi) Zone adds 1 row of new data to your metrics spreadsheet, when the participant presses one of the keys defined in the Configuration Settings:
| Column Name | Row Entry | Description |
|---|---|---|
| Zone Type | response_keyboard | This is the Zone Type name used to identify a Keyboard Response (Multi) Zone press within your metrics. |
| Reaction Time | [Number] | This is the reaction time (in ms), as measured from the start of the screen, at which the participant pressed the key recorded by the Keyboard Response (Multi) Zone. |
| Response | Text set as response in the Configuration Settings | This is the text set in the Configuration Settings for the Keyboard Response (Multi) Zone as the response for the key that was pressed. For example, if the response for the key 'e' is set as 'Correct' and the participant presses 'e', then the text in this response column will be 'Correct'. |
| Attempt | [Number] | This integer represents the attempt number for this response. The attempt number is shared across all Response Zones on a given screen. This metric is most relevant when using multiple response zones on a screen with Active Response setting 'sudden death' turned off, (or unlimited response setting turned on). Example: If, on a given screen, the participant can press multiple keys and presses 'e' second, the attempt number next to the response for 'e' will be '2'. |
| Correct | Integer number, either 1 (correct) or 0 (incorrect) | If a correct answer has been set using the Active Response Settings, and the response selected represents the correct answer, this column will contain the value 1. If an incorrect answer is selected, this column will contain a 0. Note: If a correct answer has not been set then this column will always contain '0's'. |
| Incorrect | Integer number, either 1 (incorrect) or 0 (correct) | If a correct answer has been set using the Active Response Settings, and the response selected represents the correct answer, this 'Incorrect' column will contain the value 0. If an incorrect answer is selected, this column will contain a 1. Note 1: If a correct answer has not been set then this column will always contain '1's'. Note 2: Continue buttons and other advancement zones are automatically marked as incorrect. |
The Keyboard Response (Multi) Zone is an Active Response Zone. Find out more about active responses and their corresponding 'Active Response' Configuration Setting Options here.
1 & 3) If (key) is pressed
Setting (key): Type the key mapping to be used for the response.
Default = None; No key is mapped to the Response Zone.
To map a key to a response: Enter the letter of the key you wish to detect (e.g. a for the A key). Alternatively, use any of the following special key mappings:
2 & 4) record response as (text) (Mandatory)
Setting (text): Type the name-label you wish to be assigned as the recorded response identifier.
Default = None; No response will be recorded in the metrics.
When set, this name-label (identifier) is what will be recorded in the metrics, if this key response is selected by the participant. This is also the label used for the purpose of determining whether the clicked button represents a correct or incorrect answer (setting-1 of Correct Answer Settings).
Advanced Settings
5) If (1 or 0) allow unlimited responses (disables advance on correct response)
Setting (1 or 0): Type 1 to turn setting on, Type 0 to turn setting off.
Default = 0; Participant will advance to the next screen as you have specified in the Active Response Settings.
If set to 1; Participants can make unlimited responses. A correct answer (Active Response Setting-1) will not advance the participant to the next screen. Instead you must use a Continue Button or Timelimit (Screen) Zone (or a different active response zone) to advance the participant to the next screen.
Note:
Click to view a Classic Thatcher Example which makes use of the Keyboard Response (Multi) Zone.
You're viewing the support pages for our Legacy Tooling and, as such, the information may be outdated. Now is a great time to check out our new and improved tooling, and make the move to Questionnaire Builder 2 and Task Builder 2! Our updated onboarding workshop (live or on-demand) is a good place to start.
Keyboard Space to Continue Zone Icon:
The Keyboard Space to Continue Zone allows the participant to advance to the next screen using their keyboard's Space bar. Once the participant presses the Space bar, the screen is advanced and the reaction time is recorded in the metrics at this point.
The text will appear as centred in the Zone's area.
Use the Keyboard Space to Continue Zone to allow participants to manually advance to the next screen using their keyboard. The Keyboard Space to Continue Zone is typically used when you are using keyboard response and do not want your participant to take their hands off the keyboard to progress from instructions to the tasks' trials.
The Keyboard Space to Continue Zone is a Passive Response Zone. Find out more about Passive Responses here.
-- No Settings --
Click to view a Classic Thatcher Example which makes use of the Keyboard Space to Continue Zone.
You're viewing the support pages for our Legacy Tooling and, as such, the information may be outdated. Now is a great time to check out our new and improved tooling, and make the move to Questionnaire Builder 2 and Task Builder 2! Our updated onboarding workshop (live or on-demand) is a good place to start.
The Response Text Entry Zone adds a simple text entry box to your screen, which allows the participant to enter a single line of text using their keyboard.
By default the participant must press the Enter key to submit their response unless this has been turned off using configuration setting-1. In which case another zone (either response or advancement zone) must be used to submit the participants response and allow the participants to advance to the next screen in your task.
The Text Entry box will appear as centred in the Zone's area. The width of the Text Entry box will resize to match the Zone width.
Use the Response Text Entry Zone when you want participants to enter a single word or sentence as a response to your question using a keyboard.
Response Text Entry Zone Icon:
In the example below, the Response Text Entry Zone has been set up so that the correct answer is set, as static content, to 'Next' (Active Response Setting 1). Sudden Death is turned off (Active Response Setting 2) - i.e. they are allowed multiple attempts to get the correct answer. This means the participant will only advance to the next screen once they type in the correct answer and press the Enter key (Setting 1). The reaction time is recorded for each entry only once the participant presses the enter key to submit the answer. Response Text Setting 4 has not been set as the participant has no passive means to advance the screen. As a response is set to 'not required', this does mean the participant can submit blank or 'empty' entries.
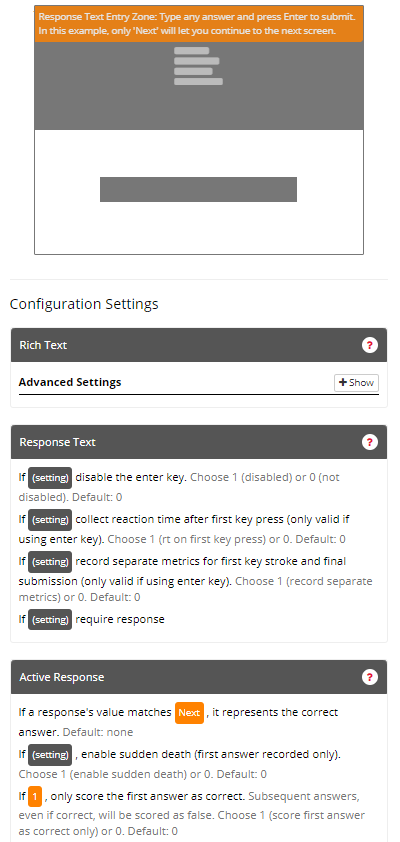
You can view an example of the metrics produced by the Response Text Entry Zone in the image below:
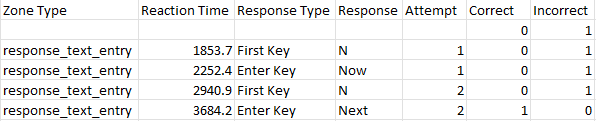
Note that some metric columns have been hidden for presentation purposes.
Each Response Text Entry Zone adds 1 row of new data to your metrics spreadsheet, when the participant submits a response:
| Column Name | Row Entry | Description |
|---|---|---|
| Zone Type | response_text_entry | This is the Zone Type name used to identify a Response Text Entry Zone response within your metrics. |
| Reaction Time | [Number] | This is the reaction time (in ms), as measured from the start of the screen, at which the participant pressed the Enter key to submit their response (by default), or the first key of their response (if Setting 2 is set to 1). |
| Response Type | 'First Key' or 'Enter Key' | This indicates whether the recorded response was the first keypress of the response ('First Key') or the Enter key used to submit the response ('Enter Key'). The first keypress will only be recorded as a separate line in the metrics if Configuration Settings 2 and 3 are both set to 1. |
| Response | Text entered in Response Text Entry Zone | This is the text the participant entered in the Text Entry Zone. For example, if the participant types the response 'Now' and presses the Enter key to submit it, the text in this response column will be 'Now'. If the Response Type is 'First Key', the text in this column is the first key of the participant's response (for example 'N', if the participant starts to type 'Now'). |
| Attempt | [Number] | This integer represents the attempt number for this response. The attempt number is shared across all Response Zones on a given screen. This metric is most relevant when using multiple response zones on a screen with Active Response setting 'sudden death' turned off, (or unlimited response setting turned on). Example: If, on a given screen, the participant can submit multiple entries to a Response Text Entry Zone and the participant submits 'Next' second, the attempt number next to the 'Next' response will be '2'. |
| Correct | Integer number, either 1 (correct) or 0 (incorrect) | If a correct answer has been set using the Active Response Settings, and the submitted response represents the correct answer, this column will contain the value 1. If an incorrect answer is submitted, this column will contain a 0. Note: If a correct answer has not been set then this column will always contain '0's'. |
| Incorrect | Integer number, either 1 (incorrect) or 0 (correct) | If a correct answer has been set using the Active Response Settings, and the submitted response represents the correct answer, this 'Incorrect' column will contain the value 0. If an incorrect answer is submitted, this column will contain a 1. Note 1: If a correct answer has not been set then this column will always contain '1's'. Note 2: Continue buttons and other advancement zones are automatically marked as incorrect. |
The Response Text Entry Zone is an Active Response Zone. Find out more about active responses and their corresponding 'Active Response' Configuration Setting Options here.
1) If (1 or 0) disable the Enter key
Setting (1 or 0): Type 1 to turn setting on, Type 0 to turn setting off.
Default = 0; Normally, the participant presses the Enter key to submit their response.
If Set to 1; the Enter key is disabled for response submission. Instead use a Continue Button Zone or a Timelimit (Screen) Zone to allow the participant to manually advance to the next screen. In this case, the value entered in to the Response Text Entry Zone will be collected as a Passive Response Zone.
2) If (1 or 0) collect reaction times after first key press (only valid if using enter key) Note: To use this, Setting-1 must be turned off (0).
Setting (1 or 0): Type 1 to turn setting on, Type 0 to turn setting off.
Default = 0; When the answer is submitted via the entry key, the Reaction Time and Value is recorded in the metrics at this point.
If set to 1; The Reaction Time is recorded upon the first key press. Use this option when you wish to know the reaction time for a participants time to start responding.
3) If (setting) record separate metrics for first key stroke and final submission (only valid if using enter key)
Choose 1 (record separate metrics) or 0. Default: 0
4) If (1 or 0) require response
Setting (1 or 0): Type 1 to turn setting on, Type 0 to turn setting off.
Default = 0; Response is not required. Participant can submit blank/empty entries and advance the screen without submitting an answer.
If set to 1; Response is required. Participant cannot leave the response text field blank/empty. Participant must type an answer before continuing to next screen via a continue button etc.
Click to view an Example of the Response Text Entry Zone.
Check out a Gorilla Academy case study that features the Response Text Entry Zone in the context of a real experiment. Watch the analysis video for tips on how to process text entry data to account for typos in participant responses.
You're viewing the support pages for our Legacy Tooling and, as such, the information may be outdated. Now is a great time to check out our new and improved tooling, and make the move to Questionnaire Builder 2 and Task Builder 2! Our updated onboarding workshop (live or on-demand) is a good place to start.
The Response Text Entry (Multi) Zone adds a simple text entry box to your screen which allows the participant to enter multiple text answers.
The responses are not case-sensitive, meaning that responses 'cat' and 'Cat' will both be marked as correct.
The Text Entry box will appear as centred in the Zone's area. The width of the Text Entry box will resize to match the Zone width.
Use the Response Text Entry (Multi) Zone is typically used to allow participants to submit multiple text entry responses to a single question, e.g. in a memory recall task.
Response Text Entry (Multi) Zone Icon:
In the example below, the Response Text Entry (Multi) Zone has been set up with the following list of correct answers: cat, dog, guinea pig, hamster, goldfish. The Zone has no other configuration settings.
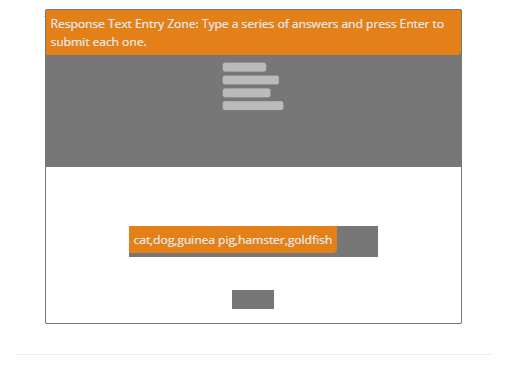
You can view an example of the metrics produced by the Response Text Entry (Multi) Zone in the image below:
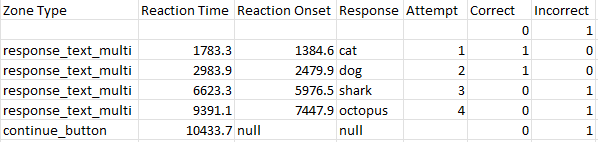
Note that some metric columns have been hidden for presentation purposes.
Each Response Text Entry (Multi) Zone adds 1 row of new data to your metrics spreadsheet for each response the participant submits:
| Column Name | Row Entry | Description |
|---|---|---|
| Zone Type | response_text_multi | This is the Zone Type name used to identify a Response Text Entry (Multi) Zone response within your metrics. |
| Reaction Time | [Number] | This is the reaction time (in ms), as measured from the start of the screen, at which the participant pressed the Enter key to submit their response. |
| Reaction Onset | [Number] | This is the reaction time (in ms), as measured from the start of the screen, at which the participant pressed the first key of their response. |
| Response | Text entered in Response Text Entry (Multi) Zone | This is the text the participant entered in the Text Entry Zone. For example, if the participant types the response 'cat' and presses the Enter key to submit it, the text in this response column will be 'cat'. |
| Attempt | [Number] | This integer represents the attempt number for this response. For example, if the participant's second response to a Response Text Entry (Multi) Zone is 'dog', the attempt number next to the 'dog' response will be '2'. The attempt number is shared across all Response Zones on a given screen. |
| Correct | Integer number, either 1 (correct) or 0 (incorrect) | If a correct answer has been set using the Active Response Settings, and the submitted response represents the correct answer, this column will contain the value 1. If an incorrect answer is submitted, this column will contain a 0. Note: If a correct answer has not been set then this column will always contain '0's'. |
| Incorrect | Integer number, either 1 (incorrect) or 0 (correct) | If a correct answer has been set using the Active Response Settings, and the submitted response represents the correct answer, this 'Incorrect' column will contain the value 0. If an incorrect answer is submitted, this column will contain a 1. Note 1: If a correct answer has not been set then this column will always contain '1's'. Note 2: Continue buttons and other advancement zones are automatically marked as incorrect. |
The Response Text Entry (Multi) Zone is a Passive Response Zone. Find out more about Passive Responses here.
-- No Settings --
Click to view a Classic Primacy and Recency Example which makes use of the Response Text Entry (Multi) Zone.
You're viewing the support pages for our Legacy Tooling and, as such, the information may be outdated. Now is a great time to check out our new and improved tooling, and make the move to Questionnaire Builder 2 and Task Builder 2! Our updated onboarding workshop (live or on-demand) is a good place to start.
Response Text Entry Area Zone Icon:
The Response Text Entry Area Zone adds a simple text entry box to your screen which encourages the participant to submit a longer length answer.
The Text Entry box will appear as centred in the Zone's area. The width of the Text Entry box will resize to match the Zone width.
The Response Text Entry Area Zone is typically used when you wish participants to submit a more detailed text entry response, as multiple lines of text, to your questions.
In the example below, the Response Text Entry Area Zone, has been set up to be 20 rows high (Setting-1). The 'require response' (Setting-2) has been enabled (set to 1). This means the participant is required to submit a response before they can continue to the next screen.
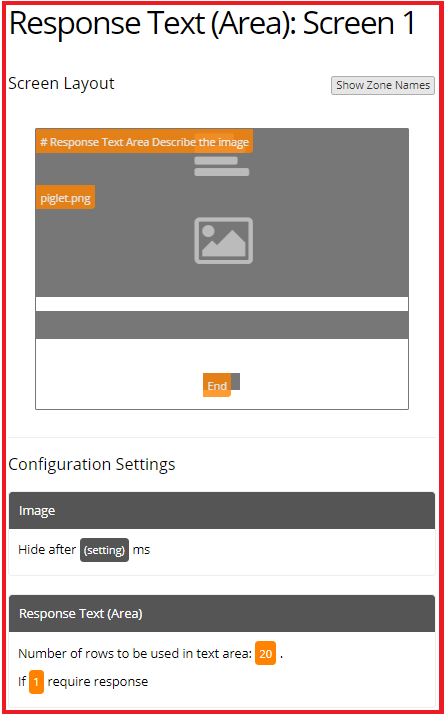
You can view an example of the metrics produced by the Response Text Entry Area Zone in the image below:
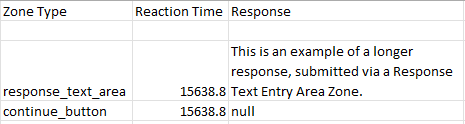
Note that some metric columns have been hidden for presentation purposes.
Each Response Text Entry Area Zone adds 1 row of new data to your metrics spreadsheet when the participant submits a response:
| Column Name | Row Entry | Description |
|---|---|---|
| Zone Type | response_text_area | This is the Zone Type name used to identify a Response Text Entry Area Zone response within your metrics. |
| Reaction Time | [Number] | This is the reaction time (in ms), as measured from the start of the screen, at which the participant pressed the Enter key to submit their response. |
| Response | Text entered in Response Text Entry Area Zone | This is the text the participant entered in the Response Text Entry Area Zone. For example, if the participant types the response 'Here is my response' and presses the Enter key to submit it, the text in this response column will be 'Here is my response'. |
The Response Text Entry Area Zone is a Passive Response Zone. Find out more about Passive Responses here.
1) Number of rows to be used in the text area: (number)
Setting (number): Set the number of rows used in the text area.
Default = None. This setting must be set manually.
2) If (1 or 0) require response
Setting (1 or 0): Type 1 to turn setting on, Type 0 to turn setting off.
Default = 0; Response is not required. Participant can submit blank/empty entries and advance the screen without submitting an answer.
If set to 1; Response is required. Participant cannot leave the response text area blank/empty. Participant must type an answer before continuing to next screen via a continue button etc.
Click to view an Example of a Sample Task which makes use of the Response Text Entry Area Zone.
You're viewing the support pages for our Legacy Tooling and, as such, the information may be outdated. Now is a great time to check out our new and improved tooling, and make the move to Questionnaire Builder 2 and Task Builder 2! Our updated onboarding workshop (live or on-demand) is a good place to start.
The Progress Bar Zone allows you to add a progress bar to your screen, which can be used to show participants how far they are through a task. For each trial containing a progress bar that a participant finishes the progress bar will fill up, indicating to the participant how far through your trials they have progressed.
Unlike other Zones, the Progress Bar Zone must be set up using a Spreadsheet source.
Note: If you wish you can change the default name of 'ShowProgressBar' by clicking on the Zone and editing the Zone content. If you choose to do this be sure to also update your corresponding column heading in your Task Spreadsheet.
For every display you wish the progress bar to be presented on:
The same progress bar can be used across multiple different displays, so long as all displays have the Progress Bar Zone on them and they are all set up to use the same spreadsheet column name. The displays need not be contiguous - they can be separated by break screens.
The Progress Bar Zone is typically used to give the participant a sense of how long a task will take them. If you have a particularly long task, or an experiment with many tasks then Progress bars can be a helpful way of letting participants know when a break period is going to occur. This could encourage a participant to complete their current section or task.
Progress Bar Zone Icon:
In the example below, the Progress Bar Zone has been set-up to correspond with the spreadsheet column named 'Progress' (Zone content). The Progress Bar colour (Setting-1) has also been set-up to correspond with a spreadsheet column named 'ProgressColour'. This means that the spreadsheet controls both when the progress bar is displayed on a screen and the colour it appears as on each screen.
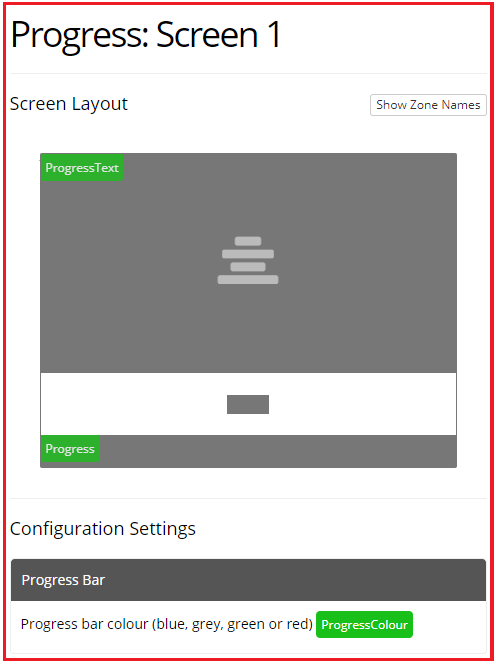
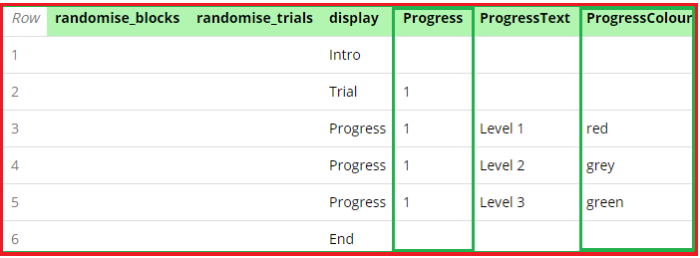
1) Progress bar colour (blue, grey, green, red) (colour)
Setting (colour): Type one of the 4 colours (blue, grey, green, red) you wish for your progress bar to appear.
Default = blue; the progress bar colour will be blue.
If this setting is also set to be controlled by a spreadsheet, colour can be varied between displays.
Click to view a Tutorial of the Progress Bar Zone.
Click to view an Example of a Sample Task which makes use of the Progress Bar Zone.
Check out a Gorilla Academy case study that features the Progress Bar Zone in the context of a real experiment.
You're viewing the support pages for our Legacy Tooling and, as such, the information may be outdated. Now is a great time to check out our new and improved tooling, and make the move to Questionnaire Builder 2 and Task Builder 2! Our updated onboarding workshop (live or on-demand) is a good place to start.
The Feedback (Accuracy) Zone allows you to provide the participant with visual feedback about their accuracy based on their response.
By default the feedback is displayed as a green tick (on a correct answer) and a red cross (on an incorrect answer). You can change these default images by editing the Zone content for the two sections of the Feedback (Accuracy) Zone:
To control which type of feedback is displayed, feedback duration, and to change feedback 'honesty':
The Feedback (Accuracy) Zone is typically used when you wish to present your participants with instantaneous visual feedback about the accuracy of their answers or responses to your question.
Note: You do not need to use a feedback zone to provide participants with their score; to show participants their score based on multiple responses, instead use the 'Embedded data settings' of the Active Response Zone configuration settings. Read more about using embedded data here.
Feedback (Accuracy) Zone Icon:
In the example below, the Feedback (Accuracy) Zone has been set up to show feedback for 500ms (Setting 3) on both correct and incorrect responses (Setting 1 & 2). Feedback is 100% honest as Feedback honesty settings are turned off (Advanced Setting 4 & 5). In this example, a text response button called 'A' is set up to be the correct answer (Active Response Setting 1). If the participant selects this as their response, then the default 'green tick' feedback will be displayed. Any other response selected by the participant will result in the default 'red cross' feedback being displayed.
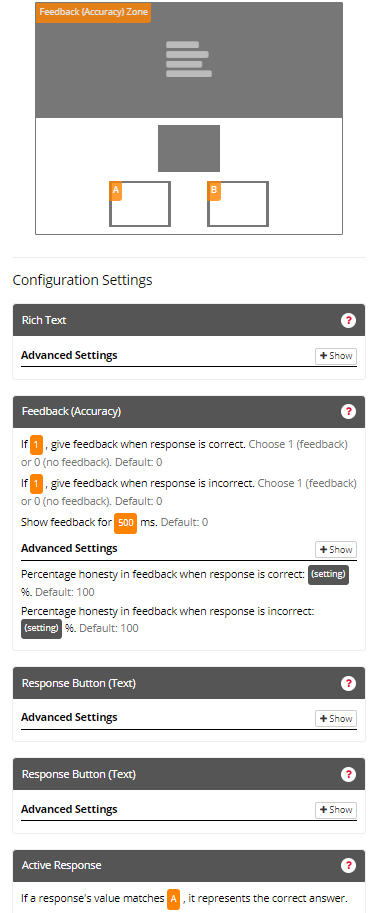
You can view an example of the metrics produced by the Feedback (Accuracy) Zone in the image below:
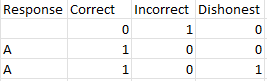
Note that some metric columns have been hidden for presentation purposes.
The Feedback (Accuracy) Zone does not add any additional rows of data to your metrics spreadsheet. However, the 'Dishonest' column in the metrics indicates whether or not the feedback displayed to the participant was dishonest:
| Column Name | Row Entry | Description |
|---|---|---|
| Dishonest | Integer number, either 1 (dishonest) or 0 (honest) | This number indicates whether the feedback shown to the participant on this trial was dishonest (1) or honest (0). In the image example above, the response A was always correct. On the first trial where the participant responded A, they were given honest feedback telling them they were correct; on the second trial where they responded A, they were given dishonest feedback telling them they were incorrect. |
1) If (1 or 0) show feedback when response is correct
Setting (1 or 0): Type 1 to turn setting on, Type 0 to turn setting off.
Default = 'Off' (0); No feedback is displayed.
If set to 1, turns on feedback: displays feedback when a correct answer is selected by the participant.
Note: You must have set up a correct answer in the 'Active Response Correct Answer' configuration settings for this to work.
2) If 1 or 0 show feedback when response is incorrect
Setting (1 or 0): Type 1 to turn setting on, Type 0 to turn setting off.
Default = 'Off' (0). No feedback is displayed.
If set to 1, turns on feedback: displays feedback when an incorrect answer is selected by the participant.
Note: You must have set up a correct answer in the 'Active Response Correct Answer' configuration settings for this to work.
3) Show feedback for (number) milliseconds (Mandatory)
Setting (number): Type a numerical value for the amount of time, in milliseconds (ms), you wish feedback to be shown for.
Default = 0; No feedback will be displayed.
When set, feedback will be displayed for the specified amount of time once a response is selected by the participant.
If the screen would normally advance once the response has been entered; there will be a delay of this amount of time for the feedback to be shown before the screen is advanced. **i.e. Active Response Setting 'Sudden death' is turned on (set to 1) If the response would not normally advance the screen: the feedback will be shown for this length of time and then hidden again.
Advanced Settings
4) Percentage honesty in feedback when a response is correct (number)%
Setting (number): Type a numerical value between 0 and 100 to set the percentage of honesty for 'correct' answer feedback.
Default = 100; feedback is always (100%) honest. If the participant gives a correct answer, then the correct answer feedback will be presented 100% of the time.
If set to any value between 0 and 100 then the percentage of 'correct answer' feedback presented, upon a correct answer being recorded, will be honest the specified % of time.
In the metrics: A correct response will always be recorded as correct. The column 'dishonest' will have a 1 if the participant received dishonest feedback - and a 0 if the participant received honest feedback.
Note 1: If you wish to use Feedback Honesty setting, you MUST turn on Sudden Death in your Active Response Settings. i.e. Active Response Setting-2 (sudden death) must be turned on (set to 1).
Note 2: Feedback Honest will not work correctly with unlimited responses - although feedback provided to participants will be dishonest (if sudden death is turned on) the dishonesty will not be recorded in the metrics.
5) Percentage honesty in feedback when response is incorrect (number)%
Setting (number): Type a numerical value between 0 and 100 to set the percentage of honesty for 'incorrect' answer feedback.
Default = 100; feedback is always (100%) honest. If the participant gives an incorrect answer, then the incorrect answer feedback will be presented 100% of the time.
If set to any value between 0 and 100 then the percentage of 'incorrect answer' feedback presented, upon a incorrect answer being recorded, will be honest the specified % of time.
In the metrics: A incorrect response will always be recorded as incorrect. The column 'dishonest' will have a 1 if the participant received dishonest feedback - and a 0 if the participant received honest feedback.
Note 1: If you wish to use Feedback Honesty setting, you MUST turn on Sudden Death in your Active Response Settings. i.e. Active Response Setting-2 (sudden death) must be turned on (set to 1).
Note 2: Feedback Honest will not work correctly with unlimited responses - although feedback provided to participants will be dishonest (if sudden death is turned on) the dishonesty will not be recorded in the metrics.
Click to view an Example of a Sample Task which makes use of the Feedback (Accuracy) Zone.
Click to view a Gorilla Academy case study featuring use of the Feedback (Accuracy) Zone to provide partially dishonest feedback in the context of a real experiment.
You're viewing the support pages for our Legacy Tooling and, as such, the information may be outdated. Now is a great time to check out our new and improved tooling, and make the move to Questionnaire Builder 2 and Task Builder 2! Our updated onboarding workshop (live or on-demand) is a good place to start.
The Feedback Web Audio (Accuracy) Zone allows you to provide the participant with audio feedback about the accuracy of their response.
The Feedback Web Audio (Accuracy) Zone must be used in conjunction with an Active Response Zone. This means:
Edit the Zone content for the two sections of the Feedback Web Audio (Accuracy) Zone to select the audio to be played as feedback:
Note: Unlike the 'Feedback (Accuracy) Zone' this zone has no default audio feedback stimuli instead you must upload your own audio sound files to use within this zone.
To control which type of audio feedback is displayed and change feedback 'honesty':
The Feedback Web Audio (Accuracy) Zone is typically used when you wish to present your participants with instantaneous audio feedback about the accuracy of their answers or responses to your question.
Note: You do not need to use a feedback zone to provide participants with their score; to show participants their score based on multiple responses, instead use the 'Embedded data settings' of the Active Response Zone configuration settings. Find out more about embedded data, in our Embedded data Walkthrough Guide.
Feedback Web Audio (Accuracy) Zone Icon:
In the example below, the Feedback Web Audio (Accuracy) Zone has been set up to give feedback on both correct and incorrect responses (Setting 1 & 2). Audio files have been uploaded to the Stimuli page and the full file path is written in the Feedback Web Audio (Accuracy) zone as content for both 'correct' and 'incorrect' feedback options. Feedback is 100% honest as Feedback honesty settings are turned off (Setting 4 & 5). In this example a text response button called 'A' is set up to be the correct answer (Active Response Setting 1). If the participant selects this as their response, then the audio sound file 'YES.mp3' will play. Any other response selected by the participant will result in the audio sound file 'NO.mp3' being played.
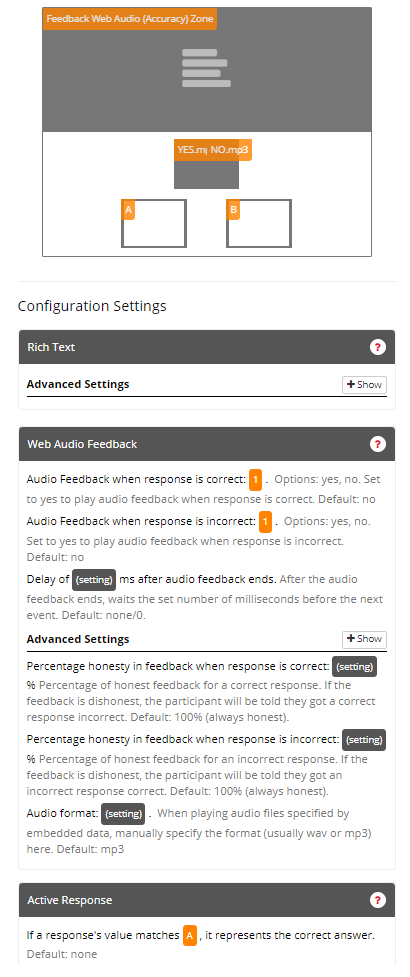
You can view an example of the metrics produced by the Feedback Web Audio (Accuracy) Zone in the image below:
Note that some metric columns have been hidden for presentation purposes.
The Feedback Web Audio (Accuracy) Zone does not add any additional rows of data to your metrics spreadsheet. However, the 'Dishonest' column in the metrics indicates whether or not the feedback played to the participant was dishonest:
| Column Name | Row Entry | Description |
|---|---|---|
| Dishonest | Integer number, either 1 (dishonest) or 0 (honest) | This number indicates whether the feedback played to the participant on this trial was dishonest (1) or honest (0). In the image example above, the response A was always correct. On the first trial where the participant responded A, they were given honest feedback telling them they were correct; on the second trial where they responded A, they were given dishonest feedback telling them they were incorrect. |
1) If (yes or no) give feedback when response is correct
Setting (yes or no): Type yes to turn setting on, Type no to turn setting off.
Default = 'Off' (no); No feedback is displayed.
If set to yes, turns on feedback: displays feedback when a correct answer is selected by the participant.
Note: You must have set up a correct answer in the 'Active Response Correct Answer' configuration settings for this to work.
2) If (yes or no) give feedback when response is incorrect
Setting (yes or no): Type yes to turn setting on, Type no to turn setting off.
Default = 'Off' (no). No feedback is displayed.
If set to yes, turns on feedback: displays feedback when an incorrect answer is selected by the participant.
Note: You must have set up a correct answer in the 'Active Response Correct Answer' configuration settings for this to work.
3) Delay of (number) ms after audio feedback ends
Setting (number): Type a numerical value for the amount of time, in milliseconds (ms), you wish to delay after the audio feedback has ended.
Default = 0; No delay after feedback has finished playing, if the screen would advance it does so immediately.
When set if the screen would normally advance once the response has been entered; there will be a delay of this amount of time, after the audio feedback has finished playing, before the screen is advanced. **i.e. Active Response Setting 'Sudden death' is turned on (set to 1)
Advanced Settings
4) Percentage honesty in feedback when a response is correct (number)%
Setting (number): Type a numerical value between 0 and 100 to set the percentage of honesty for 'correct' answer feedback.
Default = 100; feedback is always (100%) honest. If the participant gives a correct answer, then the correct answer feedback will be presented 100% of the time.
If set to any value between 0 and 100 then the percentage of 'correct answer' feedback presented, upon a correct answer being recorded, will be honest the specified % of time.
In the metrics: A correct response will always be recorded as correct. The column 'dishonest' will have a 1 if the participant received dishonest feedback - and a 0 if the participant received honest feedback.
Note 1: If you wish to use Feedback Honesty setting, you MUST turn on Sudden Death in your Active Response Settings. i.e. Active Response Setting-2 (sudden death) must be turned on (set to 1).
Note 2: Feedback Honest will not work correctly with unlimited responses - although feedback provided to participants will be dishonest (if sudden death is turned on) the dishonesty will not be recorded in the metrics.
5) Percentage honesty in feedback when response is incorrect (number)%
Setting (number): Type a numerical value between 0 and 100 to set the percentage of honesty for 'incorrect' answer feedback.
Default = 100; feedback is always (100%) honest. If the participant gives an incorrect answer, then the incorrect answer feedback will be presented 100% of the time.
If set to any value between 0 and 100 then the percentage of 'incorrect answer' feedback presented, upon a incorrect answer being recorded, will be honest the specified % of time.
In the metrics: A incorrect response will always be recorded as incorrect. The column 'dishonest' will have a 1 if the participant received dishonest feedback - and a 0 if the participant received honest feedback.
Note 1: If you wish to use Feedback Honesty setting, you MUST turn on Sudden Death in your Active Response Settings. i.e. Active Response Setting-2 (sudden death) must be turned on (set to 1).
Note 2: Feedback Honest will not work correctly with unlimited responses - although feedback provided to participants will be dishonest (if sudden death is turned on) the dishonesty will not be recorded in the metrics.
6) Audio Format (filetype)
When playing audio files that are specified by embedded data, manually specify the format of these files here. This is commonly .wav or .mp3
Default:mp3
Click to view an Example task that uses the Feedback Web Audio (Accuracy) Zone
You're viewing the support pages for our Legacy Tooling and, as such, the information may be outdated. Now is a great time to check out our new and improved tooling, and make the move to Questionnaire Builder 2 and Task Builder 2! Our updated onboarding workshop (live or on-demand) is a good place to start.
The Feedback (Speed) Zone allows you to provide the participant with visual feedback at a set time, if they have not yet given a correct response.
Although it is not mandatory, the Feedback (Speed) Zone is typically used in conjunction with an Active Response Zone. This means:
The Feedback (Speed) Zone is typically used to present feedback to the participant about the speed of their response - often to encourage them to answer as quickly as possible.
Alternatively, multiple Feedback (Speed) zones can be used to display messages to the participant at set times. e.g. as distractors while studying a stimuli presentation (video/text/image) or else as hints to help the participant answer a question.
Lastly, the Feedback (Speed) Zone, can be used to automatically advance a participant to the next screen at a set time if no correct answer has been given. This will therefore replace the need for a Timelimit (Screen) Zone in this scenario.
Feedback (Speed) Zone Icon:
In the example below, there are two Feedback (Speed) Zones.
The 1st Feedback (Speed) Zone [Dark-Green] is set up to display the message 'Hurry - only 1 second left' (Zone content) for 1s (1000ms) (Setting-2), if the participant has not responded before 2s (2000ms) (Setting-1).
The 2nd Feedback (Speed) Zone [Light-Green] is set up to display the message 'Too slow! Better luck next time.' for a duration of 1s (Setting-2) after 3s has passed (Setting-1). The 2nd Feedback (Speed) Zone has additionally been set up to auto-advance the participant to the next screen (Setting-3) if the participant has not given a correct response before this point.
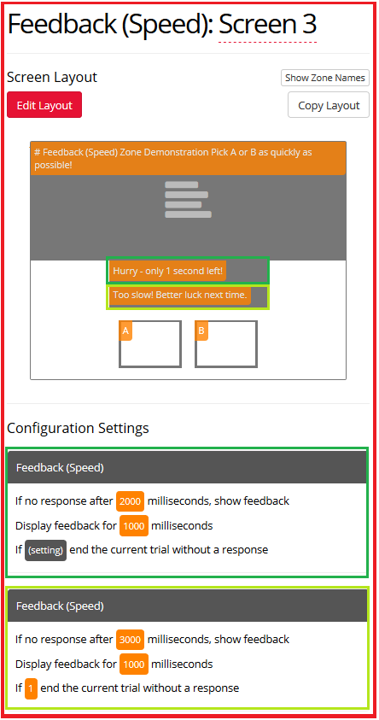
1) If no response after (number) milliseconds, show feedback
Setting (number): Type a numerical value for the time (in milliseconds) at which feedback will be displayed if the participant has not given a correct response.
Default = 0; Feedback will not be displayed.
If set, this represents the amount of time to allow participant to respond before showing the feedback text.
2) Display feedback for (number) milliseconds (Mandatory)
Setting (number): Type a numerical value for the amount of time (in milliseconds) the feedback should be displayed for.
Default = 0; Feedback will not be displayed.
If set, this represents the duration for which a participant will be shown the feedback text.
3) If (1 or 0) end the current trial without a response
Setting (1 or 0): Type 1 to turn setting on, Type 0 to turn setting off.
Default = 0 (off); Feedback (Speed) Zone will not auto-advance the participant to the next screen.
If set to 1, the screen will automatically advance once the feedback text has finished being displayed.
Click to view an Example of a Sample Task which makes use of the Feedback (Speed) Zone.
You're viewing the support pages for our Legacy Tooling and, as such, the information may be outdated. Now is a great time to check out our new and improved tooling, and make the move to Questionnaire Builder 2 and Task Builder 2! Our updated onboarding workshop (live or on-demand) is a good place to start.
Fixation Zone Icon:
The Fixation Zone allows you to add a single fixation cross to your screen.
The fixation cross will be centred in the Fixation Zone's area.
Use the Fixation Zone to present a fixation cross to your participant between trials. The Fixation Zone is typically used when you want your participant to focus during a brief pause between stimuli displays or questions.
In the example below, the Fixation Zone is set up to display the fixation cross for a total of 300ms (Setting 1). A pause time of 100ms has been set (Setting 2). This will result in a total screen display time of 500ms; 100ms wait before cross, 300ms show cross, 100ms wait after cross. Setting 1 is mandatory but Setting 2 is optional.
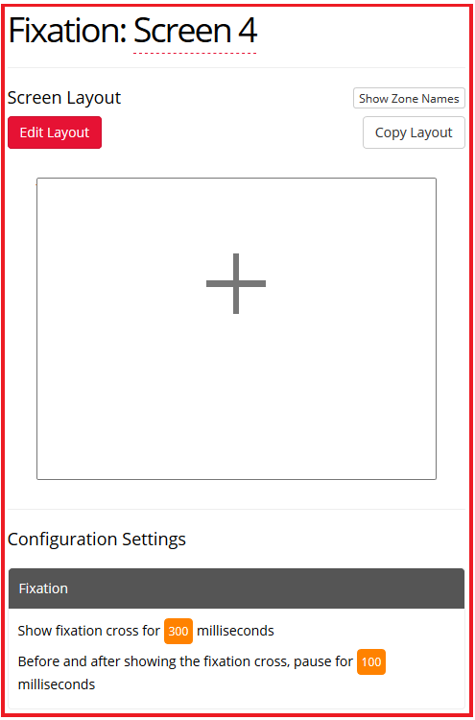
You can view an example of the metrics produced by the Fixation Zone in the image below:
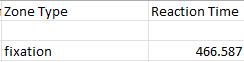
Each Fixation Zone adds 1 row of new data to your metrics spreadsheet:
| Column Name | Row Entry | Description |
|---|---|---|
| Zone Type | fixation | This is the Zone Type name used to identify a Fixation Zone within your metrics. |
| Reaction Time | [Number] | This is the total display time (in ms) of the screen containing the Fixation Zone. This time includes both the display time of the fixation cross itself (configured in Setting 1), and the delay before and after the fixation cross (configured in Setting 2). |
1) Show fixation cross for (number) milliseconds [Mandatory]
Setting (number): Type a value for the number of milliseconds (ms).
Amount of time the fixation cross is displayed for
2) Before and after showing the fixation cross, pause for (number) milliseconds
Setting (number): Type a value for the number of milliseconds (ms).
Default = 0; The fixation cross is shown immediately. There is no pause time before or after showing the fixation cross. Once the fixation time (setting-1) is reached the next screen appears immediately.
If set, a pause time in milliseconds will be applied to the fixation zone. The pause time will appear as a blank screen and will be displayed before and after the fixation cross.
Click to view an Example of a Sample Task which makes use of the Fixation Zone.
You're viewing the support pages for our Legacy Tooling and, as such, the information may be outdated. Now is a great time to check out our new and improved tooling, and make the move to Questionnaire Builder 2 and Task Builder 2! Our updated onboarding workshop (live or on-demand) is a good place to start.
Timelimit (Screen) Zone Icon:
The Timelimit (Screen) Zone allows you to add a timelimit to your screen which will auto-advance a participant to the next screen in your display after a set amount of time.
The Timelimit (Screen) Zone, by default, does not have any visible display on a screen. However, you can edit configuration setting-2 to if you wish to display a visual countdown to your participant.
The Timelimit (Screen) Zone is typically used to limit the amount of time a stimuli (e.g. text or image) is shown for. It can also be used instead of a fixation zone; when you wish to present a break between trials as a blank screen. Alternatively, it can be used alongside Response zones to limit the time a participant has to answer a question.
In the example below, the Timelimit (Screen) Zone is set to last 15s (15000ms) (setting-1). The countdown clock is set to be displayed for the full length of the timelimit (setting-2). A participant will therefore see a countdown for the full 15s of the timelimit before being automatically advanced to the next screen.
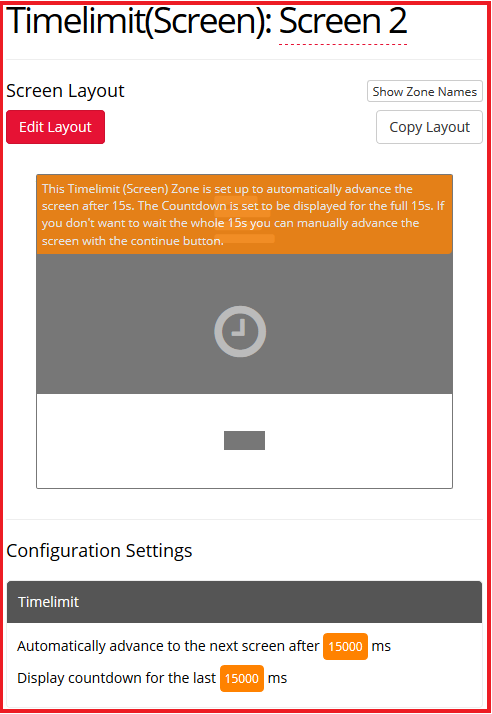
You can view an example of the metrics produced by the Timelimit (Screen) Zone in the image below:
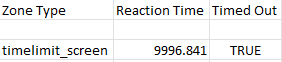
Each Timelimit (Screen) Zone adds 1 row of new data to your metrics spreadsheet when the screen is ended by the time limit elapsing:
| Column Name | Row Entry | Description |
|---|---|---|
| Zone Type | timelimit_screen | This is the Zone Type name used to identify a Timelimit (Screen) Zone within your metrics. |
| Reaction Time | [Number] | This is the total display time (in ms) of the screen containing the Timelimit (Screen) Zone. This time will approximately match the timelimit duration you have set in Configuration Setting 1. |
| Timed Out | TRUE | In cases where the screen ends due to the time limit elapsing (instead of the participant using e.g. a Continue button to progress), the Timed Out column will contain the text TRUE. |
1) Automatically advance to the next screen after (number) milliseconds [Mandatory]
Setting (number): Type a time, as a number of milliseconds (ms), for the total duration of the time-limit.
The participant will be automatically advanced to the next screen after the set amount of time has elapsed.
2) Display countdown for the last (number) milliseconds
Setting (number): Type a time, as a number of milliseconds (ms), for which a countdown clock is displayed.
Default = 0; no countdown clock is displayed.
If set to anything >0; Displays a clock and pulsing countdown for the specified amount of remaining time (to the nearest second).
Note: This time must be equal to, or less than, the overall screen timelimit set in setting-1.
Click to view an Example of a Sample Task which makes use of the Timelimit (Screen) Zone.
You're viewing the support pages for our Legacy Tooling and, as such, the information may be outdated. Now is a great time to check out our new and improved tooling, and make the move to Questionnaire Builder 2 and Task Builder 2! Our updated onboarding workshop (live or on-demand) is a good place to start.
The Timelimit (Section) Zone allows you to add an overall timelimit to a block of trials or a whole task.
Once the duration of the timelimit has elapsed, and the current screen has been finished, the participant will progress to the next display in the spreadsheet outside the time limited section. i.e. to the next row which does not have a '1' under the 'TimedSection' column.
In order for the Timelimit (Section) Zone to work properly, your spreadsheet must include at least one row after the time limited section. If you do not have a display you want to show after the time limited section, create a display containing a blank screen with a Timelimit (Screen) Zone set to a short time limit (e.g., 1ms). Add a final row to your spreadsheet specifying this display in the display column and leaving the TimedSection column blank. This will ensure that the Timelimit (Section) Zone functions correctly in your task.
The time limit is only checked each time the participant reaches a screen which contains the Timelimit (Section) Zone (such as the same screen in a run of multiple trials). If the time limit duration has elapsed then only when the participant reaches and completes a trial screen containing a Timelimit (Section) Zone will the participant be prevented from continuing with the Trials within the time-limited section.
Setting up the Timelimit (Section) Zone: Unlike most other Zones, the Timelimit (Section) Zone must be set up using a Spreadsheet source.
Note: If you wish you can change the default name of 'TimedSection' by clicking on the Zone and editing the Zone content. If you choose to do this be sure to also update your corresponding column heading in your Task Spreadsheet.
For every display you wish to be included in the time limited section:
i.e. under the 'TimedSection' column add 1's to all displays you wish to be included in the time-limited section.
The same Timelimit (section) Zone can be used across multiple different displays but these displays must be continuous and all have the Timelimit (Section) Zone on them set up identically; i.e. to use the same spreadsheet column. Thus, these displays can be separated by break screens only if the break screen is also included in the timelimit.
Note: Displays in the time limited section can not also be part of a block-randomisation (randomise_blocks). However, you can still use trial-randomisation (randomise_trials).
i.e. set the total amount of time you wish participants to be able to spend on the section. By default this is set to 30,000ms (30s).
Once the duration of the timelimit has elapsed, and the current screen has been finished, the participant will progress to the next display in the spreadsheet outside the time limited section. i.e. to the next row which does not have a '1' under the 'TimedSection' column.
The Timelimit (Section) Zone is typically used to limit the maximum about of time a participant can spend on a task or set of trials. It is also useful in cases where you are testing to see how many trials a participant can perform in a given amount of time.
Timelimit (Section) Zone Icon:
In the example below, the Timelimit (Section) Zone has been set-up to correspond with the spreadsheet column named 'Limit' (Zone content) with a total time limit of 20s (Setting 1). This means that the spreadsheet controls which trials are part of the timed section. When the time limit (Setting 1) is reached, the participant will be shown the first display which is not part of this timed section. Note that because strict timelimit mode (Setting 2) is set to No, the participant will finish the screen they are on before being sent to the next display.
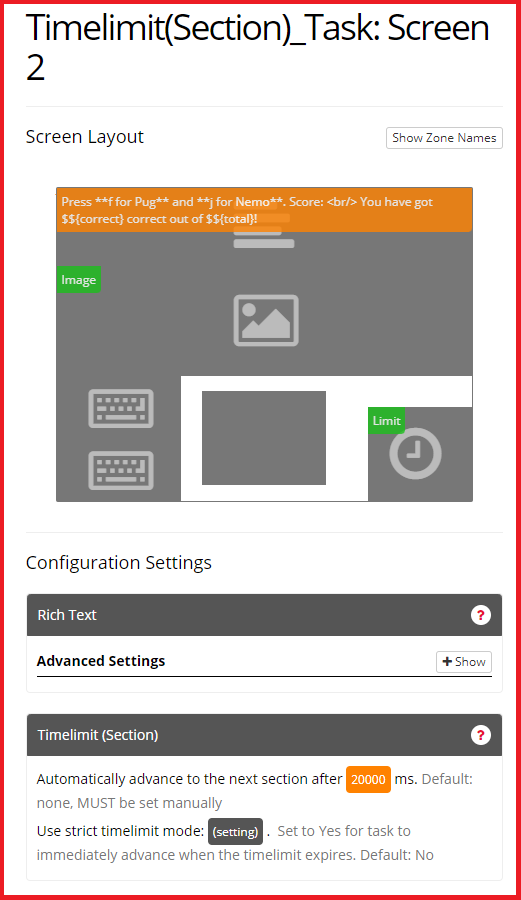
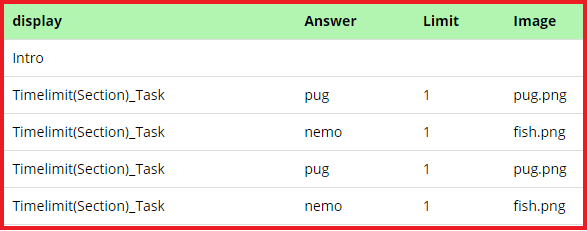
1) Automatically advance to the next section after (number) milliseconds [Mandatory]
Setting (number): Type a time, in milliseconds (ms), for the total duration of the time-limit.
Default = 30000; The maximum amount of time a participant can spend on the section is 30s (30,000 ms).
Set the maximum amount of time a participant can spend on the section. Once the duration of the timelimit has elapsed, and the current screen has been finished, the participant will progress to the next display in the spreadsheet outside the time limited section.
2) Use strict timelimit mode: (setting)
Set to Yes for task to immediately advance when the timelimit expires. Default: No
Click to view a Tutorial of the Timelimit (section) Zone.
Click to view an Example of a Task which makes use of the Timelimit (Section) Zone.
You're viewing the support pages for our Legacy Tooling and, as such, the information may be outdated. Now is a great time to check out our new and improved tooling, and make the move to Questionnaire Builder 2 and Task Builder 2! Our updated onboarding workshop (live or on-demand) is a good place to start.
Normally, a task will always advance on to the next screen in a display. The Go To Zone allows you to define a specific screen (within the current display), to move a participant to, following the completion of the current screen.
The Go To Zone is typically used when you wish to implement within-task branching. This is often used to show different screens to participants depending upon how the participant responds to a question. e.g. to advance the participant to specific response feedback screens for correct or incorrect answers.
Go To Zone Icon:
In the example below, the Go To Zone has been set-up to advance the participant to the screen named 'finish' once the time-limit on the Timelimit (Screen) Zone has elapsed.
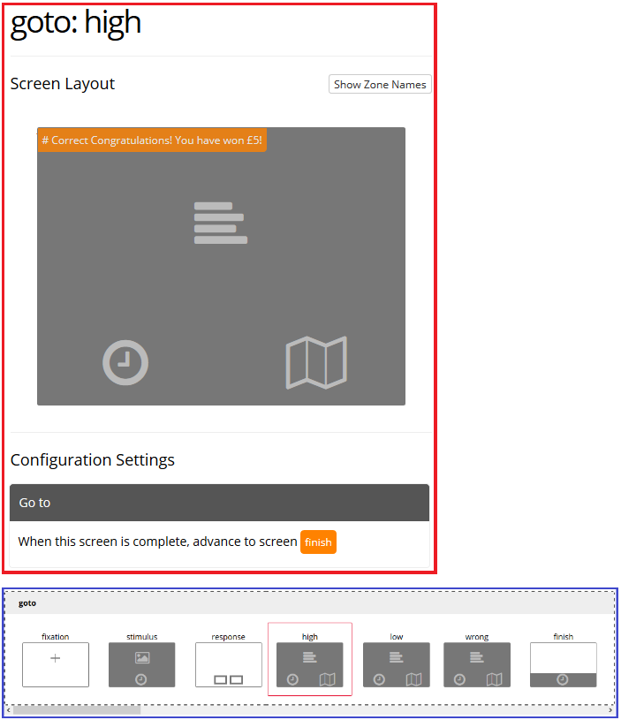
This video shows you how to direct participants to a specific screen based on their responses using the Go To Zone.
Length (mins): 5:35
1) When the screen is complete, advance to screen (text)
Setting (text): Type a screen name from the current display.
Default = None; Screen will advance as normal to the next screen in the display.
Set a screen name (within the same display). When the current screen is finished, Gorilla will then advance to the named screen within your current display.
Click to view an Example of a Sample Task which makes use of the Go To Zone.
You're viewing the support pages for our Legacy Tooling and, as such, the information may be outdated. Now is a great time to check out our new and improved tooling, and make the move to Questionnaire Builder 2 and Task Builder 2! Our updated onboarding workshop (live or on-demand) is a good place to start.
The Jump To Row Zone allows you to break the normal flow of the Task spreadsheet by defining a row from your spreadsheet you wish your participant to move on to. This can be a specific row number, or the number of rows to jump. It should be used in conjunction with in-task Branching.
The Jump To Row Zone overwrites the normal flow of your Task spreadsheet. When the participant reaches a screen containing a Jump To Row Zone, instead of progressing to the next screen in the current display - or continuing on to the next row in your spreadsheet - the participant will jump to the row number you specify, or the number of rows you specify, and be shown the display listed in this row.
The Jump To Row Zone will activate once the current screen (containing the Jump To Row Zone) has been completed.
The Jump To Row Zone overwrites the normal order that a participant will go through your spreadsheet. If the Jump To Row Zone is set up incorrectly, it is possible to create infinite loops in your task, which will mean participants will not be able to reach the end of your task.
This can be avoided by always using the Jump to Row Zone in conjunction with the Active Response: 'Branching Settings'. Ensure your task is working correctly and as expected by previewing your task and piloting before launch.
Use Case: The typical use case for a Jump to Row Zone is when you wish to grant participants the option to repeat a sub-section of trials within a task, such as repeating the practice trials of a task.
Another use case for the Jump to Row Zone is to be able skip sections of your task spreadsheet dependant on participants' answers. This allows you to skip sections of your task you don't wish participants to see if they have given a particular response.
If you are jumping to a randomised trial, use the relative jump settings (Configuration Setting 2).
Jump To Row Zone Icon:
In the example below, the Jump to Row Zone has been set-up to return the participant to row 2 of the spreadsheet once the Timelimit (Screen) has elapsed.
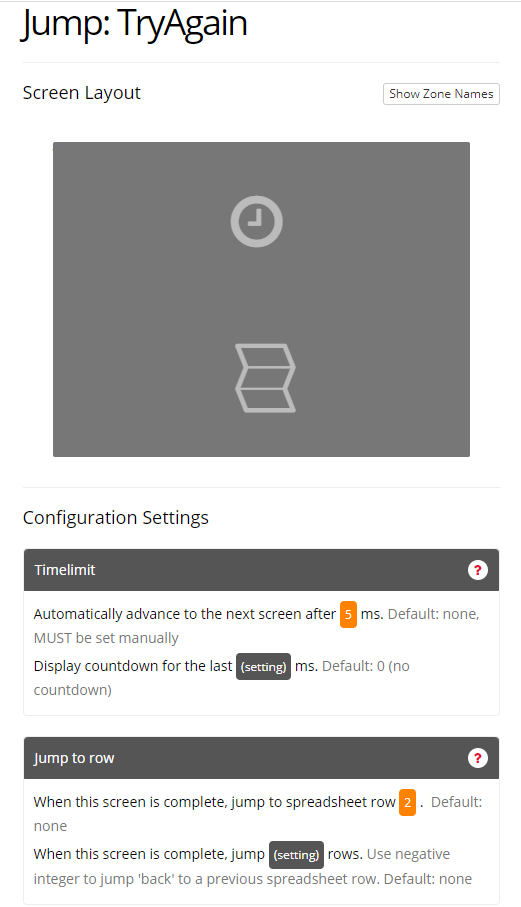
1) When this screen is complete, jump to spreadsheet row (number)
Setting (number): Type a number of a row in your task spreadsheet.
Default = none; The task will continue as normal and will not jump to any row in the spreadsheet.
If set to anything >0; On completion of the screen the task will immediately jump to this row number.
The participant will be presented with the display contained in this row and will continue through the task spreadsheet row by row from this point onward (unless a Jump to Row Zone is met).
Note: The row number must exist in your task spreadsheet for the Jump to Row Zone to be able to function. Check the Spreadsheet Tab of your Task to check the row number you wish to reference.
2) When this screen is complete, jump (number) rows. Use negative integer to jump 'back' to a previous spreadsheet row
Setting (number): Type a number of rows in your task spreadsheet.
Default = none; The task will continue as normal and will not jump any number of rows in the spreadsheet.
If set to anything other than 0; On completion of the screen the task will immediately jump this number of rows.
The participant will be presented with the display contained in the row jumped to and will continue through the task spreadsheet row by row from this point onward (unless a Jump to Row Zone is met).
Note: The row you intend the participant to jump to must exist in your task spreadsheet for the Jump to Row Zone to be able to function.
Check the Spreadsheet Tab of your Task to check the row number you wish to reference.
Note: If setting 1 is set, setting 2 will be ignored.
Click to view a Tutorial of the Jump To Row Zone.
Click to view an Example which makes use of the Jump To Row Zone to allow participants to repeat practice trials within a Task.
You can also view a Walkthrough of how to set up this Example in our Troubleshooting Guide.
You're viewing the support pages for our Legacy Tooling and, as such, the information may be outdated. Now is a great time to check out our new and improved tooling, and make the move to Questionnaire Builder 2 and Task Builder 2! Our updated onboarding workshop (live or on-demand) is a good place to start.
The Early Exit Zone allows you to break the normal flow of the Task spreadsheet by adding a button to the screen which when pressed will immediately end the current Task.
The Early Exit Zone overwrites the normal flow of your Task spreadsheet. When the participant presses the Early Exit button the Task ends immediately. The participant will not see any further part of this Task. Instead the participant will advance to the next Node in your Experiment Tree.
Further to this, when a participant clicks the Early Exit Zone a piece of embedded data with the default name earlyExit is generated. The value of this embedded data will be True. This embedded data can then be used in your experiment Tree Branch Nodes to branch participants who have chosen to exit your task early via the early exit button.
Use Case: The typical use case for a Early Exit Zone is to offer participants an option to withdraw from your experiment at any time. Further to this, the embedded data can be used to easily branch participants who withdraw to a Reject Node.
Other common use cases for the Early Exit Zone are in thresholding tasks and grit/perseverance studies. By making use of the embedded data setting (with source set to Spreadsheet) participants can be branched to tasks of different difficulty.
Explore the linked examples at the bottom of this page for a demonstration of experimental designs which make use of the Early Exit Zone embedded data.
Early Exit Zone Icon:
In the example below, the Early Exit Zone has been set-up so the Early Exit button (bottom right) displays the text 'Exit'. If the Early Exit button is pressed, this will be stored as a piece of embedded data called earlyExit (Setting 1).
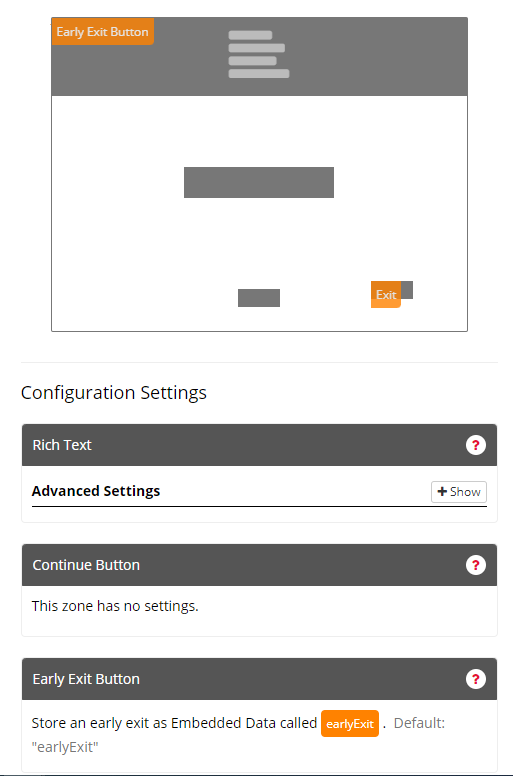
You can view an example of the metrics produced by the Early Exit Zone in the image below:

Each Early Exit Zone adds 1 row of new data to your metrics spreadsheet when the participant presses the Early Exit button:
| Column Name | Row Entry | Description |
|---|---|---|
| Zone Type | early_exit_button | This is the Zone Type name used to identify a button press from an Early Exit Zone within your metrics. |
| Reaction Time | [Number] | This is the reaction time (in ms), as measured from the start of the screen, at which the participant pressed the Early Exit button. |
| Response | EARLY EXIT BUTTON PRESSED | If the participant presses the Early Exit button, the Response column will contain the text EARLY EXIT BUTTON PRESSED. |
1) Store an early exit as Embedded Data called (text)
Setting (text): Type a key-name for the embedded data.
Default = earlyExit; The key-name given to the embedded data will be earlyExit.
If the text is changed from the default then your new text will become the key-name of the embedded data.
Embedded data & the Branch Node: When using the embedded data from the Early Exit Zone within a Branch Node. Set the Property field to be the key-name (e.g. earlyExit) and the Value field to be True. This will allow you to branch any participant who has clicked the early exit button within your task.
Note: The early exit zone will only generate embedded data if a participant has clicked the early exit button during the task. If you also wish to branch participants who have not clicked an Early Exit button then simply create a branch with both branch node fields left empty and set this as your default branch. This will allow you to separate out participants who clicked the early exit button from those who completed the task.
See the linked examples below for a demonstration of experimental set ups using the Early Exit Zone embedded data.
Click to view a Tutorial of the Early Exit Zone.
Click to view an Example of using the Early Exit Zone in a Task to allow participants to withdraw at any time.
Click to view an Example of an Experiment where the Early Exit Zone embedded data is used to branch participants who withdraw during the task.
Click to view an Example of using the Early Exit Zone to determine performance outcomes in a Thresholding Task.
Click to view an Example of an Experiment where the Early Exit Zone embedded data is used to branch participants depending upon their performance in the Thresholding Task.
You're viewing the support pages for our Legacy Tooling and, as such, the information may be outdated. Now is a great time to check out our new and improved tooling, and make the move to Questionnaire Builder 2 and Task Builder 2! Our updated onboarding workshop (live or on-demand) is a good place to start.
Switch Button Zone Icon:
The Switch Button Zone adds a 'Switch' button to the task screen which allows the participant to switch to the corresponding Switch Node Task in your experiment.
Note: The Switch Button Zone is a special Zone which must be used in conjunction with a Switch Node within your Experiment Tree in order to make use of its functionality. You must include a Switch Button Zone in both of the Tasks tethered to your Switch Node if you wish your participants to be able to switch freely between the tasks.
You must include a Switch Button Zone on every Screen of your Tasks that you wish your participant to be able to switch from.
The Switch Button Zone is only used when using the Switch Node within your Experiment Tree. You can find out more about the Switch Node here.
In the example below, you can see that there are no configuration settings for the Switch Button Zone. The Switch button label has been changed from the default of 'Switch' to 'Switch to Task 2!' by editing the Zone content.
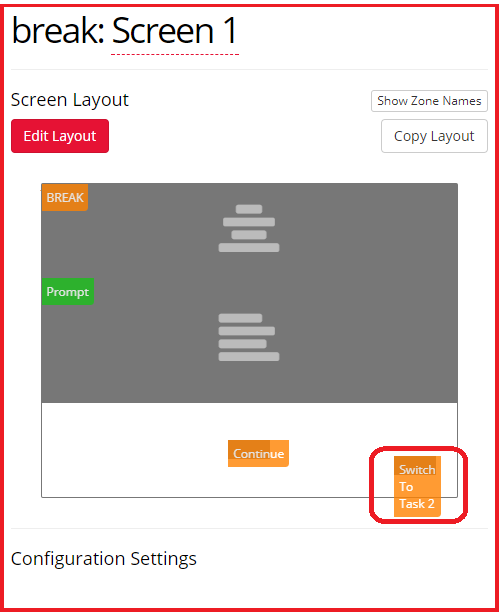
This image example shows how the Switch button appears disabled when Previewing it as a Task. Notice that the switch button will only function when previewing from the experiment itself (i.e. when the task is tethered to another task via the Switch Node).
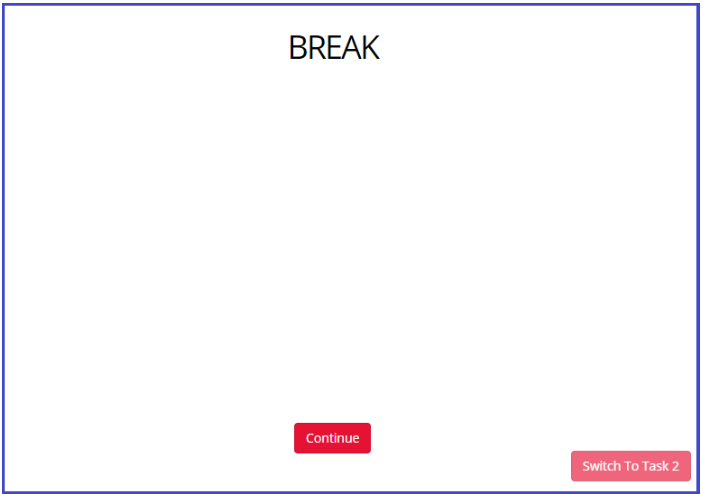

| Column Name | Row Entry | Description |
|---|---|---|
| switch-nodekey-time-primary | [Number] | This is the total time (in ms) the participant spends on the primary task. |
| switch-nodekey-percentage-primary | [Number] | This is the time the participant spent on the primary task displayed as a percentage. |
| switch-nodekey-time-secondary | [Number] | This is the total time (in ms) the participant spends on the secondary task. |
| switch-nodekey-percentage-secondary | [Number] | This is the time the participant spent on the secondary task displayed as a percentage. |
| switch-nodekey-switches | [Number] | This is a count of the total number of switches a participant made between the primary and secondary tasks. |
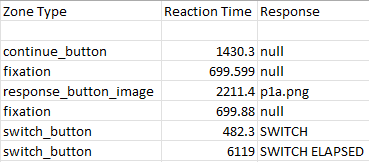
| Column Name | Row Entry | Description |
|---|---|---|
| Zone Type | switch_button | This is the Zone Type name used to identify a button press from a Switch Button Zone within your metrics. |
| Reaction Time | [Number] | If the Response column contains the text SWITCH, this is the reaction time (in ms), as measured from the start of the screen, at which the participant pressed the Switch Button. If the Response column contains the text SWITCH ELAPSED, this is the total time (in ms) that the participant has spent on the task before pressing the Switch button. |
| Response | SWITCH or SWITCH ELAPSED | Text in the Response column will read either SWITCH or SWITCH ELAPSED, depending on which reaction time is being reported. |
-- No Settings --
Click to view a Demo of the Switch Button Zone and Switch Node in an Experiment.
You're viewing the support pages for our Legacy Tooling and, as such, the information may be outdated. Now is a great time to check out our new and improved tooling, and make the move to Questionnaire Builder 2 and Task Builder 2! Our updated onboarding workshop (live or on-demand) is a good place to start.
The Share on Facebook Zone allows your participants to post a link on Facebook by pressing a ‘Facebook’ button. This creates a popup, which, when they log into Facebook, allows them to write a post containing a predetermined link.
No metrics are recorded when the participant presses the Facebook button, nor when they post to Facebook.
Note: Links to Gorilla Experiments should always be copied and pasted into the browser, rather than opened within the Facebook app, or they may not function correctly. If you are using this zone to share a link to a Gorilla Experiment, you need to ask participants to include this instruction in their Facebook Post.
Share On Facebook Zone Icon:
In the example below, you can see that there are two configuration settings for the Share to Facebook Zone. The Share to Facebook URL has been set to an external page. The button label has been left to default 'Share on Facebook'.
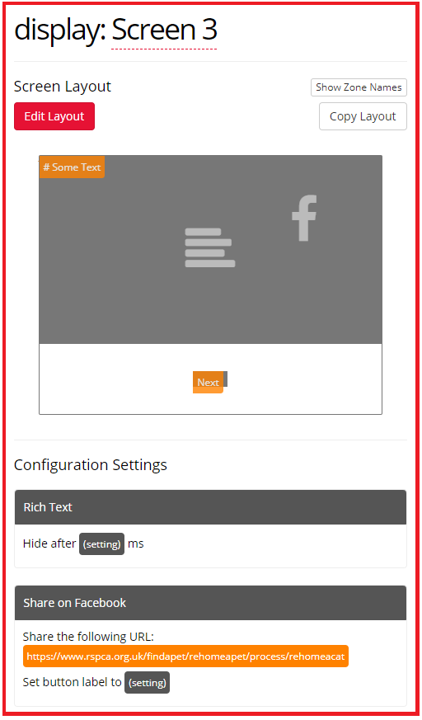
This image example shows how the Share to Facebook Zone appears when Previewing it as a Task.
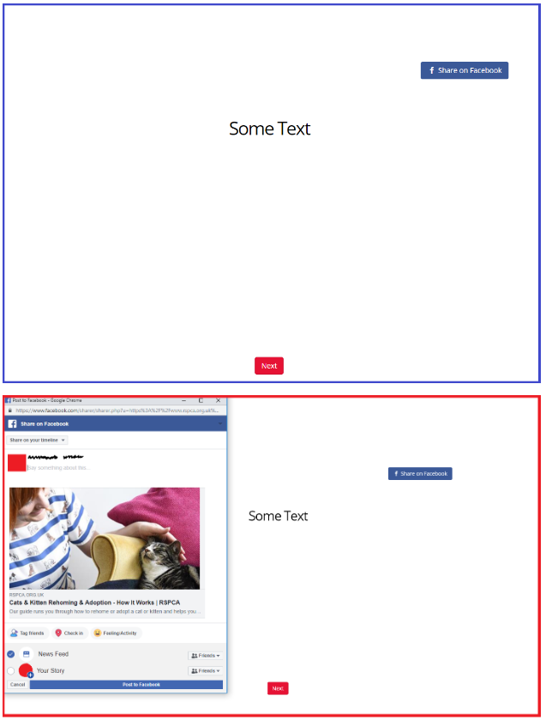
1) Share the following URL (mandatory)
Setting (text): Type the URL you wish to be entered into the Facebook post.
Default = no default; If this setting is not set, the Share to Facebook button will not appear to the participant.
When this is set, the URL you give will automatically appear in the Facebook popup post area.
2) Set button label to (text)
Setting (text): Type the name-label you wish the button to have.
Default = If this setting is not set, the button will read 'Share on Facebook'.
You're viewing the support pages for our Legacy Tooling and, as such, the information may be outdated. Now is a great time to check out our new and improved tooling, and make the move to Questionnaire Builder 2 and Task Builder 2! Our updated onboarding workshop (live or on-demand) is a good place to start.
The Share on Twitter Zone allows your participants to post a link on Twitter by pressing a ‘Twitter’ button. This creates a popup, which, when they log into Twitter, allows them to write a post containing a predetermined link.
No metrics are recorded when the participant presses the Twitter button, nor when they post to Twitter.
Note: Links to Gorilla Experiments should always be copied and pasted into the browser, rather than opened within the Twitter app, or they may not function correctly. If you are using this zone to share a link to a Gorilla Experiment, you need to ask participants to include this instruction in their Tweet.
Share On Twitter Zone Icon:
In the example below, you can see that there are two configuration settings for the Share to Twitter Zone. The Share to Twitter URL has been set to an external page. The button label has been set to 'Check out this page!'.
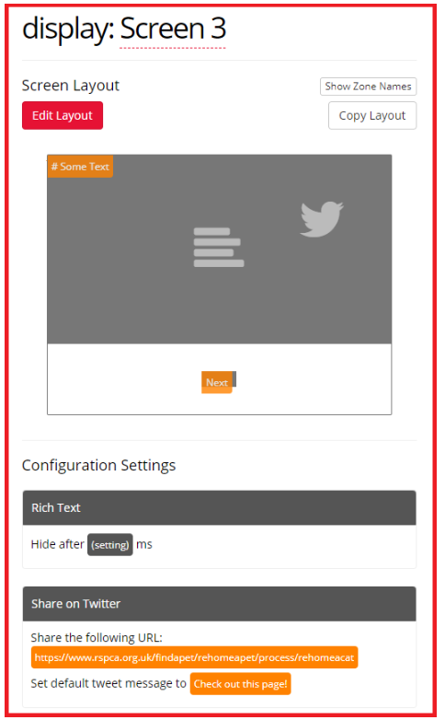
This image example shows how the Share to Twitter Zone appears when Previewing it as a Task.
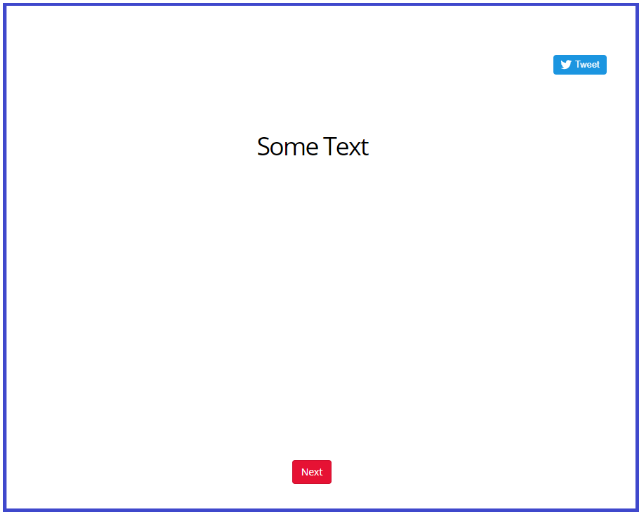
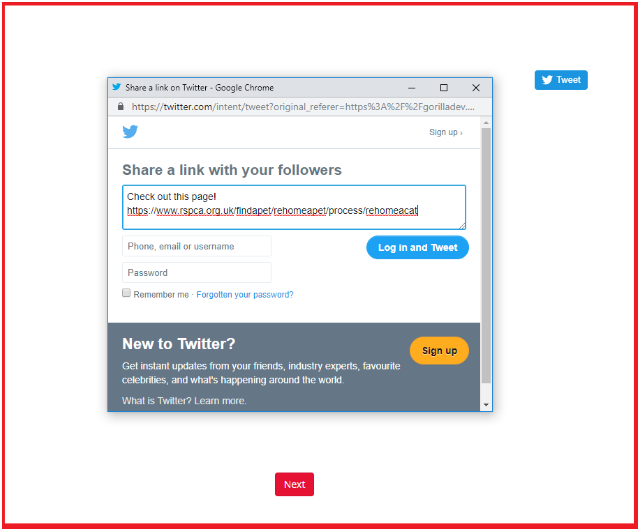
1) Share the following URL (url) [Mandatory]
Setting (text): Type the URL you wish to be entered into the tweet.
Default = no default; If this setting is not set, the Share to Twitter button will not appear to the participant.
When this is set, the URL you give will automatically appear in the Twitter popup post area.
2) Set default tweet message to (text)
Setting (text): Type the tweet text you’d like the participant to post (this is editable by the participant).
Default = Gorilla; The word ‘Gorilla’ will precede the URL.
You're viewing the support pages for our Legacy Tooling and, as such, the information may be outdated. Now is a great time to check out our new and improved tooling, and make the move to Questionnaire Builder 2 and Task Builder 2! Our updated onboarding workshop (live or on-demand) is a good place to start.
Change Blindness Zone Icon:
The Change Blindness Zone is an advanced content zone which allows you to repeatedly display a set of two image stimuli, interleaved with a mask image, for controlled time periods set in the configurations settings.
This allows you to present simultaneous images to your participant on the same screen. This special zone provides additional image display accuracy necessary for a 'Change Blindness' Task. An alternative use-case for this zone might be to create an image that flickers, by quickly changing between just one repeated image and a mask (or blank) image for example.
You can also use the Change Blindness Zone in combination with the Screen Calibration Zone to display the image at a specific size in cm or visual degrees - see the Advanced section of the Configuration Settings below for more details.
The Change Blindness Zone is made up of 3 sections. Edit the Zone Content to add both your image stimuli and mask stimuli for each section.
You can also Edit the Change Blindness Configuration Settings to set durations for both images and the mask.
The images and mask images will auto-resize to fit the Zone's area and be centred within the Zone area. This means the image will be displayed as large as possible within the Zone's area, but will not be stretched or enlarged above it's natural, uploaded, size. For best results, you should ensure the images you use for each section of the Change Blindness Zone are the same size (height and width). If you need to display images at a specific size, include a Screen Calibration Zone earlier in your task and use the Advanced Settings (see below).
Supported Image types: .png, .jpg, .jpeg, and .gif
File Size: We recommend that each individual image file you upload to your task be no larger than 50KB. For more guidance on file sizes, see our Technical Checklist.
Use case:
Typically the Change Blindness Zone is used when you wish to set up a Change Blindness style task. You can use any Response Zone to allow the participant to indicate when they have seen the change and advance the screen.
In the example below, the Change Blindness Zone has been set up so that the images used for each section are taken from the spreadsheet columns 'Image 1', 'Mask' and 'Image 2' respectively. The images will be shown for a duration of 200ms each (Setting 1) and the mask will be shown for a duration of 500 ms (Setting 2).
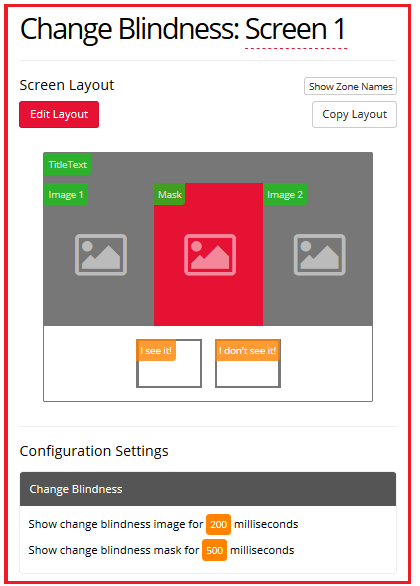
Note the Change Blindness Zone does not produce any unique Metrics
1) Show change blindness image for (number) milliseconds
Setting (number): Type a time, as a number of milliseconds (ms), to represent the total duration for which each image stimuli will be displayed. Default = 0; The image stimuli will not be displayed.
When set, the image stimuli used within the Change Blindness Zone will be displayed for this duration.
2) how change blindness mask for (number) milliseconds
Setting (number): Type a time, as a number of milliseconds (ms), to represent the total duration for which the mask image stimuli will be displayed. Default = 0; The mask stimuli will not be displayed.
When set, the mask stimuli used within the Change Blindness Zone will be displayed for this duration.
Advanced Settings
3) Set Image width to (setting) cm
Requires Screen Calibration zone
4) Set Image width to (setting) visual degrees
Requires Screen Calibration zone
Click to view a Tutorial of the Change Blindness Zone.
Click to view an Example of a Sample Task which makes use of the Change Blindness Zone.
You're viewing the support pages for our Legacy Tooling and, as such, the information may be outdated. Now is a great time to check out our new and improved tooling, and make the move to Questionnaire Builder 2 and Task Builder 2! Our updated onboarding workshop (live or on-demand) is a good place to start.
Click Painting Zone Icon:
The Click Painting Zone adds an interactive image zone to your screen which allows participants to click on the image, placing a coloured dot at the click location.
The Click Painting Zone provides a single input for the image the participant is to mark with dots.
When a participant clicks on the image in the click painting zone, the (x,y) coordinates of the click within the image are recorded in the metrics for the screen. A dot is visibly placed on the screen, centred where the participant clicked.
It is important to note that the (x,y) coordinates take into account the scaling of the image: they will always represent the equivalent location on the source image. The x coordinate represents the pixel distance of the click location from the left side of the image at its original size. The y coordinate represents the pixel distance of the click location from the top side of the image at its original size. The size of the dot does not affect the coordinates.
If you want the image to be presented to the participant at a particular size, you can use the Click Painting Zone in combination with the Screen Calibration Zone. See set up section below for more information.
You can optionally mark particular regions of the image as correct click locations, using Click Scoring Regions. For more information, see the set up section below.
Setting up a Click Painting Zone:
Note that the (x,y) coordinates take into account the scaling of the image. If the source image is larger than the available zone; Gorilla will automatically shrink (rescale) the image to fit the available area. The click coordinates recorded in the metrics take this rescaling into account and will represent the equivalent location on the source image.
Use Case: Use the Click Painting Zone when you want participants to locate or identify an object or feature within an image and need to obtain position metrics (x and y coordinates) for the click locations. Optionally, you can also designate a particular region or regions of the image where you want clicks to be automatically scored as correct.
If you wish to record participants' click locations on a video instead of an image, use the Click Painting (Video) Zone.
Note: If you do not wish to collect position data, you may instead wish to use the Canvas Painting Zone as an alternative to the Click Painting Zone.
In the example below, the Click Painting Zone has been set up to show an image 'brain.jpg', which is set as the static content for this Click Painting Zone.
The number of clicks has been limited to 1 using Configuration Setting 1. This means the participant will only be allowed to click once on this image before being advanced, automatically, to the next screen.
The dot colour and size has been configured using Configuration Settings 2 and 3 respectively. From these settings we can see that a 20px blue dot will be displayed at the point where the participant clicks.
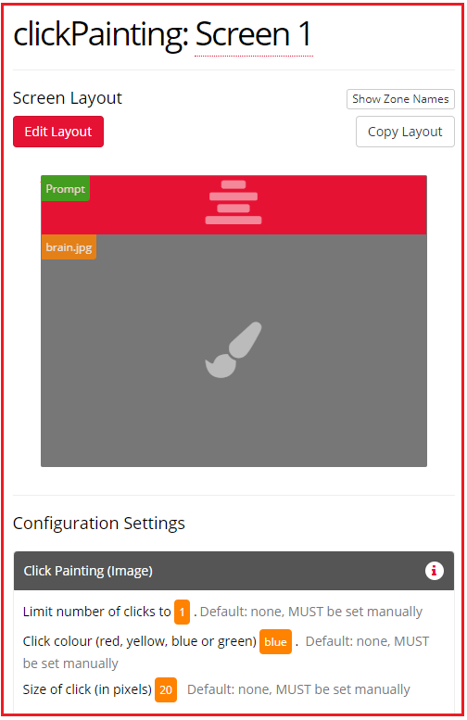
The Click Painting Zone produces specific metrics in 8 columns within your Data-Spreadsheet.
The Click Painting Zone will produce one row in your metrics for each click on the click painting zone the participant makes, up to the limit set in Configuration Setting-1.
The zone will produce one additional row in your metrics to indicate if, and when, the click limit is reached.
You can view an example of the metrics produced by the Click Painting Zone in the image below:

Note that some metric columns have been hidden for presentation purposes.
| Column Name | Row Entry | Description |
|---|---|---|
| Zone Type | click_painting | This is the Zone 'Type' identifier for the Click Painting Zone. |
| Reaction Time | [Number] | This is the reaction time in milliseconds (ms). The reaction time is recorded at the point the participant clicks on the image in the Click Painting Zone. |
| Response | click | This indicates that the participant clicked on the image in the Click Painting Zone. |
| Response | click limit reached | This indicates that the click limit set in Configuration Setting-1 has been reached. The Participant has performed the maximum number of available clicks on the Click Painting Zone image. |
| Correct | [1 or 0] | This indicates whether the click fell into one of the regions defined in the Click Scoring Regions settings (1 if yes, 0 if no). |
| Incorrect | [1 or 0] | This indicates whether the click fell into one of the regions defined in the Click Scoring Regions settings (1 if no, 0 if yes). |
| Attempt | [Number] e.g. 1, 2, etc | This indicates the number of times the participant has clicked on the Click Painting Zone. |
| X Coordinate | [Number] e.g. 53, etc | This indicates the x-coordinate for the position of the participant's click on the Click Painting Zone. Note that the coordinate system origin point (0,0) is the top-left corner of the image. |
| Y Coordinate | [Number] e.g. 87, etc | This indicates the y-coordinate for the position of the participant's click on the Click Painting Zone. Note that the coordinate system origin point (0,0) is the top-left corner of the image. |
1) Limit number of clicks to (number) [Mandatory]
Setting (number): Type a number to set the number of times a participant needs to click on the Image.
Default = none.
Once the participant has clicked on the image the specified number of times, Gorilla will automatically advance the participant to the next screen.
After the last click, a wait time of 250ms is implemented: This allows the participant to view the position of their last click before being moved on to the next screen.
Only clicks on the click painting zone will be recorded.
Note: If a number is not configured in this setting then the Zone will not function.
2) Click colour (red, yellow, blue or green) (string) [Mandatory]
Setting (string): Type the name, chosen from the available options (red, yellow, blue or green), for the colour you wish the dot to be.
Default = none.
When the participant clicks on the image a dot will appear, centred at the position where the participant clicked.
The dots will stay upon the image until the click limit is reached.
You must set a numerical value for the dot-size in configuration setting-3 for the dot to be visible.
Note: If a colour option is not configured in this setting then the Zone will not function.
3) Size of click (in pixels) (number)
Setting (number): Type a number to set the pixel size of the dot to be.
Default = none: When the participant clicks on the image no dot will be shown. The coordinates of the click point will still be recorded in your metrics.
Set to a number, which represents the size, in pixels, of the dot which appear on the image at the location the participant clicks.
Note that the (x,y) coordinates, recorded in your metrics, will always represent the centre of the dot. As the centre of the dot is the co-ordinates used, the dot size will not affect your data.
Click Scoring Regions
4) Scoring regions (list of pixel values)
Setting (list of pixel values): Type a comma-separated list of 5 pixel values defining the left, top, right, and bottom boundaries of the click scoring region. The fifth value is the tolerance, in pixels, for this region. The tolerance defines the distance in pixels outside each boundary that a click can fall and still be considered correct. Clicks that fall within the region defined by the boundaries plus the tolerance will be automatically marked as correct. If you wish to define multiple regions, type multiple sets of 5 values and separate the sets with semi-colons.
Default = none; by default, no regions will be marked as correct.
The top left of the image is 0,0. Therefore, a region encompassing a 10-pixel square at the top left of the image, with a 2-pixel tolerance, would be defined as follows: 0,0,10,10,2.
Screen Calibration Settings
5) Set image width to (number) cm
Setting (number): Type the number of cm you want to set the width of the Click Painting image to. To use this setting, you will need to include a Screen Calibration Zone earlier in your task.
Default = none; by default, the image will be scaled automatically according to Gorilla's defaults.
6) Set image width to (number) visual degrees
Setting (number): Type the number of visual degrees you want to set the width of the Click Painting image to. To use this setting, you will need to include a Screen Calibration Zone earlier in your task.
Default = none; by default, the image will be scaled automatically according to Gorilla's defaults.
Click to view a Tutorial of the Click Painting Zone.
Click to view an Example of the Click Painting Zone.
You're viewing the support pages for our Legacy Tooling and, as such, the information may be outdated. Now is a great time to check out our new and improved tooling, and make the move to Questionnaire Builder 2 and Task Builder 2! Our updated onboarding workshop (live or on-demand) is a good place to start.
Go/No-Go Zone Icon:
The Go/No-Go Zone is a Zone specialised for implementing go/no-go style experimental paradigms.
This specialised Zone allows you to present a main image stimuli followed by either a blank screen, a fixation cross or a second 'wait image'.
The Go/No-Go Zone simultaneously grants the additional functionality of recording a 'NoGo' response or an 'inhibited' response as a named response.
Once the requisite times have elapsed and no other response has been detected, the Go/No-Go Zone will record a 'No Go' response.
You can use any Active Response Zone - e.g. response button or keyboard response - to detect the 'Go' response.
Setting up a Go/No-Go Zone:
The Go/No-Go Zone is made up of 2 sections. Edit the Zone Content to add both your 'main image' stimuli and your 'wait image' stimuli for each section:
Supported Image types: .png, .jpg, and .jpeg.
File Size: We recommend that each individual image file you upload to your task be no larger than 50KB. For more guidance on file sizes, see our Technical Checklist.
Note: If you wish to use Audio Stimuli instead of Image stimuli you will need to use the Go/No-Go (Web Audio) Zone.
You can set the duration times for the 'main image' and 'wait image' in the Go/No-Go Zone's configuration settings:
Use Case: The Go/No-Go Zone is primarily used for implementing go/no-go experimental paradigms. However this Zone is also highly applicable to Visual search and Stimulus-Response compatibility tasks.
In the example below, the Go/No-Go Zone is set to show the main image for a duration of 500 ms (Setting 1). The first section of the Go/No-Go Zone has been set to Spreadsheet Source and called 'Main_Image'. Therefore, the filenames for the images which will be used in this section are contained in the corresponding spreadsheet column called 'Main_Image'.
The second section of the Go/No-Go Zone has been left empty. Instead we have set the Go/No-Go Zone to use the standard fixation cross during the wait period (Setting 3 is set to the value 1). The Wait duration has also been set to 500 ms (Setting 2).
We have set up the Go/No-Go Zone to record a 'No Go' response as the default, nogo (Setting 4).
Lastly, we have specified in Setting 5 that the screen should wait to display the full image and wait time for the Go/No-Go Zone, regardless of whether the participant responds or not.
Note: The Go/No-Go Zone does not have a response option built-in. Instead we have chosen to use two Response Button (Text) Zones for the participants to submit their response.
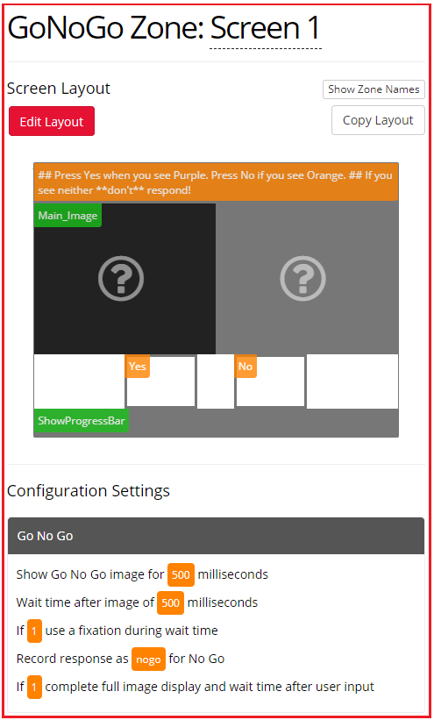
The Go/No-Go Zone will produce one row in your metrics each time a No-Go response is recorded.
You can view an example of the metrics produced by the Go/No-Go Zone in the image below:

Note that some metric columns have been hidden for presentation purposes.
| Column Name | Row Entry | Description |
|---|---|---|
| Zone Type | gonogo | This is the Zone 'Type' identifier for the Go/No-Go Zone in your metrics. |
| Reaction Time | [Number] | This is the reaction time in milliseconds (ms). The reaction time is recorded at the point where the screen ends after the participant has made a no-go response. |
| Response | [Text] | This will match the text you entered in Setting 4 (default 'nogo'). |
| Correct | [1 or 0] | This indicates whether the response was marked as correct (1 if yes, 0 if no). In the image example above, nogo was configured as a Correct response in the Active Response Settings, so the participant's no-go response has a 1 in the Correct column. |
| Incorrect | [1 or 0] | This indicates whether the response was marked as incorrect (1 if yes, 0 if no). |
1) Show Go No Go image for (number) milliseconds
Setting (number): Type a time, as a number of milliseconds (ms), to represent the total duration for which the main image stimuli will be displayed. Default = 500; The image will be shown for 500 milliseconds.
When set, the image stimuli used within the main-section of the Go/No-Go Zone will be displayed for the specified duration.
2) Wait time after image of (number) milliseconds
Setting (number): Type a time, as a number of milliseconds (ms), to represent the total duration for the wait time after the main image stimuli has been shown. Default = 500; The screen will wait for 500 milliseconds.
Note: If a 'wait image' or fixation cross (setting-3) is set, then this value instead represents the duration for which the wait image or fixation cross will be shown.
If set, after the main image duration has elapsed, the 'wait image' or 'fixation cross' will be displayed for this duration. Otherwise, if no 'wait image' or fixation cross is being used, the screen will wait for this duration.
3) If (1 or 0) show a fixation cross during the wait time
Setting (1 or 0): Type 1 to turn setting on, Type 0 to turn setting off. Default = 1 (on); A fixation cross will be shown for the duration of the wait time (Setting-2).
Note: If you wish to use this setting you must leave the content for the 'wait image' section empty.
If set to 0 (off); (and the content for the 'wait image' Zone section is empty) then nothing will be shown during the wait time.
4) Record response as (text) for No Go
Setting (text): Type a name which will be used to record a 'No-Go' response. Default = nogo; When the participant inhibits responding during a trial, the response will be recorded in the 'Response' column of your metrics as 'nogo'
For example, if you wish to mark your participants 'No-Go' response as correct for a particular trial, then in this instance you would use 'nogo' as your correct answer value in your 'ANSWER' Column for the trial in your spreadsheet. Check out the examples and tutorials below to see this in action!
5) If (1 or 0) complete full image display and wait time after user input
Setting (1 or 0): Type 1 to turn setting on, Type 0 to turn setting off. Default = 1 (on); A users response will not instantly end the trial, instead the image durations are honoured in full. i.e. Regardless of whether the participant responds or not, the 'main image' and 'wait image' (Settings 1 & 2) will be shown for their full durations.
If set to 0; then a users response will instantly end the trial and they will be advanced to the next screen within your task.
Advanced Settings
6) Set Image width to (setting) cm
Requires Screen Calibration zone
7) Set Image width to (setting) visual degrees
Requires Screen Calibration zone
Click to view an Example of a Task which makes use of the Go/No-Go Zone.
Click to view a Classic Experiment about Inattention & Impulsivity in children during the Go/No-Go Task.
You're viewing the support pages for our Legacy Tooling and, as such, the information may be outdated. Now is a great time to check out our new and improved tooling, and make the move to Questionnaire Builder 2 and Task Builder 2! Our updated onboarding workshop (live or on-demand) is a good place to start.
The Go/No-Go (Web Audio) Zone is specialised for implementing audio go/no-go style experimental paradigms. This specialised Zone allows you to present an audio stimuli, while allowing the recording of a 'NoGo' response or an 'inhibited' response as a named response.
How it works:
The Go/No-Go (Web Audio) Zone differs from other response zones, which record all 'non-responses' as both 'incorrect' and 'timed-out'. Once the requisite times have elapsed and no other response has been detected, the Go/No-Go (Web Audio) Zone will record a 'No Go' response. You can use any Active Response Zone - e.g. response button or keyboard response - to detect the 'Go' response.
Setting up the Go/No-Go Zone: There are three main steps to setting up a Web Audio Go / No-Go Zone:
Supported audio file types: .mp3, .ogg.
File Size: We recommend that audio files you upload to your task be less than 2MB per minute. For more guidance on file sizes, see our Technical Checklist.
Note: If you wish to use Image Stimuli instead of Audio stimuli you will need to use the Go/No-Go Zone.
Use Case:
The Go/No-Go (Web Audio) Zone is primarily used for implementing go/no-go experimental paradigms with audio stimuli. However this Zone is also highly applicable to Auditory search and Stimulus-Response compatibility tasks.
In the example below, the Go/No-Go (Web Audio) Zone has been set up to play an audio file named audio_stim.mp3.
We have set up the Go/No-Go (Web Audio) Zone to record a 'No Go' response as 'NoGo' (Setting 1). We have left Setting 2 as default, which means no additional wait time will be applied after the audio has finished. Lastly, we have specified in Setting 3 that the screen should wait for the full length of the audio file contained in the Go/No-Go Zone, regardless of whether the participant responds or not during the Audio play-time.
Note: The Go/No-Go (Web Audio) Zone does not have a response option built-in. Instead we have chosen to use two Response Button (Text) Zones for the participants to submit their response.
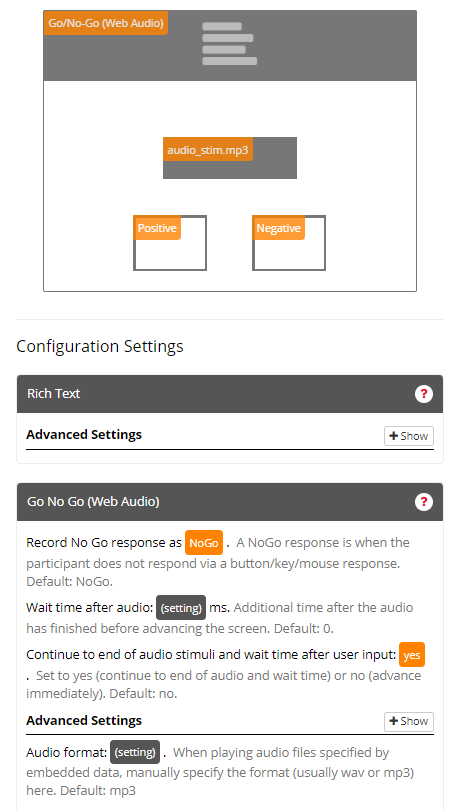
The Go/No-Go (Web Audio) Zone will produce one row in your metrics each time a No-Go response is recorded.
You can view an example of the metrics produced by the Go/No-Go (Web Audio) Zone in the image below:

Note that some metric columns have been hidden for presentation purposes.
| Column Name | Row Entry | Description |
|---|---|---|
| Zone Type | gonogo_web_audio | This is the Zone 'Type' identifier for the Go/No-Go (Web Audio) Zone in your metrics. |
| Reaction Time | [Number] | This is the reaction time in milliseconds (ms). The reaction time is recorded at the point where the screen ends after the participant has made a no-go response. |
| Response | [Text] | This will match the text you entered in Setting 1 (default 'NoGo'). |
| Correct | [1 or 0] | This indicates whether the response was marked as correct (1 if yes, 0 if no). In the image example above, NoGo did not match the correct response configured in the Active Response Settings, so the participant's no-go response has a 0 in the Correct column. |
| Incorrect | [1 or 0] | This indicates whether the response was marked as incorrect (1 if yes, 0 if no). |
1) Record response as (text) for No Go
Setting (text): Type a name which will be used to record a 'No-Go' response.
Default = none; The participants No-Go response will not be recorded.
If set to any text value: When the participant inhibits responding during a trial, the response will be recorded in the 'Response' column of your metrics as your text.
For example, if you wish to mark your participants 'No-Go' response as correct for a particular trial, then in this instance you would use 'nogo' as your correct answer value in your 'ANSWER' Column for the trial in your spreadsheet. Check out the image examples above for a demonstration of this set-up.
2) Wait time after audio (setting) ms Use this setting to add additional time after the audio has finished, before advancing the screen.
Default: 0.
3) If (yes or no) continue to end of audio stimuli after user input
Setting (yes or no): Type yes to turn setting on, Type no to turn setting off.
Default = yes (on); A users response will not instantly end the trial, instead the audio file durations are honoured in full. i.e. Regardless of whether the participant responds or not, the audio file stimuli will play to their full durations.
If set to no; then a users response will instantly end the trial and they will be advanced to the next screen within your task.
Advanced Settings
1) Audio format (filetype)
Use this setting when playing audio files specified by embedded data, to manually specify the format. This is usually .wav or.mp3
Default: .mp3
Click to view a Tutorialof the Go/No-Go (Web Audio) Zone
You're viewing the support pages for our Legacy Tooling and, as such, the information may be outdated. Now is a great time to check out our new and improved tooling, and make the move to Questionnaire Builder 2 and Task Builder 2! Our updated onboarding workshop (live or on-demand) is a good place to start.
The Go/No-Go (Video) Zone is specialised for implementing video go/no-go style experimental paradigms. This specialised Zone allows you to present a video stimuli, while allowing the recording of a 'NoGo' response or an 'inhibited' response as a named response.
How it works:
The Go/No-Go (Video) Zone differs from other response zones, which record all 'non-responses' as both 'incorrect' and 'timed-out'. Once the requisite times have elapsed and no other response has been detected, the Go/No-Go (Video) Zone will record a 'No Go' response. You can use any Active Response Zone - e.g. response button or keyboard response - to detect the 'Go' response.
Setting up the Go/No-Go Zone:
Recommended video file type: .mp4
File Size: We recommend that video files you upload to your task be less than 2MB per minute. For more guidance on file sizes, see our Technical Checklist.
You should first upload your stimuli under the Stimuli Tab of your Task and use then full file name (including file type) when referencing your Video file.
Note: If you wish to use Image Stimuli instead of Video stimuli you will need to use the Go/No-Go Zone.
Add any Active Response Zone - e.g. response button or keyboard response - to detect the 'Go' response.
Edit the Zone's Configuration Settings to set how the Go/No-Go (Video) Zone should function.
Use Case:
The Go/No-Go (Video) Zone is primarily used for implementing go/no-go experimental paradigms with video stimuli.
In the example below, the Go/No-Go (Video) Zone has been set up to play a video file named video_stim.mp4.
We have set up the Go/No-Go (Video) Zone to record a 'No Go' response as 'NoGo' (Setting 1). We have specified in Setting 2 that the screen should wait for the full length of the video file contained in the Go/No-Go Zone, regardless of whether the participant responds or not during the video play-time. Setting 3 has been left as default, which means the audio track of the video will not be muted.
Note: The Go/No-Go (Video) Zone does not have a response option built-in. Instead we have chosen to use two Response Button (Text) Zones for the participants to submit their response.

The Go/No-Go (Video) Zone will produce one row in your metrics each time a No-Go response is recorded.
You can view an example of the metrics produced by the Go/No-Go (Video) Zone in the image below:

Note that some metric columns have been hidden for presentation purposes.
| Column Name | Row Entry | Description |
|---|---|---|
| Zone Type | gonogo_video | This is the Zone 'Type' identifier for the Go/No-Go (Video) Zone in your metrics. |
| Reaction Time | [Number] | This is the reaction time in milliseconds (ms). The reaction time is recorded at the point where the screen ends after the participant has made a no-go response. |
| Response | [Text] | This will match the text you entered in Setting 1. |
| Correct | [1 or 0] | This indicates whether the response was marked as correct (1 if yes, 0 if no). In the image example above, NoGo did not match the correct response configured in the Active Response Settings, so the participant's no-go response has a 0 in the Correct column. |
| Incorrect | [1 or 0] | This indicates whether the response was marked as incorrect (1 if yes, 0 if no). |
1) Record response as (text) for No Go
Setting (text): Type a name which will be used to record a 'No-Go' response.
Default = none; The participants No-Go response will not be recorded.
If set to any text value: When the participant inhibits responding during a trial, the response will be recorded in the 'Response' column of your metrics as your text.
For example, if you wish to mark your participants 'No-Go' response as correct for a particular trial, then in this instance you would use 'nogo' as your correct answer value in your 'ANSWER' Column for the trial in your spreadsheet. See the Active Response Zone settings for more information.
2) If (setting) continue to end of video stimuli after user response.
Set to Yes to continue. Default: No.
If setting is set to Yes, the video will play till the end even after participant has responded (Go).
If set to No, the video will cut off immediately upon participant's response and the task will move onto the next screen/display.
3) If (setting) mute audio track in video.
If set to 1, the video will be muted.
If 0 (default), the video will be displayed with the sound.
Advanced Settings
1) If (setting) , provide additional metrics on video events
Choose 1 for on or 0/unset for off. Default: 0/unset.
If set to 1, you will find additional information on video events in your downloaded data. These will include:
VIDEO STARTED,
VIDEO PLAYING EVENT FIRED,
VIDEO TIMEUPDATE EVENT FIRED,
ADJUSTED START TIME based on TIMEUPDATE EVENT
You might find these useful for your analysis or might want to skip them if you only need information on participant's response (Go or No Go).
If set to 0, you will not receive these additional information regarding video events.
2) Set Video width to (setting) cm
If you wish to use this setting, you will need to include a Screen Calibration zone.
3) Set Video width to (setting) visual degrees
If you wish to use this setting, you will need to include a Screen Calibration zone.
This zone can be localised if you want to run your study in another language. For more information visit our Go/No-Go (Video) localisation guide.
Click to view an Example of a Sample Task which makes use of the Go/No-Go (Video) Zone.
You're viewing the support pages for our Legacy Tooling and, as such, the information may be outdated. Now is a great time to check out our new and improved tooling, and make the move to Questionnaire Builder 2 and Task Builder 2! Our updated onboarding workshop (live or on-demand) is a good place to start.
Keyboard Hold/Release Zone Icon
The Keyboard Hold/Release Zone is an advanced response zone which allows you to record advanced key responses, such as when a key is held down for a duration (Hold) or when a held key is released (Release).
How it works:
The Keyboard Hold/Release Zone is a unique zone which differs from standard zones in 4 ways:
The Keyboard Hold/Release Zone works by listening for the specified key 'event' once each screen. Once the event (a key held or released) has occurred the participant will be advanced to the next screen.
Setting up the Keyboard Hold/Release Zone: The exact set up of the Keyboard Hold/Release Zone will differ depending upon which operation mode you are using. The differences are highlighted in step 1 below.
In Hold mode the Zone will listen for the specified key press (configuration setting-2) and only advance the screen when the hold duration time has elapsed (configuration setting-4). When you wish to listen for 'held' key events you will need to configure all 4 settings on your Keyboard Hold/Release Zone, in order for the zone to function as required.
In Release mode the Zone will listen for the release of the specified key press (configuration setting-2) and will the screen as soon as the specified key is released. When you wish to listen for 'released' key events you will only need to configure the first 3 settings on your Keyboard Hold/Release Zone, in order for the zone to function as required.
Secondly, you will need at least 2 screens in your task, in order to set up the Keyboard Hold/Release Zone correctly. Typically, you will want to listen for the key press on one screen (Hold mode) and then listen for the release of the same key on a second screen (Release mode). In order to achieve this simply set the Keyboard Hold/Release Zone on your first screen to Hold mode by typing Hold in setting-1 of the zones configuration settings. On a later screen (either within the same display or a separate display) set up your Keyboard Hold/Release Zone to listen for a 'Release' event: Type Release into setting-1 of the zones configuration settings.
Note: You cannot listen for both a held key and a released key on the same screen. Each task screen can only be set up with one functioning Keyboard Hold/Release Zone per screen.
Use Case: The typical use case for a Keyboard Hold/Release Zone is when you wish to record advanced keyboard responses that are not just single key presses offered by the ordinary Keyboard Response Zones.
Set up for Hold mode
In the example below, the mode of the Keyboard Hold/Release Zone has been set to Hold using Setting 1.
In Setting 2, we have set up the key to be detected as 'space'. This means that the Keyboard Hold/Release Zone will listen for the space-bar to be held down.
We have set a requirement for the Hold time to be 1000 ms using Setting 4. This means that the participant is required to hold the space-bar key down for 1 second (1000ms) before the screen will advance. If the participant does not hold the space-bar key down for the required duration an alert message will show, giving instructions to the participant, indicating the required time.
Lastly, the response will be recorded in the metrics as 'Pressed', as this was the label entered into Setting 3.
Note, the Keyboard Hold/Release Zone will only record a response once the key has been held for the specified length of time (in this case 1000ms). Attempts at holding the specified key for anything less than the full amount will not be recorded by this zone.
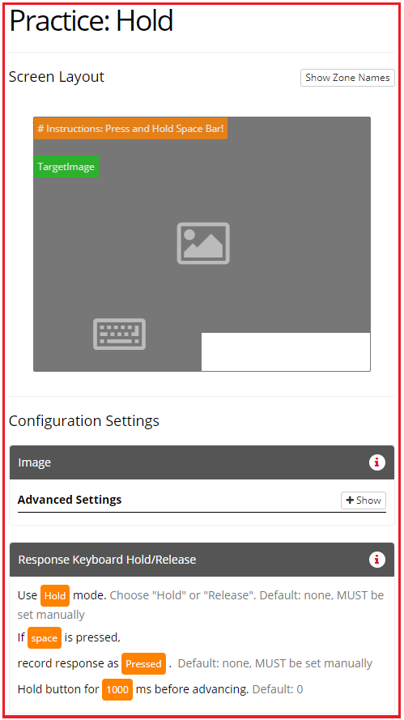
Set up for Release mode
In the example below, the mode of the Keyboard Hold/Release Zone has been set to Release using Setting 1.
In Setting 2, we have set up the key to be detected as 'space'. This means that the Keyboard Hold/Release Zone will listen for the space-bar being lifted (i.e. no longer held).
Lastly, the response will be recorded in the metrics as 'Released', as this was the label entered into Setting 3.
Note that Release mode does not make use of Setting 4, so this has been left unset.
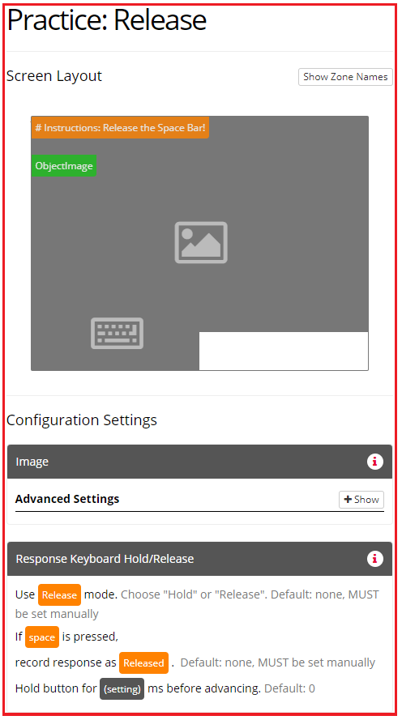
The Keyboard Hold/Release Zone will produce one row in your metrics.
You can view an example of the metrics produced by the Keyboard Hold/Release Zone in the image below:

Note that some metric columns have been hidden for presentation purposes.
| Column Name | Row Entry | Description |
|---|---|---|
| Zone Type | response_keyboard_hold_release | This is the Zone 'Type' identifier for the Keyboard Hold/Release Zone in your metrics. |
| Reaction Time | [Number] | This is the reaction time in milliseconds (ms). If the Keyboard Hold/Release Zone has been set to 'Hold' Mode, then this number represents the time, in ms, at which the zone successfully recorded a 'held' key press. If the Keyboard Hold/Release Zone has been set to 'Release' Mode, then this number represents the time, in ms, at which the participant released the 'held' key. |
| Response | [Text] | This will match the text you entered in Setting 3. |
1) Use (Hold or Release) mode (either 'Hold' or 'Release') [Mandatory]
Setting (Hold or Release): Type either 'Hold' or 'Release' to choose the operation mode for the Zone. Default = none; The Zone is not set to any mode and will not listen for key presses or key releases.
If set to Hold; the Zone will listen for 'Held' key presses of the key specified in setting-2.
If set to Release; the Zone will listen for 'Released' key presses of the key specified in setting-2.
2) If (key) is pressed
Setting (key): Type the key mapping to be used for the response. Default = None; No key is mapped to the Response Zone.
To map a key to a response: Enter the letter of the key you wish to detect (e.g. a for the A key). Alternatively, use any of the following special key mappings:
3) Record response as (text)
Setting (text): Type the name-label you wish to be assigned as the recorded response identifier. Default = none; the reaction time response will be recorded but there will be no response identifier recorded.
If set this name-label is what will be recorded in the metrics, if this key is pressed/release as a response by a participant.
4) Hold button for (number) ms before advancing
Setting (number): Type a numerical value for the amount of time, in milliseconds (ms), the key should be held for before the screen will advance. Default = 0; The screen will advance immediately upon the required key being pressed. This will act like the regular keyboard response zone.
If set, the key must be held for the specified length of time, in milliseconds (ms), before the screen will advance. If the participant releases the key before the required time has elapsed an alert message will be displayed asking the participant to keep the key pressed.
This zone can be localised if you want to run your study in another language. For more information visit our Keyboard Hold/Release localisation guide.
Click to view a Tutorial of the Keyboard Hold/Release Zone.
Click to view an Example of the Keyboard Hold/Release Zone in a Task.
Click to view a Demo of an Experiment which contains the Keyboard Hold/Release Zone Task game.
You're viewing the support pages for our Legacy Tooling and, as such, the information may be outdated. Now is a great time to check out our new and improved tooling, and make the move to Questionnaire Builder 2 and Task Builder 2! Our updated onboarding workshop (live or on-demand) is a good place to start.
This zone is in BETA. Use at your own risk and please report any issues promptly.
The AAT Zone allows participants to move an image on the screen using their arrow keys. It is designed for use in Approach Avoidance Tasks.
The illusion of an increase or decrease in distance towards the object is supported by a zooming effect, which occurs when participants move the image using the up and down arrow keys. Alternatively, the AAT Zone can be configured so that participants move the image sideways using their left and right arrow keys.
How it works:
Add an AAT Zone to your task and then set its value to be an image you have uploaded in your stimuli. You can either set the image as static content, so that the same image is always presented, or set the image to change using your task spreadsheet or a manipulation.
When you download your data, you will receive information on all the arrow key responses participants have made, with the reaction time for each.
In the example below, the AAT Zone has been set up to display an image named kitten.jpg.
We have set up the AAT Zone to use the default mode of moving the image up and down with zooming effect (Setting 1). Using Setting 2, we have set up practice trials, so the participant will see feedback during the trial. The feedback text that will be shown if the participant presses the wrong direction key will be 'Wrong!' (Setting 3). Finally, the correct direction, UP, is configured in Active Response Setting 1.

The AAT Zone will produce one row in your metrics each time the participant presses a relevant direction key (UP or DOWN for default mode, or LEFT or RIGHT for neutral mode).
You can view an example of the metrics produced by the AAT Zone in the image below:

Note that some metric columns have been hidden for presentation purposes.
| Column Name | Row Entry | Description |
|---|---|---|
| Zone Type | aat | This is the Zone 'Type' identifier for the AAT Zone in your metrics. |
| Reaction Time | [Number] | This is the reaction time in milliseconds (ms). The reaction time is recorded at the point where the participant presses the key. |
| Response | [UP or DOWN or LEFT or RIGHT] [Number] | This indicates the apparent position of the image, relative to its original position. For example, UP 2 means the participant has pressed the UP key twice in sequence after the beginning of the screen, causing the image to become 2 sizes smaller, or 2 steps further away. |
| Response | START | If the participant's most recent keypress has returned the image to its original position/size, the Response column will contain the text START. |
| Attempt | [Number] | This indicates the number of times the participant has pressed a relevant direction key on this trial. |
| Correct | [1 or 0] | This indicates whether the response was marked as correct (1 if yes, 0 if no). The correct response is defined in Active Response Setting 1. |
| Incorrect | [1 or 0] | This indicates whether the response was marked as incorrect (1 if yes, 0 if no). |
1) Run as neutral trials (yes, no)
Default = no; image can be moved up and down with zooming effect.
If set to yes, images can be moved left and right (with no zooming effect) rather than up and down.
2) Run as practice trials (yes, no)
Default = no; feedback will not be displayed
If set to yes, feedback will be displayed during the trial.
3) Feedback text (yes, no)
Default = incorrect; the text displayed on an incorrect answer will be 'incorrect'.
If set to any other value, that text will be displayed instead.
4) Feedback text size ()px
Default = 14; text will be displayed at a size of 14px
If set to any other number, text will be displayed at that pixel size instead.
You're viewing the support pages for our Legacy Tooling and, as such, the information may be outdated. Now is a great time to check out our new and improved tooling, and make the move to Questionnaire Builder 2 and Task Builder 2! Our updated onboarding workshop (live or on-demand) is a good place to start.
This zone is in BETA. Use at your own risk and please report any issues promptly.
KNOWN ISSUES
Delay in recording start
There is a delay between Gorilla making the request for the microphone to begin recording and the microphone actually starting data collection. This can cause the beginning of a participants audio response to be cut off. The length of the delay varies between devices and participants depending on hardware configurations, though is usually consistent within a participant. Currently, there is no method for determining how long the delay is/was.
We recommend building-in this to delay to your task design. If your stimuli appear on the same screen as the audio recording, delay the appearance of the stimuli. If the audio recording occurs on a separate screen, delay the appearance of a prompt to start speaking. In both cases, the delay can be achieved via script (example here) and we currently recommend a delay between 500-1500 ms.
Corrupted recording/ID MISMATCH error
The audio recording zone needs to fully close and begin the uploading process on the audio at the end of each Screen. Currently, if any zone other than the Audio Recording zone ends the screen, this can result in the audio recording either becoming corrupted (losing the current recording). or, the next recording can be disrupted by the previous recording still finishing, which can result in both recordings being lost (and the error ID MISMATCH appearing in the metrics).
We recommend designing your task around this limitation by making sure the audio recording zone ends the screen, either by using the inbuilt audio recording timer (as a direct replacement for a Timelimit (Screen) or the Stop Recording button (as a direct replacement for the Continue Button). Note that you can change the text on this button via the localisation settings.
If it isn't possible to rework your task in this manner, you can delay the action of the zone responsible for advancing the script. This can only be achieved via script. You can find two examples of this here and here.
FUTURE PLANS
We have currently exhausted all, readily available options for resolving either of the above issues within the code. We encourage users to move to Task Builder 2 for our newer Audio Recording functionality which also allows you to record up to 20mins of audio per recording.
Audio Recording Zone Icon:
The Audio Recording Zone allows you to record audio from your participants by utilising the participant’s microphone.
Note: The participant must accept the microphone permission notification that appears in their browser for this zone to function correctly.
The image below shows the Audio Recording Zone set to test Mode - Setting 1 is set to test.
Setting 5 has been set to 3000ms, meaning the participant test recordings will be limited to 3s. Once the participant has recorded an initial microphone check, the audio will be played back to the participant. They will then be given the option to replay back the audio again or re-record the audio.
Notice that in test mode, we need to provide a way for participants to manually advance the screen. We have therefore included a continue button (manual advancement zone) on this screen to allow participants to advance the screen once they have finished testing their microphone recording set up.
We recommend including instructions on the test screen to explain to your participants the behaviour they should expect from the Audio Recording Zone in test mode.
Settings 2,3, and 4 are not used in test mode, therefore these settings are left empty and unset.
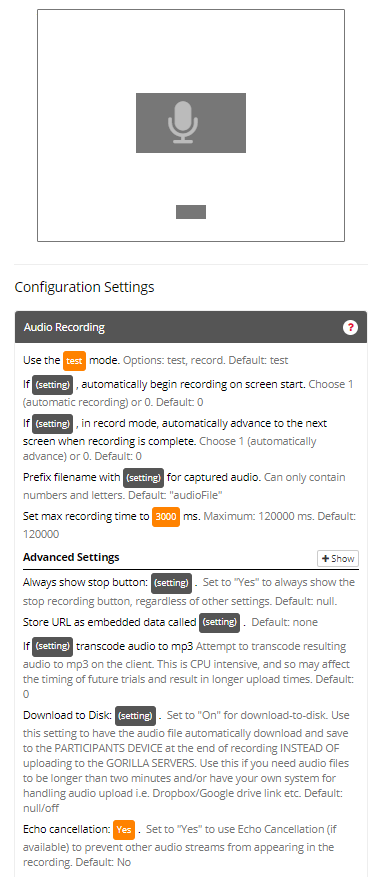
The Audio Recording Zone will produce four rows in your metrics each time an audio file is recorded.
You can view an example of the metrics produced by the Audio Recording Zone in the image below:
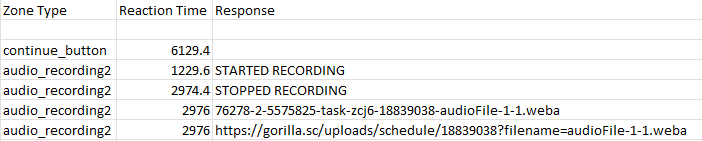
Note that some metric columns have been hidden for presentation purposes.
| Column Name | Row Entry | Description |
|---|---|---|
| Zone Type | audio_recording2 | This is the Zone 'Type' identifier for the Audio Recording Zone in your metrics. |
| Reaction Time | [Number] | This is the reaction time in milliseconds (ms). The reaction time is recorded when recording starts (where the Response column contains the text STARTED RECORDING) and when recording ends (where the Response column contains the text STOPPED RECORDING). |
| Response | [Filename] | This is the filename of the audio recording. If you have downloaded your metrics after running an experiment, you will find this file in the uploads folder included in your downloaded data. If you have downloaded your metrics from a task preview, you can access the file using the URL in the following row. |
| Response | [URL] | This is the URL link which if pasted into a browser will allow you to download the corresponding audio recording. When previewing your task, this is how you can access your audio recordings. |
Accessing audio files (in preview mode): When previewing a task, your audio files can be accessed via a URL placed in the metrics. After the preview has finished, download the data and find the URL in this file.
Accessing audio files (in full experiment): When running a full experiment, all of the audio files can be accessed from the 'Download Experiment Data' button on your Experiment's Data page. The zip folder with all your metrics data will include an 'Uploads' folder, containing all of your audio files.
Getting speech onset times: Sometimes, you need to get the speech onset latency estimates for recorded audio files. The automated tool Chronset could help you doing this for several audio files at once.
Setting up the Audio Recording Zone: The Audio Recording Zone has two modes of operation:
Edit Configuration Setting-1 to set the mode for the Audio Recording Zone. Both modes should be used at least once within your task.
Setting up 'test' Mode: To set up the Audio Recording Zone in test mode:
Note that 'test' mode records no metrics, embedded data nor saves the audio recording. Instead this mode allows the participant to instantly play back their recorded audio in order to make sure their voice can be heard and their microphone is working.
We recommend using 'test' mode at least once in your task to allow your participants to check the audio recording is working correctly with their microphone before advancing with your task.
Setting up 'record' Mode: To set up the Audio Recording Zone in record mode:
Use Case: Use the Audio Recording Zone when you need to record a participant's voice as part of a Task. This can be particularly useful for language studies.
1) Use the (test or record) mode (choose 'test' or 'record')
Setting (test or record): Type either test or record to choose the operation mode for the Zone. Default = test; If no mode is set the Audio Recording Zone will default to the 'test' mode.
Test: In test mode the Audio Recording Zone will record audio, and allow the participant to replay the audio to check that their microphone is functioning correctly. Test mode records no metrics.
Record: In record mode the Audio Recording Zone will record participant audio and return the recorded audio to the Audio Recording Zone Metrics.
2) If (1 or 0) automatically begin recording on screen start.
Setting (1 or 0): Type either 1 to turn the setting on, or 0 to turn the setting off. Default = 0; By default, the Audio Recording Zone will begin recording when the 'Start Recording' button is pressed.
If set to 1; The Audio Recording Zone will begin recording when the screen starts.
If set to 0; The Audio Recording Zone will only begin recording when the 'Start Recording' is pressed.
3) If (1 or 0) automatically advance to the next screen when recording is complete.
Setting (1 or 0): Type either 1 to turn the setting on, or 0 to turn the setting off. Default = 1; By default, the Audio Recording Zone will automatically advance to the next screen when either the 'Stop Recording' button is pressed or the maximum recording time is reached (Configuration Setting-5).
Note: If set to 0, The screen will not advance when the participant has finished recording nor when the maximum recording time has been reached. Instead, you must also include an advancement zone (e.g. Continue Button or Timelimit (screen) Zone) or response zone on the same screen so that participants can advance the screen manually.
4) Prefix filename with (text) for captured audio
Setting (text): Type a name to identify the recorded audio file. Default = audioFile; By default, the Audio Recording Zone will produce an audio file with the filename audioFile-1-3, or similar.
If set to any text string; this changes the filename of the recorded audio file e.g. if set to TaskAudio, the file will be named TaskAudio-1-3.
Note: only use alpha-numeric characters in your file names. Do not use special characters as this could prevent you from retrieving data files.
You will likely wish to use this setting with spreadsheet 'source' if you wish to uniquely identify your recorded audio files on a 'per-trial' basis.
5) Set max recording time to (number) ms (Maximum: 120000 ms, i.e. 2min)
Setting (number): Type a duration in milliseconds (ms) to set the maximum recording time. Default = 120000; By default, the maximum recording time equals the allowed maximum of 120000 milliseconds (2 minutes).
When set, this restricts the length of an audio recording to the number of milliseconds you enter. Once the maximum recording time has been reached the Audio Recording Zone will stop recording. Maximum possible recording length is 120000 ms (2 minutes). If you need to record for longer than 2 minutes, use Setting-9 below.
This setting is particularly useful when you have set the screen to auto-record and auto-advance, as it stops the recording at the duration set allowing the screen to progress at a set time.
Advanced Settings
6) Always show stop button
Setting (text): Type Yes to always show the 'Stop Recording' button, regardless of other settings. For example, by default, if you specify a max recording time using Setting-5, the 'Stop recording' button will not be shown. You can override this default and show the 'Stop recording' button by typing Yes for this setting.
7) Store URL as embedded data called (text)
Setting (text): Type a key-name for the embedded data. Default = none; No key is created, no embedded data is stored.
If set to any text-string, this will store the recorded audio as embedded data under the given key name.
You can then retrieve this audio file later using this key name. Enter your key name as embedded data - e.g. $${myEmbeddedDataKeyName} - into a Web Audio Zone to replay the recorded audio back to the participant.
Note: Audio embedded data cannot be retrieved on a screen directly after it is recorded. There must be an intermediary screen of at least 550ms.
8) If (1 or 0) transcode audio to mp3
Setting (1 or 0): Type either 1 to turn the setting on, or 0 to turn the setting off. By default, the Audio Recording Zone will not transcode audio to mp3. Audio will be saved in .weba format.
Note: turning this setting on can be CPU intensive and may affect the timing of future trials or result in longer upload times.
9) Download to Disk
Setting (text): Type On to have the audio file automatically download and save to disk at the end of recording, instead of uploading to the Gorilla servers. By default, the Audio Recording Zone will upload recorded files to the Gorilla servers instead of downloading to disk.
This setting is useful if you need audio files to be longer than two minutes.
10) Echo cancellation
Setting (Yes or No): Type either a Yes to use Echo Cancellation (if available) or a No to turn the setting off. By default, it is off.
This setting is useful if you want to prevent other audio streams (such as from an Audio or Video zone) from entering a participant's audio recording.
This zone can be localised if you want to run your study in another language. For more information visit our Audio Recording localisation guide.
Click to view a Tutorial of the Audio Recording Zone.
Click to view an Example of a Sample Task which makes use of the Audio Recording Zone.
You can try out the Audio Recording Zone as a participant by taking our Demo
For insights and top tips from real researchers, check out our Gorilla Presents webinar on running audio recording and speech production studies online!
You're viewing the support pages for our Legacy Tooling and, as such, the information may be outdated. Now is a great time to check out our new and improved tooling, and make the move to Questionnaire Builder 2 and Task Builder 2! Our updated onboarding workshop (live or on-demand) is a good place to start.
This zone is in BETA. Use at your own risk and please report any issues promptly.
Canvas Painting Zone Icon:
The Canvas Painting Zone adds an interactive image zone to your screen which allows participants to paint over the provided image using a selection of colours of your choice.
The Canvas Painting Zone is an advanced zone which differs from its simpler counterpart the Click Painting Zone in 3 ways:
Under the bonnet the Canvas Painting Zone utilises HTML5 Canvas elements to create the interactive zone for your participants to draw on using their mouse.
The Canvas Painting Zone presents your uploaded image to the participants along with a panel of colour options below. The participant is then free to draw over the image using any of the provided colours.
Once the screen advances the entire canvas will be saved and uploaded to our servers as an image file.
In the configuration example below, you can see an implementation of a 'free-draw' paradigm: Participants are asked to replicate the cat image on the left using the Canvas Painting Zone on the right.
The Canvas Painting Zone has been set up to use a 'blank' canvas. You can see that the Canvas Painting Zone Content is set to display an image called 'white_blackFrame.png' - a white image with a black border.
We have set our Paint Brush Size to 20 using Setting 2, which means the size of the paint brush will be a 20 pixel by 20 pixel square.
We have used Setting 3 to set the maximum possible number of colour options of 15. We have arranged the RGB colour codes into an order to create a colour progression.
Setting 1 is left as the default 'canvas_paint'.
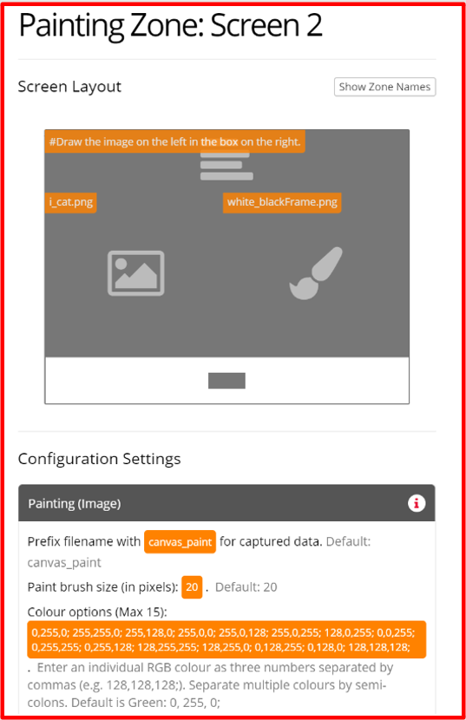
The Canvas Painting Zone will produce two rows in your metrics on each trial.
You can view an example of the metrics produced by the Canvas Painting Zone in the image below:

Note that some metric columns have been hidden for presentation purposes.
| Column Name | Row Entry | Description |
|---|---|---|
| Zone Type | canvas_painting | This is the Zone 'Type' identifier for the Canvas Painting Zone in your metrics. |
| Response | [Filename] | This is the filename of the Canvas Painting file for this trial. If you have downloaded your metrics after running an experiment, you will find this file in the uploads folder included in your downloaded data. If you have downloaded your metrics from a task preview, you can access the file using the URL in the following row. |
| Response | [URL] | This is the URL link which if pasted into a browser will allow you to download the corresponding Canvas Painting file. When previewing your task, this is how you can access your participants' Canvas Paintings. |
Accessing Canvas Painting data files (in preview mode): When previewing a task, your additional files can be accessed via a URL placed in the metrics. After the preview has finished, download the data and find the URL in this file.
Accessing Canvas Painting data files (in full experiment): When running a full experiment, all of the additional files can be accessed from the 'Download Experiment Data' button on your Experiment's Data page. The zip folder with all your metrics data will include an 'Uploads' folder, containing all of your additional files.
Canvas Painting Zone Set up:
Supported Image types: .png, .jpg, and .jpeg. Remember you will need to upload your image stimuli in the Stimuli Tab for your task.
Canvas Painting Presentation Size: Just like the Image Zone, the Canvas Painting Zone requires an uploaded image to function. The size of the painting area will be the same size as the uploaded image.
If the uploaded image is larger than the size of the zone itself it will be resized to fit the zone, while maintaining the exact aspect ratio. These are the exact same rules that apply to Images uploaded to an Image Zone, for full details of all the resizing rules and behaviour please refer to the Image Zone documentation.
If your canvas appears too small: We recommend first to maximise the size of your Canvas Painting Zone within your screen's design. Then check the dimensions (width and height) of your uploaded image - increase the size of the original image and you will see your canvas size increase.
Using a Blank Canvas: If you wish to present a blank canvas to the participant, simply upload a blank, white or plain coloured image to the Canvas Painting Zone.
Use Case:
Use the Canvas Painting Zone when you wish your participants to highlight, indicate or otherwise free draw over a specified image.
For Example:
1 ) Prefix filename with (text) for captured data.
Setting (text): Type a name to identify the canvas_painting image file. Default prefix: canvas_paint The full default file name will be: task-NODEKEY-XXXXXX-canvas_paint-A-B
If set to any text string; The text highlighted in bold, in the default filenames above, will be replaced with your chosen filename.
Note: only use alpha-numeric characters in your file names. Do not use special characters as this could prevent you from retrieving data files.
You will likely wish to use this setting with spreadsheet 'source' if you wish to uniquely identify your canvas painting images on a 'per-trial' basis.
Review the metrics section above for details on the default file name structure.
2) Paint brush size (in pixels): (number).
Setting (number): Type a number to set the pixel size of the paint brush. Default = 20; By default, the paint bush size will be a 20 x 20 pixel square.
If set to any number, the paint brush size will be created with a length and height matching the set value. i.e. if set to 10 the brush size will be a 10 x 10 pixel square, if set to 25 the brush size will be a 25 x 25 pixel square.
3) Colour options (Max 15): (RGB colour value).
Setting (RGB colour value): Type up to 15 RGB colour values separated by semicolons. Default = 0,255,0; (green); By default, the participant will be presented with one colour option for the brush which is RGB value '0,255,0;' representing the colour green.
Enter an individual RGB colour as three numbers separated by commas (e.g. 128,128,128;).
You can set up to 15 individual colours to form a colour palette for your participant to select from. Separate multiple colours by semi-colons. The colour palette will appear at the bottom of the Canvas, allowing participants to select the colour they wish to paint with.
See the image example above for more details on setting multiple colours including how this appears to the participant.
You can try out the Canvas Painting Zone as a participant by taking our Canvas Painting Zone Demo
Click to view a Tutorial of the Canvas Painting Zone
Click to view an Example of a Sample Task using the Canvas Painting Zone
You're viewing the support pages for our Legacy Tooling and, as such, the information may be outdated. Now is a great time to check out our new and improved tooling, and make the move to Questionnaire Builder 2 and Task Builder 2! Our updated onboarding workshop (live or on-demand) is a good place to start.
Click Painting (Video) Zone Icon:
The Click Painting (Video) Zone adds an interactive video zone to your screen which allows participants to click on the video, placing a coloured dot at the click location.
The demo and example tasks for this zone are currently in development. They will be added here in the future.
The Click Painting (Video) Zone provides a single input for the video the participant is to mark with dots.
When a participant clicks on the video in the click painting zone, the reaction time and the (x,y) coordinates of the click within the video are recorded in the metrics for the screen. A dot is visibly placed on the screen, centred where the participant clicked. This dot will persist until the maximum number of clicks is reached.
It is important to note that the (x,y) coordinates take into account the scaling of the video: they will always represent the equivalent location on the source video. The x coordinate represents the pixel distance of the click location from the left side of the video at its original size. The y coordinate represents the pixel distance of the click location from the top side of the video at its original size. The size of the dot does not affect the coordinates.
If you want the video to be presented to participants at a particular size, you can use the Click Painting (Video) Zone in combination with the Screen Calibration Zone. See set up section below for more information.
You can optionally mark particular regions of the video as correct click locations, using Click Scoring Regions. For more information, see the set up section below.
Setting up a Click Painting (Video) Zone:
Note that the (x,y) coordinates take into account the scaling of the video. If the source video is larger than the available zone; Gorilla will automatically shrink (rescale) the video to fit the available area. The click coordinates recorded in the metrics take this rescaling into account and will represent the equivalent location on the source video.
Use Case: Use the Click Painting Zone when you want participants to locate or identify an object or feature within a video and need to obtain position metrics (x and y coordinates) for the click locations. Optionally, you can also designate a particular region or regions of the video where you want clicks to be automatically scored as correct.
In the example below, the Click Painting (Video) Zone has been set up to show a video 'sample.mp4', which is set as the static content for this Click Painting (Video) Zone.
The number of clicks has been limited to 2 using Configuration Setting-1. This means the participant will only be allowed to click twice on this video.
The dot colour and size has been configured using Configuration Setting-2 and 3 respectively. From these settings we can see that a 20px red dot will be displayed at the point where the participant clicks.
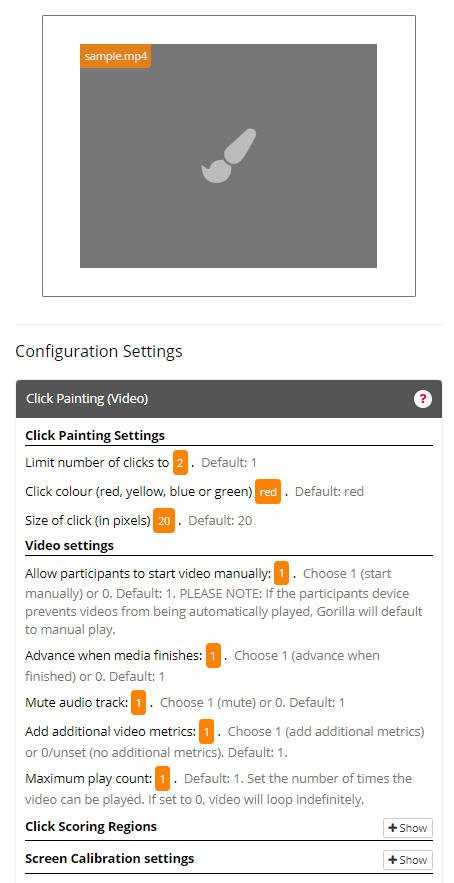
The Click Painting (Video) Zone will produce one row in your metrics for each click on the click painting zone the participant makes, up to the limit set in Configuration Setting-1.
The zone will produce one additional row in your metrics to indicate if, and when, the click limit is reached.
You can view an example of the metrics produced by the Click Painting (Video) Zone in the image below:
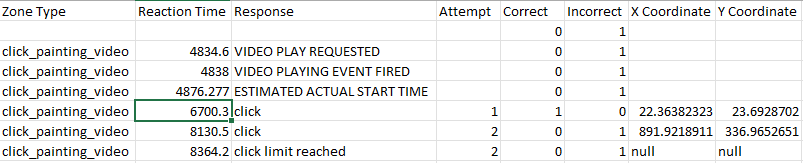
Note that some metric columns have been hidden for presentation purposes.
| Column Name | Row Entry | Description |
|---|---|---|
| Zone Type | click_painting_video | This is the Zone 'Type' identifier for the Click Painting (Video) Zone. |
| Reaction Time | [Number] | This is the reaction time in milliseconds (ms). The reaction time is recorded at the point the participant clicks on the video in the Click Painting (Video) Zone. |
| Response | click | This indicates that the participant clicked on the video in the Click Painting (Video) Zone. |
| Response | click limit reached | This indicates that the click limit set in Configuration Setting-1 has been reached. The Participant has performed the maximum number of available clicks on the Click Painting (Video) Zone. |
| Correct | [1 or 0] | This indicates whether the click fell into one of the regions defined in the Click Scoring Regions settings (1 if yes, 0 if no). |
| Incorrect | [1 or 0] | This indicates whether the click fell into one of the regions defined in the Click Scoring Regions settings (1 if no, 0 if yes). |
| Attempt | [Number] e.g. 1, 2, etc | This indicates the number of times the participant has clicked on the Click Painting (Video) Zone. |
| X Coordinate | [Number] e.g. 53, etc | This indicates the x-coordinate for the position of the participant's click on the Click Painting (Video) Zone. Note that the coordinate system origin point (0,0) is the top-left corner of the video. |
| Y Coordinate | [Number] e.g. 87, etc | This indicates the y-coordinate for the position of the participant's click on the Click Painting (Video) Zone. Note that the coordinate system origin point (0,0) is the top-left corner of the video. |
1) Limit number of clicks to (number)
Setting (number): Type a number to set the number of times a participant needs to click on the video. Default = 1. By default, participants will only be allowed to click once on the video.
Once the participant has clicked on the video the specified number of times, Gorilla will automatically advance the participant to the next screen.
After the last click a wait time of 250ms is implemented: This allows the participant to view the position of their last click before being moved on to the next screen.
Only clicks on the click painting zone will be recorded.
2) Click colour (red, yellow, blue or green) (string) [Mandatory]
Setting (string): Type the name, chosen from the available options (red, yellow, blue or green), for the colour you wish the dot to be.
Default = red.
When the participant clicks on the video a dot will appear, centred at the position where the participant clicked.
The dots will stay upon the video until the click limit is reached.
3) Size of click (in pixels) (number)
Setting (number): Type a number to set the pixel size of the dot to be. Default = 20: if this setting is not configured, the dot will be 20 pixels in size.
Set to a number, which represents the size, in pixels, of the dot which appear on the video at the location the participant clicks.
Note that the (x,y) coordinates, recorded in your metrics, will always represent the centre of the dot. As the centre of the dot is the co-ordinates used, the dot size will not affect your data.
Video settings
4) Allow participants to start video manually (1 or 0)
Setting (1 or 0): Type either 1 if you want the participant to click to start the video manually, or 0 if you want the video to start automatically when the screen starts.
Default = 1; by default, the participant will have to start the video manually.
5) Advance when media finishes (1 or 0)
Setting (1 or 0): Type either 1 if you want the screen to advance when the video has finished, or 0 if not.
Default: 1; by default, the screen will advance when the video has finished, even if the maximum number of clicks has not yet been reached.
Note that once the maximum number of clicks has been reached, the screen will advance even if the video has not finished playing.
6) Mute audio track (1 or 0)
Setting (1 or 0): Type either 1 if you want the audio track of the video to be muted, or 0 if you want the audio track to play.
Default: 1; by default, the audio track of any video displayed in a Click Painting (Video) Zone will be muted.
7) Add additional video metrics (1 or 0)
Setting (1 or 0): Type either 1 if you want to record additional metrics related to the video, or 0 if you do not want to record these additional metrics.
Default: 1; by default, additional video metrics will be recorded.
8) Maximum play count (number)
Setting (number): Type the number of times you want to allow the video to be played. If set to 0, the video will loop indefinitely until the maximum number of clicks is reached.
Default: 1; by default, the video will play once.
Click Scoring Regions
9) Scoring regions (list of pixel values)
Setting (list of pixel values): Type a comma-separated list of 5 pixel values defining the left, top, right, and bottom boundaries of the click scoring region. The fifth value is the tolerance, in pixels, for this region. The tolerance defines the distance in pixels outside each boundary that a click can fall and still be considered correct. Clicks that fall within the region defined by the boundaries plus the tolerance will be automatically marked as correct. If you wish to define multiple regions, type multiple sets of 5 values and separate the sets with semi-colons.
Default = none; by default, no regions will be marked as correct.
The top left of the video is 0,0. Therefore, a region encompassing a 100-pixel square at the top left of the video, with a 20-pixel tolerance, would be defined as follows: 0,0,100,100,20.
Screen Calibration Settings
10) Set image width to (number) cm
Setting (number): Type the number of cm you want to set the width of the Click Painting video to. To use this setting, you will need to include a Screen Calibration Zone earlier in your task.
Default = none; by default, the video will be scaled automatically according to Gorilla's defaults.
11) Set image width to (number) visual degrees
Setting (number): Type the number of visual degrees you want to set the width of the Click Painting video to. To use this setting, you will need to include a Screen Calibration Zone earlier in your task.
Default = none; by default, the video will be scaled automatically according to Gorilla's defaults.
Click to view a Tutorial of the Click Painting (Video) Zone.
You're viewing the support pages for our Legacy Tooling and, as such, the information may be outdated. Now is a great time to check out our new and improved tooling, and make the move to Questionnaire Builder 2 and Task Builder 2! Our updated onboarding workshop (live or on-demand) is a good place to start.
This zone is in BETA. Use at your own risk and please report any issues promptly.
Gabor Patch Zone Icon:
The Gabor Patch Zone is an advanced zone which generates a gabor patch on the screen for your participant following the criteria set out in the zones configuration settings and the values obtained from a Screen Calibration Zone.
The Gabor Patch Zone is unique content Zone that differs from other zones in that it is dependant on the use of another zone: The Screen Calibration Zone.
It is Mandatory to use the Screen Calibration Zone at least once in the same task as the Gabor Patch. And the Screen Calibration Zone must be presented to the participant before the Gabor Patch Zone is reached.
The Gabor Patch Zone uses information generated about visual degrees by the Screen Calibration Zone and the internal Gabor Patch configuration settings to generate and present a Gabor Patch to the participants.
The mandatory use of the Screen Calibration Zone allows the Gabor Patch to be accurately generated in the visual degrees on the user's screen. If the participant does not interact with the Screen Calibration Zone prior to meeting the Gabor Patch Zone, a Gabor Patch will not be generated.
Setting up a Gabor Patch Zone:
First you must add a Screen Calibration Zone to your Task Structure. You can read more about setting up a Screen Calibration Zone here. Here we will mention only the specifics related to setting up a Gabor Patch Zone.
Once the Screen Calibration Zone is set up correctly you can now add and set up your Gabor Patch Zones and see them working straight away.
There are three types of patch to choose from:
Next configure the general configuration settings: For all patch types there are 6 general configuration settings, if no settings are configured the default values will be used. See the configuration settings section below for the details.
Finally, if you have chosen a patch type of either 'Rotation' or 'Phase', there are 3 additional configuration settings. These are found under the Rotating and Phase Specific Settings section. Press the + show button to expand and edit these options.
Use Case: Gabor patches or Gabor features are a great way to present various orientations to your research participants.
These stimuli are often used for visual perception research, where the standard for presenting stimuli is to use ‘visual degrees’ or ‘visual angle’ as a measurement of size.
In the example below, the Gabor Patch Zone has been set up to generate the 'Static' Patch Type using Setting 1.
As the Patch Type is Static, we do not need to use any of the Rotation or Phase specific settings, so configuration settings 7, 8 and 9 have been left as their defaults.
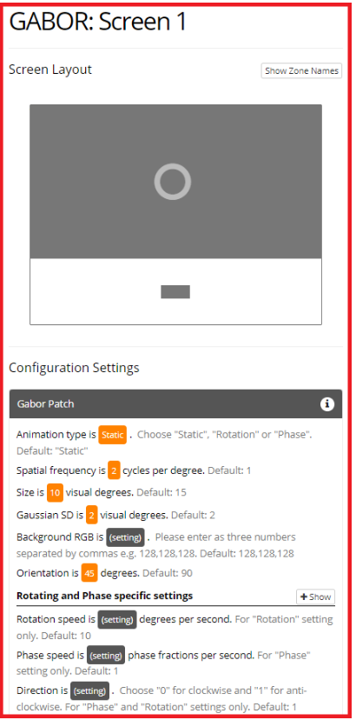
The image below (not to scale) shows the Gabor Patch produced by the setup shown in the example above:
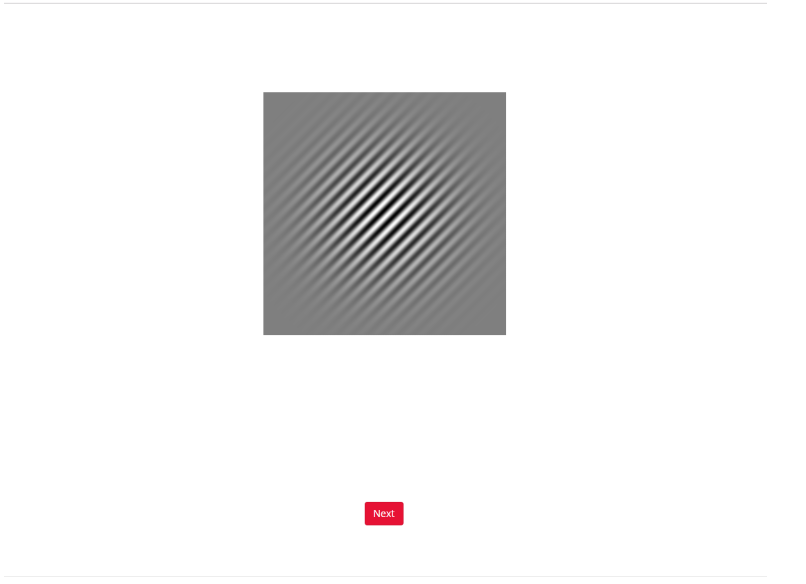
Note the Gabor Patch Zone does not produce any unique Metrics.
1) Animation type is (choose 'Static', 'Rotation' or 'Phase')
Setting (Static or Rotation or Phase): Type either 'Static', 'Rotation' or 'Phase' to choose the Patch Type for the Zone. Default = Static; The Gabor Patch type produced will be a static image with a fixed orientation and phase.
Static - This type of Gabor Patch produces a static image with a fixed orientation and phase. Rotation - This type of Gabor Patch produces an image with a cycling orientation, so the patch rotates in place. Phase - This type of Gabor Patch produces an image where the phase changes, so the lines appear to move in a single direction.
2) Spatial frequency is (number) cycles per degree
Setting (number): Type an integer (whole number) to represent the number of cycles per visual degree on screen. Default = 1; represents a spatial frequency of 1 cycle per visual degree.
This determines the number of cycles per visual degree on screen. The number of cycles per visual degree determines how many oriented lines will be visible within the patch, and the width of these lines. The higher this value, the more lines are displayed and the more compact they will be.
You can choose any positive integer for this (so 1 not 1.2 or 0.8) if you do use a decimal number it will be rounded down to an integer.
3) Size is (number) visual degrees.
Setting (number): Type a whole number to set size of the patch in visual degrees. Default = 15; The Gabor patch will be displayed as a square of size 15 VD (visual degrees).
This determines the size, in visual degrees, that the Gabor Patch will appear on the participants screen. Note Gabor Patches will always be square so the size determines both it's height and width.
4) Gaussian SD is (number) visual degrees.
Setting (number): Type a number to set the size of the Gaussian Window in visual degrees. Default = 2; The Standard Deviation of the Gaussian Window imposed over the patch will be 2 Visual Degrees.
This setting controls the size and 'blurriness' of the Gaussian 'window' imposed over the patch. This window appears as a circular view port with a blurry edge.
The standard deviation of this window (sized in visual degrees) determines how large and blurry the window's edge will be - a higher number will lead to a larger and more blurred edge.
Note the minimum window that can be imposed is 1 VD.
5) Background RGB is (RGB color code).
Setting (number): Enter a background colour as a RGB color code. Default = 128,128,128; The Gabor patch background colour will be Grey as determined by the RGB color code 128,128,128.
This determines the background colour for the Gabor Patch which will appear behind the Gabor Patch.
You must set the color using an RGB color code where each Red, Green and Blue value is separated using a comma (','). (e.g. 128,128,128)
Note that an individual RGB value will always be a single number between 0 and 255.
6) Orientation is (number) degrees.
Setting (number): Type a number of degrees to determine the orientation of the patch lines. Default = 90; The orientation of the lines in the Gabor Patch will be at 90 degrees or vertical.
This determines the orientation of the Gabor Patch, in degrees. This is most noticeable as determining the initial direction the lines of Gabor Patch appear to be orientated.
Rotating and Phase specific settings
7) Rotation Speed is (number) degrees per second. [Rotation Patch Type Only]
Setting (number): Type a number of angular degrees for the rotation speed. Default = 10; The patch will rotate at 10 angular degrees per second.
Rotation Speed determines how fast the patch rotates. The number set represents the Rotation Speed in angular degrees per second. Or else described as the angle the patch will change per second.
The higher the Rotation Speed the faster the patch will appear to rotate. Note Patches rotate about their center point.
8) Phase speed is (number) phase fractions per second. [Phase Patch Type Only]
Setting (number): Type a number of phase fractions for the phase speed. Default = 1; The patch will move at a rate of 1 phase fraction per second.
The Phase speed determines how fast the patch moves. The number set represents the Phase Speed in phase fractions per second. Or else described as the number of cycles (or lines) that will move per second.
The higher the Phase Speed the faster the lines in the patch will appear to move.
9) Direction is (1 or 0).
Setting (1 or 0): Choose 1 or 0 to set the Rotation or Phase direction. Default = 1; The patch will rotate in an anti-clockwise (or right-phase) direction.
Set to 0 for clockwise (rotation) or left (phase). Set to 1 for anticlockwise (rotation) or right (phase).
You can try out the Gabor Patch Zone as a participant by taking part in this Demo
Click to view an Example of a Sample Task using the Gabor Patch Zone
You're viewing the support pages for our Legacy Tooling and, as such, the information may be outdated. Now is a great time to check out our new and improved tooling, and make the move to Questionnaire Builder 2 and Task Builder 2! Our updated onboarding workshop (live or on-demand) is a good place to start.
This zone is in BETA. Use at your own risk and please report any issues promptly.
The Mouse Tracking Zone allows you to record a participant’s mouse movements during a screen or continuously over multiple screens. The (x,y) coordinates of the cursor are pulled several times a second, and then recorded in a unique Mouse Tracking metrics file.
Setting up the Mouse Tracking Zone:
Place the Mouse Tracking Zone on each of your Task Screens where you wish to use mouse tracking.
Edit Configuration Setting-1 of the Mouse Tracking Zone to determine how the Mouse Tracking Zone should record and store metric data. More information is available in the configuration setting section below.
Use Case: Use the Mouse Tracking Zone when you wish to detect and record approximately where a participant's mouse is focused when participating in your task, for example when choosing between responses, or in anticipation of stimuli presentation.
The Mouse Tracking Zone generates a data file containing the coordinates of the participant's mouse position on the screen over time, with time stamps for each position provided in the time_stamp column. At the top, the file also contains the x-coordinate, y-coordinate, width and height for each Zone on the screen. The x-coordinate provided for each Zone corresponds to the Zone's left-hand edge, and the y-coordinate corresponds to the Zone's bottom edge.
All coordinates are measured in pixels from the bottom-left edge of the screen (0,0), with the x-coordinate increasing as the mouse moves right and the y-coordinate increasing as the mouse moves up. The columns x_normalised and y_normalised report the same coordinates as a proportion of the Gorilla screen space, making these coordinates comparable across different participants. See our eyetracking pages for more information on normalised coordinates.
This image below shows the Mouse Tracking Zone with Setting 1 set to 0. This means that once the participant has responded and/or the screen advances, the Mouse Tracking Zone will stop recording. It will then also package all mouse-tracking data collected across each of the preceding 3 screens into a single mouse tracking data file.
The image below shows how you would set up your trial display to collect mouse-tracking data across multiple screens. You can see that we have a trial display consisting of 3 screens: A Fixation, A Stimuli and then a Response screen.
We wish to detect a participants mouse movements on all 3 of these screens, so we have added a Mouse Tracking Zone to each screen.
On the 'Fixation' and 'Stimuli' screens, the Mouse Tracking Zone is set to continue recording mouse tracking data: Setting 1 is set to 1.
On the 'Response' screen, Setting 1 is set to 0, which tells the Mouse Tracking Zone to stop recording and save the generated mouse tracking data.
You can view an example of the metrics produced by the Mouse Tracking Zone in the image below:
Note that some metric columns have been hidden for presentation purposes.
| Column Name | Row Entry | Description |
|---|---|---|
| Zone Type | mouse_tracking | This is the Zone 'Type' identifier for the Mouse Tracking Zone. |
| Response | [Filename] | This is the filename of the mouse tracking data for this trial. If you have downloaded your metrics after running an experiment, you will find this file in the uploads folder included in your downloaded data. If you have downloaded your metrics from a task preview, you can access the file using the URL in the following row. |
| Response | [URL] | This is the URL link which if pasted into a browser will allow you to download the corresponding mouse tracking data for this trial. When previewing your task, this is how you can access your mouse tracking data files. |
Accessing Mouse Tracking data files (in preview mode): When previewing a task, your additional files can be accessed via a URL placed in the metrics. After the preview has finished, download the data and find the URL in this file.
Accessing Mouse Tracking data files (in full experiment): When running a full experiment, all of the additional files can be accessed from the 'Download Experiment Data' button on your Experiment's Data page. The zip folder with all your metrics data will include an 'Uploads' folder, containing all of your additional files.
1) If (1 or 0) continue recording after the end of this screen. Only set this if you are recording data across multiple screens, and ensure that the last screen does not have this set. Use 1 to continue recording and 0 to stop recording.
Setting (1 or 0): Type either 1 or 0 to select if the Mouse Tracking Zone should continue recording.
Default = 0; By default, the Mouse Tracking Zone will stop collecting data when the screen is advanced, producing a unique Mouse Tracking data file for this screen.
If set to 1; The Mouse Tracking Zone will continue to record the mouse movements of the participant between screens containing an Mouse Tracking Zone.
If set to 0; The Mouse Tracking Zone will stop recording once the screen has been advanced and a unique metrics file containing the Mouse Tracking data will be created.
2) Prefix filename with(text) for captured data.
Setting (text): Type a name to identify the mouse tracking data file.
Default = mousetracking; By default, the Mouse Tracking Zone will produce data with the filename mousetracking-1-3, or similar.
When set to any text, this changes the filename of the Mousetracking data i.e. if set to 'MouseTask', the file might be named 'MouseTask-1-3'.
Note: Only use alpha-numeric characters in your file names. Do not use special characters as this could prevent you from retrieving data files.
Click to view a Tutorial of the Mouse Tracking Zone.
Click to view an Example of a Sample Task which makes use of the Mouse Tracking Zone.
You can try out the Mouse Tracking Zone as a participant by taking our Demo
For insights and top tips from real researchers, check out our Gorilla Presents webinar on running eye and mouse tracking studies online!
You're viewing the support pages for our Legacy Tooling and, as such, the information may be outdated. Now is a great time to check out our new and improved tooling, and make the move to Questionnaire Builder 2 and Task Builder 2! Our updated onboarding workshop (live or on-demand) is a good place to start.
This zone is in BETA. Use at your own risk and please report any issues promptly.
The Mouse Response Zone allows participants to respond using their mouse's left and right clicks.
Setting up the Mouse Response Zone:
Place the Mouse Response Zone on each of your Task Screens where you wish to use mouse response.
Edit Configuration settings of the Mouse Response Zone to determine what the Mouse Response Zone should record left and right mouse clicks as.
This image below shows the Mouse Response Zone with left mouse click set to record as LEFT (Setting 1), and right mouse click set to record as RIGHT (Setting 2). LEFT is set up as the correct response (Active Response Setting 1), meaning that on this screen, a left mouse click will be recorded as correct.
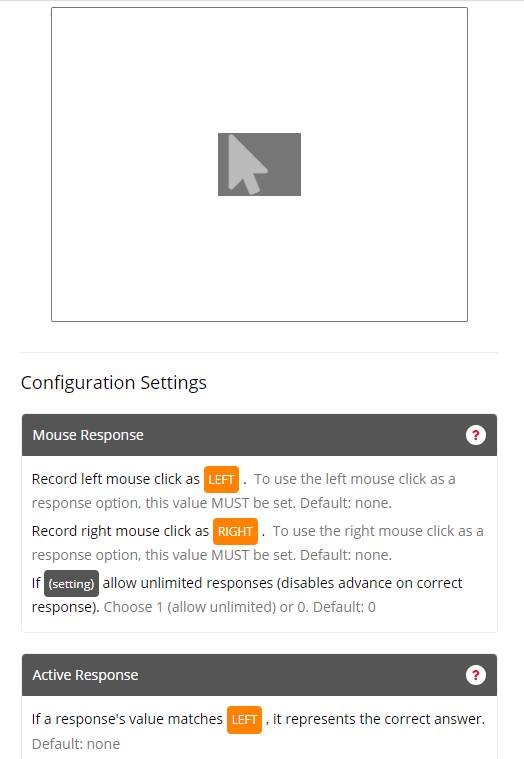
You can view an example of the metrics produced by the Mouse Response Zone in the image below:
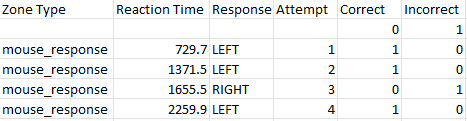
Note that some metric columns have been hidden for presentation purposes.
| Column Name | Row Entry | Description |
|---|---|---|
| Zone Type | mouse_response | This is the Zone 'Type' identifier for the Mouse Response Zone in your metrics. |
| Reaction Time | [Number] | This is the reaction time in milliseconds (ms). The reaction time is recorded at the point after the beginning of the screen where the participant clicks the mouse. |
| Response | [Text] | This will match the text you entered into Setting 1 (if the left mouse button was clicked) or Setting 2 (if the right mouse button was clicked). |
| Attempt | [Number] | This indicates the number of times the participant has clicked the mouse on this trial. |
| Correct | [1 or 0] | This indicates whether the response was marked as correct (1 if yes, 0 if no). The correct response is defined in Active Response Setting 1. |
| Incorrect | [1 or 0] | This indicates whether the response was marked as incorrect (1 if yes, 0 if no). |
1) Record left/right mouse click as (setting).
To use the left/right mouse click as a response option, this value MUST be set. Default: none.
You will notice when you add the zone that left click will automatically be assigned to the LEFT static value and right click to the RIGHT static value. These can be changed by clicking on the values, selecting the source and typing the name of the value you wish to use for each click.
2) If (setting) allow unlimited responses (disables advance on correct response).
Choose 1 (allow unlimited) or 0. Default: 0
When set to 1, participants will be able to give unlimited responses and their response will not progress the screen onto the next one. If using this, you should add a zone that will allow for the screen to progress e.g. a Timelimit (Screen) zone or a Continue Button - otherwise participants will not be able to advance.
Click to view an Example of a simple Task which makes use of the Mouse Response Zone.
You're viewing the support pages for our Legacy Tooling and, as such, the information may be outdated. Now is a great time to check out our new and improved tooling, and make the move to Questionnaire Builder 2 and Task Builder 2! Our updated onboarding workshop (live or on-demand) is a good place to start.
This zone is in BETA. Use at your own risk and please report any issues promptly.
The Reading Zone is an advanced content zone specifically designed for building paced and self-paced reading tasks.
The Reading Zone provides multiple configuration options which enable the creation of a wide variety of reading task paradigms. In addition to the choice of mode (Paced or Selfpaced), the Reading Zone includes options for timing and trigger method. It also provides options for where and how reading content is presented via the location, presentation style and masking configuration settings.
The Reading Zone is a unique zone which differs from standard zones in 6 ways:
Under the bonnet Gorilla takes the full text content entered into the Reading Zone and splits it up into separate presentation segments whenever it finds a pipe symbol (|). Pipe symbols act as the delimiter which allows you to control what text content is shown in each segment. The configuration settings of the Reading Zone then determine how each segment of the content is displayed to the participant. View the examples and configuration settings sections below for more details on how this works.
Setting up the Reading Zone:
There are three main steps to setting up a Reading Zone:
1) Entering text content
Note: We recommend making the Reading Zone as large as possible. The text content will wrap within the Reading Zone automatically. This means long sentences will display across multiple lines, respecting the boundaries and size of the Zone. If you wish to display a medium - long length sentences across a single line you will need to maximise the width of your Reading Zone.
The image example below splits the text 'The cat sat on the mat.' into 6 separate text segments using the pipe ("|") as the delimiter.
Each text segment will be displayed individually with respect to how the rest of the Reading Zone settings are configured.
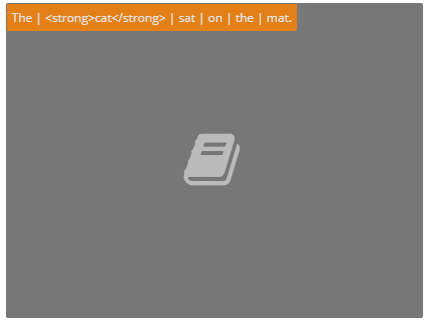
The image example below shows the content split using the pipe ("|") delimiter.
In the text segment the word 'cat' has been styled to be presented as bold using HTML.
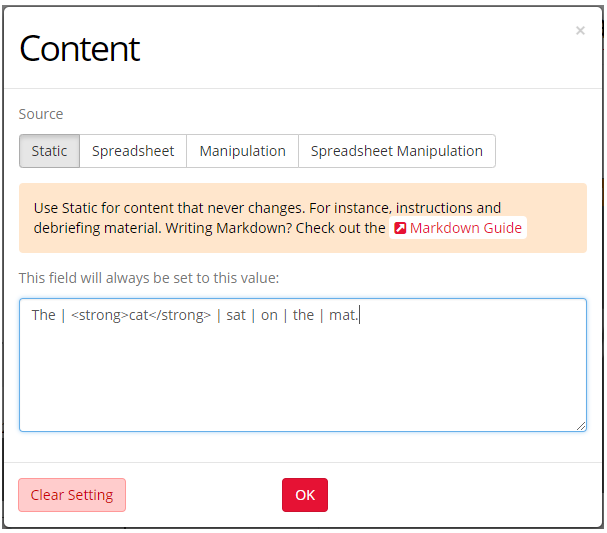
2) Choosing the operation mode
Note: If no mode is set the Reading Zone will default to 'Paced' mode.
View the image examples and configuration settings sections below for more details on the operation mode.
3) Configuration settings The Reading Zone, like the majority of other multi-mode zones has a set of general configuration settings which are shared by both modes (Paced and Selfpaced). However, the Reading Zone also includes a set of specific configuration settings which are unique to each operation mode.
View the image examples and configuration settings sections below for more details on all of the settings.
Use Case: The Reading Zone is typically used to conduct experiments involving paced and self-paced reading tasks. The Reading Zone will also be extremely useful in any task where you wish to procedurally display text, at either a controlled rate, or at a rate dictated by the participant.
In the example below, the Reading Zone has been set up to conduct a paced reading test. Setting 1 is set to 'Paced'.
The Zone content has been set to "The | cat | sat | on | the | mat.". and Setting 2 has the presentation method set as 'Progressive'.
This means that the sentence "The cat sat on the mat." will be presented progressively, extending the sentence one word at a time.
The content location has been set to "Centre" using Setting 3. This means that the 'current' text segment being presented will always be centred within the Reading Zone.
We do not wish to use a mask, nor are we interested in the reaction times of individual words, as our task is paced, so we have left both Settings 4 and 5 as their default values of 'Off' and 'Individual' respectively.
Lastly, we have changed the Paced content timing from the default of 500ms to 300ms using Setting 6 in the Paced Settings section.
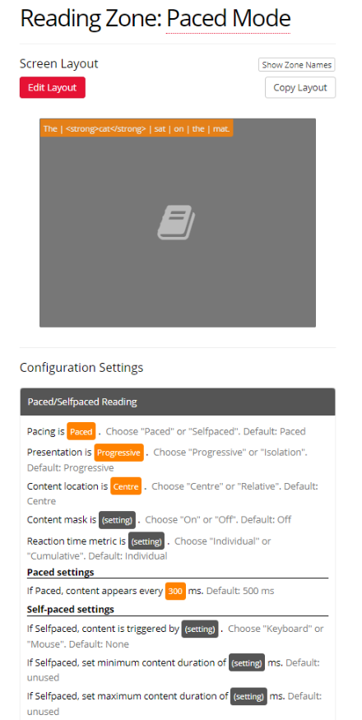
In the example below, the Reading Zone has been set up to conduct a Self-paced reading test. Setting 1 is set to 'Selfpaced'. This means that the Participant controls the speed (i.e. 'pace') at which each new text segment is displayed.
The Zone content has been set to "The | cat | sat | on | the | mat.". and Setting 2 has the presentation method set as 'Progressive'.
This means that the sentence "The cat sat on the mat." will be presented progressively, extending the sentence one word at a time.
The content location has been set to "Relative" using Setting 3. This means that each word (or text segment) will be presented at the position where it is located within the full sentence.
We do not wish to use a mask, so Setting 4 has been set to "Off".
As the task is self paced, we wish to know the reaction time taken for the participant to read each text segment individually. Therefore we have set Setting 5 to 'Individual'.
Lastly we have configured all 3 of the Self-paced Settings. We have opted to use 'Keyboard' as our content trigger method (Setting 7). This means the participant must use the space bar key on their keyboard to trigger the progression of the text content and advance the task.
Note: When conducting a Self-paced task, it is mandatory that Setting 7 is set. If this setting is not set, the Reading Zone will not work and the participant will not be able to progress with the task.
We have also chosen to set a minimum and maximum content duration of 200ms and 1000ms respectively (Settings 8 & 9). The minimum content duration ensures each text segment is seen by the participant for a minimum duration and can aid in detecting participants who rapidly skip through a reading task. The maximum duration adds back in a pacing element to a Selfpaced task, allowing the creation of pseudo-paced tasks. In this example, if the participant does not interact with the Reading Zone before 1000 ms (1 second) has elapsed the next text segment will be displayed automatically.
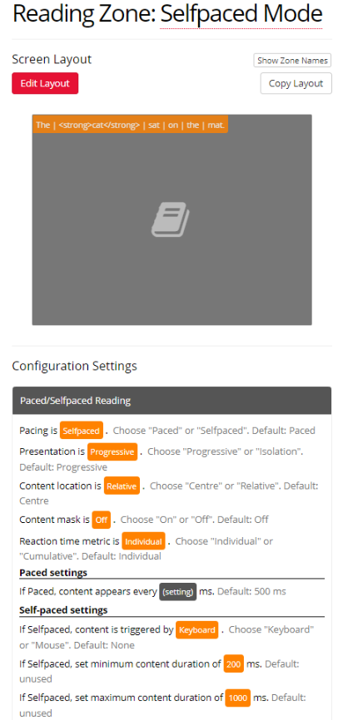
The Reading Zone adds 1 new row of data to your task metrics spreadsheet for every text segment in your reading content. After the metrics for all text segments have been recorded, 1 additional row is produced, with the response Content End.
You can view an example of the metrics produced by the Reading Zone in the image below:
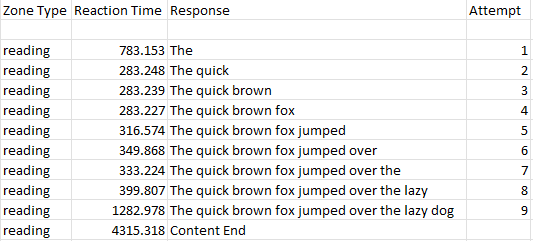
Note that some metric columns have been hidden for presentation purposes.
| Column Name | Row Entry | Description |
|---|---|---|
| Zone Type | reading | This is the Zone 'Type' identifier for the Reading Zone in your metrics. |
| Reaction Time | [Number] | This is the reaction time in milliseconds (ms). If Setting 5 is set to 'Individual', this represents the time taken on the individual text segment. In paced mode, this will equal your paced timing setting. If Setting 5 is set to 'Cumulative', this represents the cumulative time taken on the reading content, up to the current text segment. If the Response column reads 'Content End', this represents the total time taken to view all text segments in your reading content. |
| Response | [Text] | This represents the text shown at this stage in the Reading Zone. If Setting 2 is set to 'Individual', this text will represent the individual text segment presented at this stage. If Setting 2 is set to 'Progressive', this text will represent the complete text presented at this stage. |
| Response | Content End | This is the additional row produced by the Reading Zone once all text segments have been presented. The Content End row makes the end of the reading content presented in an individual Reading Zone. This can be particularly helpful when presenting Reading Zones back to back. |
| Attempt | [Number] | In the context of a Reading Zone, each text segment is given an attempt number from 1 (starting at the first text segment) to N representing the number of the last text segment. The Attempt number can be useful for ordering your text segments, or comparing reaction times for an individual text segment across participants. |
1) Pacing is (Paced or Selfpaced).
Setting (Paced or Selfpaced): Type either 'Paced' or 'Selfpaced' to choose the operation mode for the Zone. Default = Paced; Each segment of the text content will be presented sequentially at an even rate.
Paced: In Paced mode the Reading Zone will automatically display each text segment, sequentially, at an even rate which is determined by the Paced Settings: Configuration Setting-6. In this mode the participant does not need to interact with the Reading Zone. The Reading Zone functions purely to control the style and how quickly the content is presented.
Selfpaced: In Selfpaced mode the Reading Zone will only display the next text segment upon receiving a trigger input from the participant. For the Selfpaced mode to function it is mandatory that Selfpaced Setting: Configuration Setting-7 - the trigger input method - is also set.
Note: If Selfpaced mode is chosen and no trigger method is configured the participant will not be able to interact with the Reading Zone nor advance the task.
Selfpaced mode has additional configuration settings which can be found under the Selfpaced Settings section.
2) Presentation is (Progressive or Isolation).
Setting (Progressive or Isolation): Type either 'Progressive' or 'Isolation' to choose the presentation style for the Zone. Default = Progressive; Text segments are presented sequentially in a cumulative fashion.
Progressive: Each text segment is presented sequentially in a cumulative fashion such that when the last text segment is reached the full text content (i.e. all text segments) will be visible on the screen.
Use this method when you wish to build up a sentence word by word using the Reading Zone.
Isolation: Each text segment is presented individually one segment at a time. When the last text segment is reached only the last text segment will be visible on the screen.
Use this method when you wish to show a sentence one word at a time; where each word is shown in isolation from the rest of the sentence.
3) Content location is (Centre or Relative).
Setting (Centre or Relative): Type either 'Centre' or 'Relative' to choose how content should be positioned upon presentation. Default = Centre; Visible content will always be presented in the centre of the Reading Zone.
Centre: When presenting the text segments all visible content will always be presented as centred within the Reading Zone.
Relative: When presenting the text segments each visible text segment will be presented at the position it occupies within the full text Content. With certain zone configurations this will appear as text content moving across the screen from left to right.
This setting is best demonstrated by viewing the task examples below.
4) Content mask is (On or Off).
Setting (On or Off): Type either 'On' or 'Off' to choose whether to mask content or not. Default = Off; content will not be masked.
On: Content will be masked. Only visible content will appear non-masked. Which content counts as 'visible' will depend upon the setup of Configuration Setting-2.
Note: Configuration Setting-3 must be set to 'Relative' for Masking to be applied to the text Content.
Off: Regardless of other Zone Configuration Settings content will not be masked.
5) Reaction time metric is (Individual or Cumulative).
Setting (Individual or Cumulative): Type either 'Individual' or 'Cumulative' to choose the operation mode for the Zone. Default = Individual; Reaction time recorded for each text segment will represent the total time that the text segment was presented on the screen.
Individual: Each text segment will produce a single row in your metrics. For each text segment, the reaction time that is recorded, represents the time that the individual text segment was visible for. For the full series of metrics produced by the Reading Zone, reaction times will appear as a list of unique individual reaction times one for each text segment
Cumulative: The recorded reaction time will be relative to the start of the screen. Each text segment will produce a single row in your metrics. The reaction time that is recorded, for each text segment, represents the time taken from the start of the screen. For the full series of metrics produced by the Reading Zone, reaction times will appear a cumulative list of reaction times; with the reaction time increasing with each successive text segment.
Paced settings
6) If Paced, content appears every (number) ms.
Setting (number): Type a time, as a number of milliseconds (ms), to represent the total duration each text segment should be presented for. Default = 500ms; Each text segment will be presented for 500 ms.
If set, each text segment will be presented for the specified amount of time. When the specified duration is reached the next text segment is shown. If there are no more text segments left to be presented Gorilla will auto advance the participant to the next screen in the task.
Selfpaced settings
7) If Selfpaced, content is triggered by (Keyboard or Mouse).
Setting (Keyboard or Mouse): Type either 'Keyboard' or 'Mouse' to choose the trigger method for selfpaced mode. Default = None.
Note: If Selfpaced mode is chosen it is mandatory that this setting is configured. If Selfpaced mode is chosen and no trigger method is configured the participant will not be able to use the Reading Zone nor advance the task.
Keyboard: If Keyboard is selected, the participant can trigger the presentation of each text segment by using the Space Bar Key on their keyboard. Each press of the space bar Key will trigger the progression of the text content presentation and advance the task.
Mouse: If Mouse is selected, the participant can trigger the presentation of each text segment by using a Left Mouse Button Click. Each press of the Left Mouse Button will trigger the progression of the text content presentation and advance the task. For Mac users clicking the Mouse button will trigger the progression of the text content presentation and advance the task.
8) If Selfpaced, set minimum content duration of (number) ms.
Setting (number): Type a time, as a number of milliseconds (ms), for the minimum length of time a text segment should be displayed for. Default = None; No minimum content duration is set. The next text segment will be displayed immediately when triggered by the participant.
If set; the minimum content duration ensures each text segment is seen by the participant for a specified minimum amount of time.
9) If Selfpaced, set maximum content duration of (number) ms.
Setting (number): Type a time, as a number of milliseconds (ms), for the maximum length of time a text segment should be displayed for. Default = None; No maximum content duration is set. The next text segment will be displayed only if triggered by the participant.
If set; the maximum content duration ensures each text segment is only seen by the participant for a specified maximum amount of time. If the participant does not interact with the Reading Zone before the maximum amount of time has elapsed the next text segment will be displayed automatically.
The maximum duration adds back in a pacing element to a Selfpaced task set up - allowing the creation of pseudo-paced tasks.
You can try out the Reading Zone as a participant by taking our Reading Zone Demo
You're viewing the support pages for our Legacy Tooling and, as such, the information may be outdated. Now is a great time to check out our new and improved tooling, and make the move to Questionnaire Builder 2 and Task Builder 2! Our updated onboarding workshop (live or on-demand) is a good place to start.
This zone is in BETA. Use at your own risk and please report any issues promptly.
The Screen Calibration Zone is an Advanced Zone that asks participants to calibrate their monitor, permitting stimuli to be presented in either Centimetres (CM) or Visual Angle (degrees).
This is achieved by asking participants to scale an image of a bank card to the size of a real bank card held up against the screen. This allows future stimuli size to be defined in CM. To define stimuli in Visual Angle (degrees), the Advanced Setting of this zone needs to be switched On. In doing so, participants will be asked how far from the screen they are sat. Without this, Visual Angle (degrees) will not be accurate.
Please Note: As the Screen Calibration Zone uses the size of a bank card to calibrate the screen, this zone cannot be used on mobile devices. You can prevent participants using mobile devices in your experiment by setting a Device Type Requirement to your Experiment.
The data generated by the Screen Calibration Zone get saved to the experiment, so will be available throughout all tasks in the experiment tree. Therefore, you only need one Screen Calibration Zone at the beginning of your experiment. Any future stimuli that are set to display at specific CM or visual degrees values will use the Screen Calibration data generated at the start.
Presenting Stimuli:
The next step is to set the presentation size of your stimuli. You are able to do this in the ‘Advanced Settings’ of visual stimuli, such as an Image Zone or a Video Zone. You can set the image width to CMs or to visual degrees. This can be entered in the configuration settings as static content, or can be sourced from Spreadsheet or Manipulation values.
The example below shows the Screen Calibration Zone in the Task Builder.
The image below shows how the Screen Calibration Zone appears in the Task Preview.
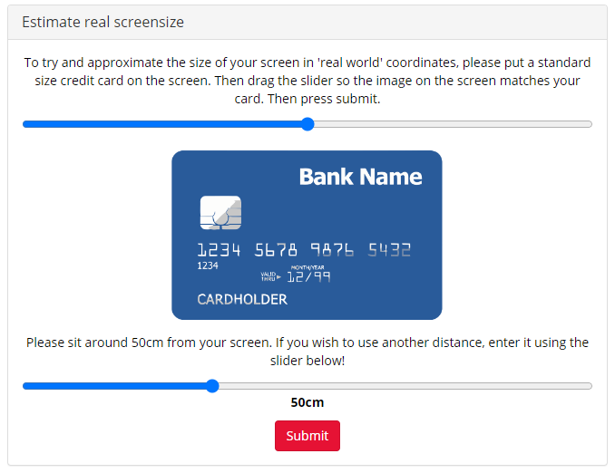
The Advanced Settings have been turned On, so that images can be defined in visual degrees accurately. The Localisation settings have been left as default
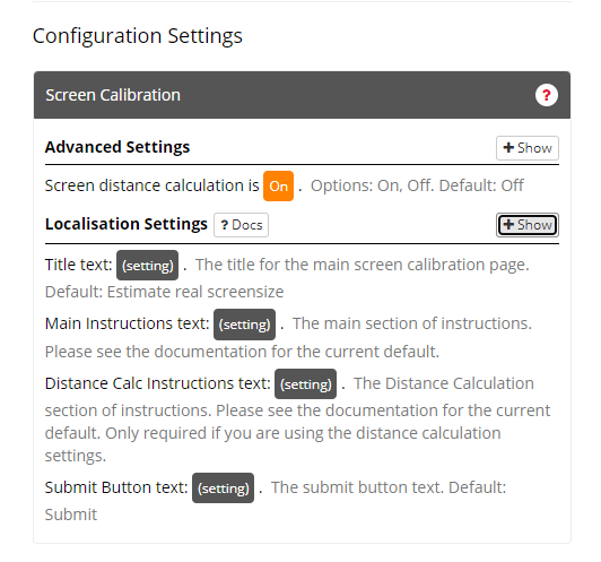
The Screen Calibration Zone adds 2 new rows of data to your task metrics spreadsheet.
You can view an example of the metrics produced by the Screen Calibration Zone in the image below:

Note that some metric columns have been hidden for presentation purposes.
| Column Name | Row Entry | Description |
|---|---|---|
| Zone Type | screen_calibration | This is the Zone 'Type' identifier for the Screen Calibration Zone in your metrics. |
| Reaction Time | [Number] | This is the reaction time in milliseconds (ms). This represents the time taken for the participant to complete the Screen Calibration. |
| Response | Pixels per CM: [Number] | This represents pixels displayed per centimetre on the participant's screen, based on the results of the Screen Calibration. |
| Response | Calibration Complete | This is an additional row produced by the Screen Calibration Zone once calibration is complete. |
This zone can be localised if you want to run your study in another language. For more information visit our Screen Calibration localisation guide.
Advanced Settings
1) Screen distance calculation is (On, Off)
Set this as On to define stimuli size in Visual Angle (Degrees). Participants will be asked how far from the screen they are sat.
If Off, visual stimuli can be defined in centimetres only.
Click to view a Tutorial of the Screen Calibration Zone.
You're viewing the support pages for our Legacy Tooling and, as such, the information may be outdated. Now is a great time to check out our new and improved tooling, and make the move to Questionnaire Builder 2 and Task Builder 2! Our updated onboarding workshop (live or on-demand) is a good place to start.
Note: This feature is currently in Closed-Beta, meaning it is still under development. If you would like to use this zone for your experiment, you can receive access via our Contact Form.
We are aware of an issue where the Eye Tracking Zone does not function correctly when using Firefox. Our development team are investigating. In the meantime, we recommend advising participants to use Chrome and/or limiting recruitment by browser.
The Eye Tracking Zone allows you to add basic eye tracking functionality to your task by utilising a participant's webcam.
Under the bonnet the Eye Tracking Zone utilises WebGazer.js. It works by using a participant's webcam to detect a participant's face. It then uses prediction models to infer the participant eye-gaze locations on the screen in real time. Please see the WebGazer team's publication page for advice on how to cite them.
Note: We also have a more up-to-date version of the Eye Tracking Zone based on WebGazer 2. Please see the Eye Tracking 2 Zone page for details on how to configure that version.
The current zone does not provide data which you can reliably detect fixations, saccades, scan paths and blinks with. Instead it provides estimates of gaze locations, with an associated confidence -- these can be used to create heatmaps of images, or percentage occupancy of areas of interest.
Note on ethics: the webcam images used in the eye tracking zone are translated into coordinates on the participant's computer. All Gorilla receives is the coordinate data; the webcam images are only used to determine the coordinate data and are not saved.
Please note we are unable to give support for data analysis, beyond identifying what the output data represents. You can find more information about eye tracking in Gorilla in our Eye Tracking Guide.
It is important to note that the Eye Tracking Zone differs from standard zones in 4 ways:
The Eye Tracking Zone has two modes of operation:
Both modes should be used at least once within your task.
For best results we recommend repeating the calibrate mode approximately every 10 trials or 3 minutes. This will help you to account for participant 'head-drift' or body repositioning which could affect gaze detection performance.
To set up the Eye Tracking Zone in Calibrate mode:
The zone calibration also includes the option to retry calibration if the calibration is considered failed. Calibration has two stages: initial calibration, followed by validation. In the validation stage, the eye tracking zone tests the predictions it's making. If it finds that its predictions for a number (set by you) of calibration points are closer to a different calibration point than to the intended point, the calibration will be considered failed and will be retried. The default number of calibration points is 5, but you have the option to change this to 9 in the Advanced Calibration Settings.
At the end of your calibrate screen, you have the option (available in the Advanced Calibration Settings) to be shown a validation plot, like the one in the image below. The squares represent the points used for calibration, and the circles represent the variation in the detected gaze location for each point. The calibration data for each participant will be included in your metrics, and you can use it to get an idea of the accuracy and reliability of your eye tracking data.
To set up the Eye Tracking Zone in Collect mode:
Set the Eye Tracking Zone Configuration setting-1 to 'collect'
Note: In Collect mode the Size and Position of the Eye Tracking Zone do not matter. Place the Eye Tracking Zone anywhere on your Task Screens.
Edit the Zone names of the other zones you are including in your task. Typically, these ROI will be stimuli zones or response zones. Your metrics file will include the x and y coordinates of all the zones on each screen, so naming ROI will allow you to easily identify the zones you are interested in.
Note: When updating Zone names, you may only use alpha-numeric characters.
The Eye Tracking Zone will produce 1 row in your metrics for a failed calibration, 4 rows in your metrics for a successful calibration, and 14 rows for each screen or trial where you collect eye tracking data.
You can view an example of the metrics produced by the Eye Tracking Zone in the image below. The first 4 rows of data are generated by the Eye Tracking Zone used in calibrate mode, and the remaining rows by the Eye Tracking Zone used in collect mode.
Note that some metric columns have been hidden for presentation purposes.
| Column Name | Row Entry | Description |
|---|---|---|
| Zone Type | eye_tracking | This is the Zone 'Type' identifier for the Eye Tracking Zone. |
| Reaction Time | [Number] | This indicates the time at which the participant completed eyetracking calibration, measured from the start of the screen. |
| Response Type | [Text] | This column specifies what information is contained in the Response column for that row. When the Zone is used in calibrate mode, Response Type has four possible values: 'filename' = the Response column contains the filename of your calibration file, which can be found in the uploads folder of your downloaded metrics; 'url' = the Response column contains the URL of your calibration file, which you can copy-paste into a browser to access; 'calibration succeeded' = the calibration was successful; 'calibration failed - retrying' = the calibration was unsuccessful. When the Zone is used in collect mode, Response Type has 12 possible values: 'Left Time'/'Right Time' = the Response column contains the time in milliseconds the participant spent looking at the left-hand or right-hand half of the screen respectively; 'Left Percent'/'Right Percent' = the Response column contains the percentage of the total screen duration the participant spent looking at the left-hand or right-hand half of the screen respectively; 'A/B/C/D Time' = the Response column contains the time in milliseconds the participant spent looking at the top-left, top-right, bottom-left, and bottom-right quadrants of the screen respectively; 'A/B/C/D Percent' = the Response column contains the percentage of the total screen duration the participant spent looking at the top-left, top-right, bottom-left, and bottom-right quadrants of the screen respectively. |
| Response | [Text] or [Number] | The contents of this column depend on the value in the Response Type column. When the Zone is used in calibrate mode and the Response Type is 'filename', this column will contain the filename of the eyetracking calibration file. If you have downloaded your metrics after running an experiment, you will find this file in the uploads folder included in your downloaded data. If you have downloaded your metrics from a task preview, you can access the file using the URL in the following row, where the Response Type is 'url'. When the Zone is used in collect mode, this column will contain a) the time in milliseconds, or the percentage of the total screen duration, that a participant spent looking at a particular half or quadrant of the screen, as indicated in the Response Type column; b) if Response Type is blank, the filename or URL of the detailed eyetracking data file. This can be accessed in the same way as the calibration file. |
Accessing detailed eyetracking data files (in preview mode): When previewing a task, your detailed eyetracking data files can be accessed via a URL placed in the metrics. After the preview has finished, download the data and find the URL in this file.
Accessing detailed eyetracking data files (in full experiment): When running a full experiment, all of the detailed eyetracking data files can be accessed from the 'Download Experiment Data' button on your Experiment's Data page. The zip folder with all your metrics data will include an 'Uploads' folder, containing all of your detailed eyetracking data files.
1) Use the (calibrate or collect) mode (choose 'calibrate' or 'collect')
Setting (calibrate or collect): Type either 'calibrate' or 'collect' to choose the operation mode for the Zone. Default = calibrate; If no mode is set the Eye Tracking Zone will default to the 'calibrate' mode.
Calibrate: In calibrate mode the Eye Tracking Zone will perform a routine calibration and validation test. Note Calibration mode requires the Eye Tracking Zone to take up the full size of the Screen - see image example above.
Collect: In collect mode the Eye Tracking Zone will detect a participant's gaze and return the screen coordinates of the participant's predicted gaze to the Eye Tracking metrics.
2) Prefix filename with (text) for captured data
Setting (text): Type a name to identify the eye tracking data file.
Defaults: In calibrate mode the default file name will be: task-NODEKEY-XXXXXX-eyetracking_calibration-A-B
In collect mode the default file name will be: task-NODEKEY-XXXXXX-eyetracking_collection-A-B
If set to any text string; eyetracking_collection will be replaced with your chosen prefix. Note this only affects files generated in collect mode; calibration files will retain the default file name.
Note: only use alpha-numeric characters in your file name prefixes. Do not use special characters as this could prevent you from retrieving data files.
You will likely wish to use this setting with spreadsheet 'source' if you wish to uniquely identify your eye tracking data files on a 'per-trial' basis.
3) If (setting) or more calibration points fail, retry calibration. A calibration point is considered failed if the validation prediction for that point is closer to another calibration point.
Setting (number): Type a number of calibration points whose failure will trigger calibration to retry.
Default: If you leave this setting blank, calibration will not be retried.
Advanced Calibration Settings
4) If (1 or 0) use long mode for calibrating, which uses 9 points instead of 5. [Calibrate mode ONLY]
Setting (1 or 0): Type either 1 to select long-mode calibration (which uses 9 calibration points), or 0 to select short-mode calibration (which uses 5). Default = 0; By default, the Eye Tracking Zone will use short-mode calibration.
5) If (1 or 0) show the dot while calibrating. This is useful for testing, but not recommended for participants. Use 1 to show the dot, otherwise 0. [Calibrate Mode ONLY]
Setting (1 or 0): Type either 1 or 0 to select if a 'predicted gaze' dot should be shown during calibration mode. Default = 0; By default, the Eye Tracking Zone will not show a red dot during calibration mode.
If set to 1; The Eye Tracking Zone will show a red dot during calibration mode which represents the position of the 'predicted gaze' of the participant.
If set to 0; The Eye Tracking Zone will not show a red dot during calibration.
6) If (1 or 0) show the validation plot after calibrating. This is useful for testing, but not recommended for participants. Use 1 to show the plot, otherwise 0. [Calibrate Mode ONLY]
Setting (1 or 0): Type either 1 or 0 to select if the Eye Tracking Zone should show an additional screen, containing calibration and validation results, after calibration has completed. Default = 0; By default, the Eye Tracking Zone will automatically advance to the next Screen/Display in your task, once the calibration has completed.
If set to 1; The Eye Tracking Zone will add an additional static screen at the end of the calibration. This screen will contain a visual representation of the eye tracking calibration and validation results. The screen will appear directly after calibration has completed. It will present with an 'End Calibration' button which allows the participant/researcher to advance to the next screen manually in their own time.
If set to 0; The Eye Tracking Zone will not present with the additional calibration/validation results screen. Instead, once the calibration has been completed the participant will be automatically advanced to the next Screen/Display in your task.
We recommend adding a calibration 'finished' screen for your participants to remind them to limit head movement as much as possible for the subsequent trials. This also acts to let them know the eye tracking calibration stage has finished.
7) If (1 or 0) continue recording after the end of this screen. Only set this if you are recording data across multiple screens, and ensure that the last screen does not have this set. Use 1 to continue recording and 0 to stop recording.
Setting (1 or 0): Type either 1 or 0 to select if the Eye Tracking Zone should continue recording. Default = 0; By default, the Eye Tracking Zone will stop collecting data when the screen is advanced, producing a unique Eye Tracking data file for this screen.
If set to 1; The Eye Tracking Zone will continue to poll and record the gaze of the participant between screens containing an Eye Tracking Zone.
If set to 0; The Eye Tracking Zone will stop recording once the screen has been advanced and a unique metrics file containing the Eye Tracking data will be created.
Advanced Data Collection Settings
8) If (1 or 0) collect detailed eyetracking data. If you need to do advanced analysis on the raw eyetracking data, enable this option to collect it.
Setting (1 or 0): Type either 1 or 0 to select if you want the Eye Tracking Zone to collect detailed eyetracking data, i.e., the full raw coordinate data from the task. Default = 0; By default, the Eye Tracking Zone will not collect detailed raw eyetracking data.
If set to 1, the Eye Tracking Zone will give you the full raw coordinate data.
If set to 0, the Eye Tracking Zone will give you information on the absolute and percentage time the participants' gaze was in each half and each quadrant of the task screen.
This zone can be localised if you want to run your study in another language. For more information visit our Eye Tracking localisation guide.
For insights and top tips from real researchers, check out our Gorilla Presents webinar on running eye and mouse tracking studies online!
You're viewing the support pages for our Legacy Tooling and, as such, the information may be outdated. Now is a great time to check out our new and improved tooling, and make the move to Questionnaire Builder 2 and Task Builder 2! Our updated onboarding workshop (live or on-demand) is a good place to start.
Note: This feature is currently in Closed-Beta, meaning it is still under development. If you would like to use this zone for your experiment, you can receive access via our Contact Form.
We are aware of an issue where the Eye Tracking 2 Zone does not function correctly when using Firefox. Our development team are investigating. In the meantime, we recommend advising participants to use Chrome and/or limiting recruitment by browser.
The Eye Tracking 2 Zone allows you to add basic eye tracking functionality to your task by utilising a participant's webcam.
Under the bonnet the Eye Tracking Zone utilises version 2 of WebGazer.js. It works by using a participant's webcam to detect a participant's face. It then uses prediction models to infer the participant eye-gaze locations on the screen in real time. Please see the WebGazer team's publication page for advice on how to cite them.
Note: We also have an older version of the Eye Tracking Zone based on an earlier version of WebGazer. Please see the Eye Tracking Zone page for details on how to configure that version.
The current zone does not provide data which you can reliably detect fixations, saccades, scan paths and blinks with. Instead it provides estimates of gaze locations, with an associated confidence -- these can be used to create heatmaps of images, or percentage occupancy of areas of interest. If you are interested in knowing more, have a look at this Twitter thread.
Note on ethics: the webcam images used in the eye tracking zone are translated into coordinates on the participant's computer. All Gorilla receives is the coordinate data; the webcam images are only used to determine the coordinate data and are not saved.
Please note we are unable to give support for data analysis, beyond identifying what the output data represents. You can find more information about eye tracking in Gorilla in our Eye Tracking Guide.
It is important to note that the Eye Tracking 2 Zone differs from standard zones in 4 ways:
The Eye Tracking 2 Zone has three modes of operation:
Both calibrate and record mode should be used at least once within your task. Upload mode is optional; it should be used on a separate screen at the end of the task/block if you want to combine eyetracking data from multiple trials into one file - see configuration setting-1 below for more information.
For best results we recommend repeating the calibrate mode approximately every 10 trials or 3 minutes. This will help you to account for participant 'head-drift' or body repositioning which could affect gaze detection performance.
To set up the Eye Tracking 2 Zone in Calibrate mode:
The Calibration Settings also include the option to retry calibration if the calibration is considered failed. Calibration has two stages: initial calibration, followed by validation. In the validation stage, the eye tracking zone tests the predictions it's making. If it finds that its predictions for a number (set by you) of calibration points are closer to a different calibration point than to the intended point, the calibration will be considered failed and will be retried. The default number of calibration points is 5, but you have the option to change this to 9 in the Calibration Settings. You can also specify the maximum number of times you want to retry calibration in the Calibration Settings.
At the end of your calibrate screen, you have the option (available in the Calibration Settings) to be shown a validation plot, like the one in the image below. The squares represent the points used for calibration, and the circles represent the variation in the detected gaze location for each point. The calibration data for each participant will be included in your metrics, and you can use it to get an idea of the accuracy and reliability of your eye tracking data.
To set up the Eye Tracking 2 Zone in Record mode:
Set the Eye Tracking 2 Zone Configuration setting-1 to 'record'
Note: In Record mode the Size and Position of the Eye Tracking 2 Zone do not matter. Place the Eye Tracking 2 Zone anywhere on your Task Screens.
Edit the Zone names of the other zones you are including in your task. Typically, these ROI will be stimuli zones or response zones. Your metrics file will include the x and y coordinates of all the zones on each screen, so naming ROI will allow you to easily identify the zones you are interested in.
Note: When updating Zone names, you may only use alpha-numeric characters.
The Eye Tracking 2 Zone will produce 1 row in your metrics for a failed calibration, 4 rows in your metrics for a successful calibration, and 14 rows for each screen or trial where you record eye tracking data.
You can view an example of the metrics produced by the Eye Tracking 2 Zone in the image below. The first 4 rows of data are generated by the Eye Tracking 2 Zone used in calibrate mode, and the remaining rows by the Eye Tracking 2 Zone used in record mode.
Note that some metric columns have been hidden for presentation purposes.
| Column Name | Row Entry | Description |
|---|---|---|
| Zone Type | eye_tracking_2 | This is the Zone 'Type' identifier for the Eye Tracking 2 Zone. |
| Reaction Time | [Number] | This indicates the time at which the participant completed eyetracking calibration, measured from the start of the screen. |
| Response Type | [Text] | This column specifies what information is contained in the Response column for that row. When the Zone is used in calibrate mode, Response Type has five possible values: 'filename' = the Response column contains the filename of your calibration file, which can be found in the uploads folder of your downloaded metrics; 'url' = the Response column contains the URL of your calibration file, which you can copy-paste into a browser to access; 'calibration succeeded' = the calibration was successful; 'calibration failed - retrying' = the calibration was unsuccessful and will be retried; and 'calibration failed - max failures' = the calibration was unsuccessful and will not be tried again as the maximum number of failures (Calibration Setting 8) has been reached. When the Zone is used in record mode, Response Type has 12 possible values: 'Left Time'/'Right Time' = the Response column contains the time in milliseconds the participant spent looking at the left-hand or right-hand half of the screen respectively; 'Left Percent'/'Right Percent' = the Response column contains the percentage of the total screen duration the participant spent looking at the left-hand or right-hand half of the screen respectively; 'A/B/C/D Time' = the Response column contains the time in milliseconds the participant spent looking at the top-left, top-right, bottom-left, and bottom-right quadrants of the screen respectively; 'A/B/C/D Percent' = the Response column contains the percentage of the total screen duration the participant spent looking at the top-left, top-right, bottom-left, and bottom-right quadrants of the screen respectively. |
| Response | [Text] or [Number] | The contents of this column depend on the value in the Response Type column. When the Zone is used in calibrate mode and the Response Type is 'filename', this column will contain the filename of the eyetracking calibration file. If you have downloaded your metrics after running an experiment, you will find this file in the uploads folder included in your downloaded data. If you have downloaded your metrics from a task preview, you can access the file using the URL in the following row, where the Response Type is 'url'. When the Zone is used in record mode, this column will contain a) the time in milliseconds, or the percentage of the total screen duration, that a participant spent looking at a particular half or quadrant of the screen, as indicated in the Response Type column; b) if Response Type is blank, the filename or URL of the detailed eyetracking data file. This can be accessed in the same way as the calibration file. |
Accessing detailed eyetracking data files (in preview mode): When previewing a task, your detailed eyetracking data files can be accessed via a URL placed in the metrics. After the preview has finished, download the data and find the URL in this file.
Accessing detailed eyetracking data files (in full experiment): When running a full experiment, all of the detailed eyetracking data files can be accessed from the 'Download Experiment Data' button on your Experiment's Data page. The zip folder with all your metrics data will include an 'Uploads' folder, containing all of your detailed eyetracking data files.
1) Use the (calibrate, record, or upload) mode (choose 'calibrate', 'record', or 'upload')
Setting (calibrate, record, upload): Type either 'calibrate', 'record', or 'upload' to choose the operation mode for the Zone. Default = calibrate; If no mode is set the Eye Tracking 2 Zone will default to the 'calibrate' mode.
Calibrate: In calibrate mode, the Eye Tracking 2 Zone will perform a routine calibration and validation test. Note Calibration mode requires the Eye Tracking 2 Zone to take up the full size of the Screen - see image example above.
Record: In record mode, the Eye Tracking 2 Zone will detect a participant's gaze and return the screen coordinates of the participant's predicted gaze to the Eye Tracking metrics.
Upload: Upload mode allows you to generate a single data file containing all eye tracking data from an entire block or task. On all screens where you want to record eye tracking data, add an Eye Tracking 2 Zone with this setting set to 'record', and Record Setting-11 below (continue recording after the end of this screen) set to 1. Then, on a separate screen at the end of the block or task, add an Eye Tracking 2 Zone with this setting set to 'upload'. This will generate one eye tracking data file for the whole block or task.
2) Prefix filename with (text) for captured data
Setting (text): Type a name to identify the eye tracking data file.
Defaults: In calibrate mode the default file name will be: task-NODEKEY-XXXXXX-eyetracking_calibration-A-B
In record mode the default file name will be: task-NODEKEY-XXXXXX-eyetracking_collection-A-B
If set to any text string; eyetracking_collection will be replaced with your chosen prefix. Note this only affects files generated in record mode; calibration files will retain the default file name.
Note: only use alpha-numeric characters in your file name prefixes. Do not use special characters as this could prevent you from retrieving data files.
You will likely wish to use this setting with spreadsheet 'source' if you wish to uniquely identify your eye tracking data files on a 'per-trial' basis.
3) If (1 or 0) collect detailed eyetracking data. If you need to do advanced analysis on the raw eyetracking data, enable this option to collect it.
Setting (1 or 0): Type either 1 or 0 to select if you want the Eye Tracking 2 Zone to collect detailed eyetracking data, i.e., the full raw coordinate data from the task. Default = 0; By default, the Eye Tracking 2 Zone will not collect detailed raw eyetracking data.
If set to 1, the Eye Tracking 2 Zone will give you the full raw coordinate data.
If set to 0, the Eye Tracking 2 Zone will give you information on the absolute and percentage time the participants' gaze was in each half and each quadrant of the task screen.
Calibration Settings
4) If (1 or 0) use long mode for calibrating, which uses 9 points instead of 5. [Calibrate mode ONLY]
Setting (1 or 0): Type either 1 to select long-mode calibration (which uses 9 calibration points), or 0 to select short-mode calibration (which uses 5). Default = 0; By default, the Eye Tracking 2 Zone will use short-mode calibration.
5) If (1 or 0) show the dot while calibrating. This is useful for testing, but not recommended for participants. Use 1 to show the dot, otherwise 0. [Calibrate Mode ONLY]
Setting (1 or 0): Type either 1 or 0 to select if a 'predicted gaze' dot should be shown during calibration mode. Default = 0; By default, the Eye Tracking 2 Zone will not show a red dot during calibration mode.
If set to 1; The Eye Tracking 2 Zone will show a red dot during calibration mode which represents the position of the 'predicted gaze' of the participant.
If set to 0; The Eye Tracking 2 Zone will not show a red dot during calibration.
6) If (1 or 0) show the validation plot after calibrating. This is useful for testing, but not recommended for participants. Use 1 to show the plot, otherwise 0. [Calibrate Mode ONLY]
Setting (1 or 0): Type either 1 or 0 to select if the Eye Tracking 2 Zone should show an additional screen, containing calibration and validation results, after calibration has completed. Default = 0; By default, the Eye Tracking 2 Zone will automatically advance to the next Screen/Display in your task, once the calibration has completed.
If set to 1; The Eye Tracking 2 Zone will add an additional static screen at the end of the calibration. This screen will contain a visual representation of the eye tracking calibration and validation results. The screen will appear directly after calibration has completed. It will present with an 'End Calibration' button which allows the participant/researcher to advance to the next screen manually in their own time.
If set to 0; The Eye Tracking 2 Zone will not present with the additional calibration/validation results screen. Instead, once the calibration has been completed the participant will be automatically advanced to the next Screen/Display in your task.
We recommend adding a calibration 'finished' screen for your participants to remind them to limit head movement as much as possible for the subsequent trials. This also acts to let them know the eye tracking calibration stage has finished.
7) If (setting) or more calibration points fail, retry calibration. A calibration point is considered failed if the validation prediction for that point is closer to another calibration point.
Setting (number): Type a number of calibration points whose failure will trigger calibration to retry.
Default: If you leave this setting blank, calibration will not be retried.
8) If (setting) calibration failures in row, skip over calibration.
Setting (number): Type the maximum number of times you want the Eye Tracking 2 Zone to retry calibration.
Default: If you leave this setting blank, this will allow calibration to repeat indefinitely.
9) On maximum calibration failures, set embedded data named (setting) to the text value "true"
Setting (text): Type the name you want to give to an embedded data value indicating whether this participant has failed calibration. Use this if, for example, you want to branch participants down different paths in the experiment tree based on whether or not they completed calibration successfully. In your Branch Node, for the Group that failed calibration, the Property would be the name given to this setting, and the Value would equal true.
Default: If you leave this setting blank, the embedded data will not be saved.
10) On maximum calibration failures, send participant to screen named (setting) in the current display.
Setting (text): Type the name of a screen in the current display. Participants who reach the maximum number of calibration failures will be sent to this screen. You could add text to this screen explaining that calibration has failed, and then use an Early Exit button on this screen to eject the participant from the task.
Default: If you leave this setting blank, the participant will not be redirected to another screen on failing calibration.
Record Settings
11) If (1 or 0) continue recording after the end of this screen. Only set this if you are recording data across multiple screens, and ensure that the last screen does not have this set. Use 1 to continue recording and 0 to stop recording.
Setting (1 or 0): Type either 1 or 0 to select if the Eye Tracking 2 Zone should continue recording. Default = 0; By default, the Eye Tracking 2 Zone will stop collecting data when the screen is advanced, producing a unique Eye Tracking data file for this screen.
If set to 1; The Eye Tracking 2 Zone will continue to poll and record the gaze of the participant between screens containing an Eye Tracking 2 Zone. Only set this to 1 if you are recording data across multiple screens, and ensure that the last screen does not have this set (i.e. the last screen is set to 0). Otherwise, Gorilla won't know when to upload your data file.
If set to 0; The Eye Tracking 2 Zone will stop recording once the screen has been advanced and a unique metrics file containing the Eye Tracking 2 data will be created.
Note: If you are planning to upload all your eye tracking data on a separate screen at the end of the block or task (see configuration setting-1 above), you should set this setting to 1 on all screens where you record eye tracking data.
This zone can be localised if you want to run your study in another language. For more information visit our Eye Tracking 2 localisation guide.
For insights and top tips from real researchers, check out our Gorilla Presents webinar on running eye and mouse tracking studies online!
Click to view a Tutorial of the Eye Tracking 2 Zone.
You're viewing the support pages for our Legacy Tooling and, as such, the information may be outdated. Now is a great time to check out our new and improved tooling, and make the move to Questionnaire Builder 2 and Task Builder 2! Our updated onboarding workshop (live or on-demand) is a good place to start.
Note: This feature is currently in Closed-Beta, meaning it is still under development. If you would like to use this zone for your experiment, you can receive access via our contact form.
KNOWN ISSUES
The Gaussian Blur feature of the MouseView Zone does not work in Safari. This is a general issue which also affects implementations of MouseView outside Gorilla. If recruiting participants to an experiment that uses the Gaussian Blur feature of the MouseView Zone, we recommend using the 'Limit by Browser' option on the Recruitment tab to prevent participants using Safari from accessing the study.
The MouseView Zone allows you to track the participant's mouse movements on the screen using a cursor-directed aperture.
Use case: The MouseView Zone can be used for attention tracking in web-based experiments as an alternative to the Eye Tracking Zone.
You can read more about MouseView from their official website. You can also read a paper reporting the reliability and validity of MouseView in a replication of an established eye-tracking task.
The MouseView Zone generates a data file containing the coordinates of the participant's mouse position on the screen over time, with time stamps for each position provided in the time_stamp column. At the top, the file also contains the x-coordinate, y-coordinate, width and height for each Zone on the screen. The x-coordinate provided for each Zone corresponds to the Zone's left-hand edge, and the y-coordinate corresponds to the Zone's bottom edge.
All coordinates are measured in pixels from the bottom-left edge of the screen (0,0), with the x-coordinate increasing as the mouse moves right and the y-coordinate increasing as the mouse moves up. The columns x_normalised and y_normalised report the same coordinates as a proportion of the Gorilla screen space, making these coordinates comparable across different participants. See our eyetracking pages for more information on normalised coordinates.
Setting up the MouseView Zone:
Upload a background stimuli to your screen then place the MouseView Zone on each of your Task Screens where you wish to use mouse view.
Edit Configuration settings of the MouseView Zone - see details below.
In the example below, Setting 1 of the MouseView Zone is left as default, meaning it is set to record and mousetracking data will be collected on this screen. Setting 2 is also left as default: this means that the MouseView data files will have the default prefix 'mouseview'. Setting 3 is set to 1, meaning that mousetracking data will continue recording after the end of this screen - this implies that this screen is the first of many screens and/or trials.
In the Mouseview specific settings, the overlay colour is set to green (Mouseview Setting 4). Overlay Alpha and Gaussian blur are left as default, meaning they will be set to 0.8 and 20 respectively. Finally, the aperture size is set to 10% of screen space.
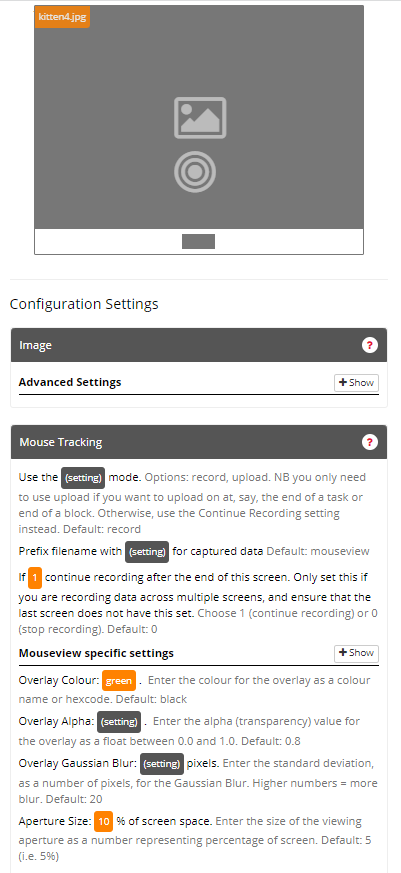
You can view an example of the metrics produced by the MouseView Zone in the image below:
Note that some metric columns have been hidden for presentation purposes.
| Column Name | Row Entry | Description |
|---|---|---|
| Zone Type | mouse_view | This is the Zone 'Type' identifier for the MouseView Zone. |
| Response | [Filename] | This is the filename of the mouse tracking data for this trial. If you have downloaded your metrics after running an experiment, you will find this file in the uploads folder included in your downloaded data. If you have downloaded your metrics from a task preview, you can access the file using the URL in the following row. |
| Response | [URL] | This is the URL link which if pasted into a browser will allow you to download the corresponding mouse tracking data for this trial. When previewing your task, this is how you can access your mouse tracking data files. |
Accessing MouseView data files (in preview mode): When previewing a task, your additional files can be accessed via a URL placed in the metrics. After the preview has finished, download the data and find the URL in this file.
Accessing MouseView data files (in full experiment): When running a full experiment, all of the additional files can be accessed from the 'Download Experiment Data' button on your Experiment's Data page. The zip folder with all your metrics data will include an 'Uploads' folder, containing all of your additional files.
1) Use the (setting) mode.
Setting (record or upload : Type either 'record' or 'upload' to choose the operation mode for the Zone. Default = record; If no mode is set the MouseView Zone will default to the 'record' mode.
Record: In record mode, the MouseView Zone will record participant mouse movements and return the recorded mouse movements to the MouseView Zone Metrics. Use this setting on all screens where you want to record mouse movements.
Upload: Upload mode allows you to generate a single data file containing all mouse movements from an entire block or task. On all screens where you want to record mouse movements, add a MouseView Zone with this setting set to 'record', and setting 3 below (continue recording after the end of this screen) set to 1. Then, on a separate screen at the end of the block or task, add a MouseView Zone with this setting set to 'upload'. This will generate one mouse tracking data file for the whole block or task.
2) Prefix filename with (setting) for captured data
Setting (text): Type a name to identify the mouse tracking data file.
Default = mouseview; By default, the MouseView Zone will produce data with the filename mouseview-1-3, or similar.
When set to any text, this changes the filename of the MouseView data i.e. if set to 'MouseTask', the file might be named 'MouseTask-1-3'.
Note: Only use alpha-numeric characters in your file names. Do not use special characters as this could prevent you from retrieving data files.
3) If (setting) continue recording after the end of this screen.
Only set this if you are recording data across multiple screens, and ensure that the last screen does not have this set (unless you are planning to upload your data on a separate screen at the end of the block or task - see setting 1 above). Choose 1 (continue recording) or 0 (stop recording). Default: 0
Mouseview specific settings
1) Overlay Colour: (setting).
Enter the colour for the overlay as a colour name or hex code. Default: black
2) Overlay Alpha: (setting).
Enter the alpha (transparency) value for the overlay as a float between 0.0 and 1.0. Default: 0.8
3) Overlay Gaussian Blur: (setting) pixels.
Enter the standard deviation, as a number of pixels, for the Gaussian Blur. Higher numbers = more blur. Default: 20
4) Aperture Size: (setting) % of screen space.
Enter the size of the viewing aperture as a number representing percentage of screen. Default: 5 (i.e. 5%)
Click to view an Example of a simple Task which makes use of the MouseView Zone.
For insights and top tips from real researchers, check out our Gorilla Presents webinar on running eye and mouse tracking studies online!
You're viewing the support pages for our Legacy Tooling and, as such, the information may be outdated. Now is a great time to check out our new and improved tooling, and make the move to Questionnaire Builder 2 and Task Builder 2! Our updated onboarding workshop (live or on-demand) is a good place to start.
Note: This feature is currently in Closed-Beta, meaning it is still under development. If you would like to use this zone for your experiment, you can receive access via our contact form.
KNOWN ISSUES
Delay in recording start
There is a delay between Gorilla making the request for the webcam to begin recording and the webcam actually starting data collection. This can cause the beginning of a participant's video recording to be cut off. The length of the delay varies between devices and participants depending on hardware configurations, though is usually consistent within a participant. Currently, there is no method for determining how long the delay is/was.
We recommend building in this delay to your task design. If your stimuli appear on the same screen as the video recording, delay the appearence of the stimuli. If the video recording occurs on a separate screen, delay the appearance of a prompt to start recording. In both cases, the delay can be achieved via script and we currently recommend a delay between 500-1500 ms.
Corrupted recording/ID MISMATCH error
The video recording zone needs to fully close and begin the uploading process on the video at the end of each Screen. Currently, if any zone other than the Video Recording zone ends the screen, this can result in the video recording either becoming corrupted (losing the current recording), or the next recording can be disrupted by the previous recording still finishing, which can result in both recordings being lost (and the error ID MISMATCH appearing in the metrics).
We recommend designing your task around this limitation by making sure the video recording zone ends the screen, either by using the inbuilt video recording timer (as a direct replacement for a Timelimit (Screen) or the Stop Recording button (as a direct replacement for the Continue Button). Note that you can change the text on this button via the localisation settings.
If it isn't possible to rework your task in this manner, you can delay the action of the zone responsible for advancing the script. This can only be achieved via script. We have an example script for delaying the space bar to continue action and delaying the continue button action.
FUTURE PLANS
We have currently exhausted all, readily available options for resolving either of the above issues within the code. While we are pursuing other avenues, these will require substantial changes to the existing zone and supporting infrastructure which will not be backwards compatible with the existing zone. As such, they will require the release of a new zone (Video Recording 2), with the old zone being deprecated. We don't have a timeline for when this new zone will be available however.
Use Case: Use the Video Recording Zone when you need to record a participant on video for part of a Task. This can be particularly useful for studies involving elicitation of gesture, sign language, and/or facial expressions.
The Video recording zone allows you to create video files of your participants, via their webcams.
You can choose to record video with or without audio. You can also choose whether to record automatically on screen start, or to allow the participant to manually start the recording.
Participants will be asked for permission to access their webcam the first time either the Video Recording Zone or the Video Feed Zone is used in an experiment. We recommend first using the zone in its test setting, so participants can check that their webcam is working correctly.
Setting up the Video Recording Zone: The Video Recording Zone has two modes of operation:
Edit Configuration Setting-1 to set the mode for the Video Recording Zone. Both modes should be used at least once within your task.
Setting up 'test' Mode: To set up the Video Recording Zone in test mode:
Note that 'test' mode records no metrics, embedded data nor saves the video recording. Instead this mode allows the participant to instantly play back their recorded video in order to make sure their video can be seen and their webcam is working. Configuration Setting-2 gives you the option to record (and so also test for) audio.
We recommend using 'test' mode at least once in your task to allow your participants to check the video recording is working correctly with their webcam before advancing with your task.
Setting up 'record' Mode: To set up the Video Recording Zone in record mode:
In the example below, the Video Recording Zone is set up in record mode (Setting 1). Setting 2 is left as default, meaning that audio will not be recorded. The video will automatically begin recording when the screen starts, as Setting 3 is set to 1. Once the recording is complete, the task will automatically advance to the next screen (Setting 4). The filename of the recorded video will begin with videoFile, as Setting 5 has been left as default. The recording will be 2 seconds long, as maximum recording time is set to 2000ms (Setting 6).
The advanced settings have been left as default, so the URL of the recorded video file will not be stored as embedded data (Advanced Setting 7), and the Stop Recording button will not be shown (Advanced Setting 8).
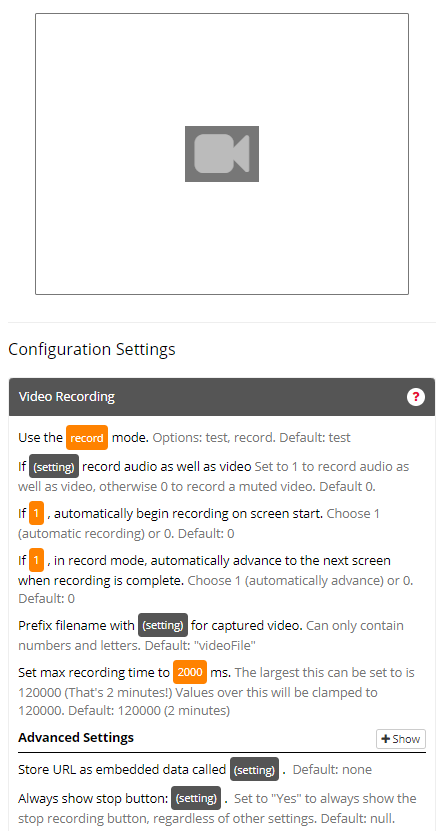
Accessing video files (in preview mode): When previewing a task, your additional files can be accessed via a URL placed in the metrics. After the preview has finished, download the data and find the URL in this file.
Accessing video files (in full experiment): When running a full experiment, all of the additional files can be accessed from the 'Download Experiment Data' button on your Experiments Data page. The zip folder with all your metrics data will include an 'Uploads' folder, containing all of your additional files.
1) Use the (test or record) mode (choose 'test' or 'record')
Setting (test or record): Type either 'test' or 'record' to choose the operation mode for the Zone. Default = test; If no mode is set the Video Recording Zone will default to the 'test' mode.
Test: In test mode the Video Recording Zone will record video, and allow the participant to replay the video to check that their webcam is functioning correctly. Test mode records no metrics.
Record: In record mode the Video Recording Zone will record participant video and return the recorded video to the Video Recording Zone Metrics.
2) If (1 or 0) record audio as well as video
Setting (1 or 0): Type either 1 to turn the setting on, or 0 to turn the setting off.
If set to 1; The Video Recording Zone will record audio as well as video.
If set to 0; The Video Recording Zone will only record video.
3) If (1 or 0) automatically begin recording on screen start.
Setting (1 or 0): Type either 1 to turn the setting on, or 0 to turn the setting off. Default = 0; By default, the Video Recording Zone will begin recording when the 'Start Recording' is pressed.
If set to 1; The Video Recording Zone will begin recording when the screen starts.
If set to 0; The Video Recording Zone will only begin recording when the 'Start Recording' button is pressed.
4) If (1 or 0) automatically advance to the next screen when recording is complete.
Setting (1 or 0): Type either 1 to turn the setting on, or 0 to turn the setting off. Default = 1; By default, the Video Recording Zone will automatically advance to the next screen when either the 'Stop Recording' button is pressed or the maximum recording time is reached (Configuration Setting-6).
Note: If set to 0, the screen will not advance when the participant has finished recording nor when the maximum recording time has been reached. Instead, you must also include an advancement zone (e.g. Continue Button or Timelimit (screen) Zone) or response zone on the same screen so that participants can advance the screen manually.
5) Prefix filename with (text) for captured video
Setting (text): Type a name to identify the recorded video file. Default = videoFile; By default, the Video Recording Zone will produce an video file with the filename videoFile-1-3, or similar.
If set to any text string, this changes the filename of the recorded video file. For example, if set to TaskVideo, the file will be named TaskVideo-1-3.
Note: only use alpha-numeric characters in your file names. Do not use special characters, as this could prevent you from retrieving data files.
You will likely wish to use this setting with spreadsheet 'source' if you wish to uniquely identify your recorded video files on a 'per-trial' basis.
6) Set max recording time to (number) ms (Maximum: 120000 ms)
Setting (number): Type a duration in milliseconds (ms) to set the maximum recording time. Default = 120000; By default, the maximum recording time equals the allowed maximum of 120000 milliseconds (2 minutes).
When set, this restricts the length of an video recording to the number of milliseconds you enter. Once the maximum recording time has been reached the Video Recording Zone will stop recording. Maximum possible recording length is 120000 ms (2 minutes).
This setting is particularly useful when you have set the screen to auto-record and auto-advance, as it stops the recording at the duration set, allowing the screen to progress at a set time.
Advanced Settings
7) Store URL as embedded data called (text)
Setting (text): Type a key-name for the embedded data. Default = none; No key is created, no embedded data is stored.
If set to any text-string, this will store the recorded video as embedded data under the given key name.
You can then retrieve this video file later using this key name. Enter your key name as embedded data - e.g. $${myEmbeddedDataKeyName} - into a Video Zone to replay the recorded video back to the participant.
Note: Video embedded data cannot be retrieved on a screen directly after it is recorded. There must be an intermediary screen of at least 550ms.
8) Always show stop button
Setting (text): Type "Yes" to always show the 'Stop Recording' button, regardless of other settings. For example, by default, if you specify a max recording time using Setting-6, the 'Stop recording' button will not be shown. You can override this default and show the 'Stop recording' button by typing "Yes" for this setting.
This zone can be localised if you want to run your study in another language. For more information visit our Video Recording localisation guide.
Click to view a Tutorial of the Video Recording Zone.
Click to view an Example of a Sample Task which makes use of the Video Recording Zone.
You're viewing the support pages for our Legacy Tooling and, as such, the information may be outdated. Now is a great time to check out our new and improved tooling, and make the move to Questionnaire Builder 2 and Task Builder 2! Our updated onboarding workshop (live or on-demand) is a good place to start.
The Video Feed Zone allows you present participants with the feed from their webcam and to capture still images using the webcam.
Note: This feature is currently in Closed-Beta, meaning it is still under development. If you would like to use this zone for your experiment, you can receive access via our contact form.
This zone can be used in an experiment where you want your participants to believe they are being observed, without actually capturing video recordings.
Participants will be asked for permission to access their webcam the first time either the Video Recording Zone or the Video Feed Zone is used in an experiment.
The demo and example tasks for this zone are currently in development. They will be added here in the future.
In the example below, the Video Feed Zone is set up to require an audio feed as well as video feed (Setting 1). This means that if a microphone feed is not detected, the participant will see a popup error message. Setting 2 is left as default, meaning the video feed will be visible to the participant.
A snapshot of the participant will be taken 500ms after the screen starts (Advanced Setting 3). Advanced Setting 4 has been left as default, so the filename of this snapshot will start with 'snapshot'. The URL of the snapshot will not be stored as embedded data, since Advanced Setting 5 has been left as default. Advanced Setting 6 has been set to 1, so the participant's camera will disconnect once the screen has finished.
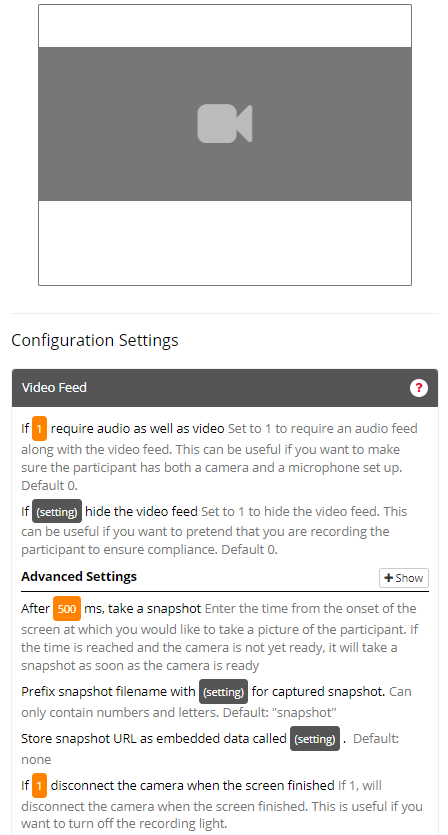
Ordinarily, the Video Feed Zone will not produce any metrics. The exception is if you use the Zone to record a snapshot of the participant (Advanced Setting 3). In this case, the Video Feed Zone will produce 2 rows in your metrics.
You can view an example of the metrics produced by the Video Feed Zone in the image below:

Note that some metric columns have been hidden for presentation purposes.
| Column Name | Row Entry | Description |
|---|---|---|
| Zone Type | video_feed | This is the Zone 'Type' identifier for the Video Feed Zone. |
| Response | [Filename] | This is the filename of the snapshot file for this trial. If you have downloaded your metrics after running an experiment, you will find this file in the uploads folder included in your downloaded data. If you have downloaded your metrics from a task preview, you can access the file using the URL in the following row. |
| Response | [URL] | This is the URL link which if pasted into a browser will allow you to download the corresponding snapshot for this trial. When previewing your task, this is how you can access your snapshot files. |
Accessing snapshot files (in preview mode): When previewing a task, your snapshot files can be accessed via a URL placed in the metrics. After the preview has finished, download the data and find the URL in this file.
Accessing snapshot files (in full experiment): When running a full experiment, all of the snapshot files can be accessed from the 'Download Experiment Data' button on your Experiment's Data page. The zip folder with all your metrics data will include an 'Uploads' folder, containing all of your snapshot files.
1) If (1 or 0) require audio as well as video
Setting (1 or 0): Type either 1 to turn the setting on, or 0 to turn the setting off. Default = 0; If not set the Video Feed Zone will default to not requiring audio.
If set to 1; The Video Feed Zone will require audio as well as video. If no audio feed is detected, the participant will see a popup error message.
If set to 0; The Video Feed Zone will not require audio, only video.
2) If (1 or 0) hide the video feed
Setting (1 or 0): Type either 1 to turn the setting on, or 0 to turn the setting off. Default = 0; If not set the Video Feed Zone will default to showing the video feed.
If set to 1; The Video Feed Zone will hide the video feed from the participant. However, the recording light on the participant's camera will still switch on.
If set to 0; The Video Recording Zone will show the video feed to the participant.
Advanced Settings
3) After (number) ms, take a snapshot
Setting (number): Type a number of milliseconds at which you want to take a picture of the participant. Default = none; No snapshot will be taken.
If set to any number, a snapshot of the view from the participant's webcam will be taken once this number of milliseconds after the start of the screen.
You can then retrieve this snapshot file later by accessing the URL in the metrics (if you are previewing your task), or in the uploads folder of your downloaded data (if you are running the task as part of a full experiment).
4) Prefix snapshot filename with (text) for captured snapshot
Setting (text): Type a name to identify the captured snapshot file. Default = snapshot; By default, the Video Feed Zone will produce a snapshot file with the filename snapshot-1-3, or similar.
If set to any text string; this changes the filename of the captured snapshot file e.g. if set to TaskCapture, the file will be named TaskCapture-1-3.
Note: only use alpha-numeric characters in your file names. Do not use special characters as this could prevent you from retrieving data files.
You will likely wish to use this setting with spreadsheet 'source' if you wish to uniquely identify your captured snapshots on a 'per-trial' basis.
5) Store snapshot URL as embedded data called (text)
Setting (text): Type a key-name for the embedded data. Default = none; No key is created, no embedded data is stored.
If set to any text-string, this will store the captured snapshot as embedded data under the given key name. You can then retrieve this snapshot later using this key name. To display the snapshot to the participant on a subsequent screen, you will need to use an Image Zone and some script along the lines of this script, which adds a recent answer image to a subsequent screen. (You will need to edit the script to enter variable names corresponding to your own task, and also replace stimuliURL on line 95 with recentAnswer.)
6) If (1 or 0) disconnect the camera when the screen finished
Setting (1 or 0): Type either 1 to turn the setting on, or 0 to turn the setting off. Default = 0; If not set, the Video Feed Zone will not disconnect the camera when the screen has finished.
If set to 1; The Video Feed Zone will disconnect the camera when the screen has finished, ensuring the recording light on the participant's camera will switch off.
If set to 0; The Video Recording Zone will not disconnect the camera when the screen has finished; the recording light on the participant's camera will stay on.
This zone can be localised if you want to run your study in another language. For more information visit our Video Feed localisation guide.
You're viewing the support pages for our Legacy Tooling and, as such, the information may be outdated. Now is a great time to check out our new and improved tooling, and make the move to Questionnaire Builder 2 and Task Builder 2! Our updated onboarding workshop (live or on-demand) is a good place to start.
Note: This feature is currently in Closed-Beta, meaning it is still under development. If you would like to use this zone for your experiment, you can receive access via our contact form.
API Compatibility
This zone is reliant on the Vibration API which is only supported on Chromium-based browsers on Android devices. At the moment, this API is not supported on any iOS based device.
There is nothing Gorilla can do to alter or workaround this. We are always limited by what functionality the different browser and device vendors choose to allow. We will keep a close eye on the development of this API and will update this message as new support is added by the browser/device vendors.
The Haptic Feedback zone allows you to play a series of vibrations (haptics) on a users mobile device or tablet. It also allows you to record a series of touch interactions on a screen, such as a participant tapping out a beat. This is stored in embedded data and can be replayed to the participant via the Haptic Feedback zone.
The zone makes use of the Haptics.js API, a wrapper around the Vibration API. It allows for a range of different vibration patterns, from simple, one-off vibrations to more complicated pulse-width modulations.
The demo and examples tasks for this zone are currently in development. They will be added here in the future.
1) Use the (play or record) mode (choose play or record)
Setting (play or record): Type either play or record to choose the operation mode for the Zone. Default = play; If no mode is set the zone will default to the play mode.
Play: In play mode, the Haptic Feedback zone will play a vibration pattern on the participants device.
Record: In record mode, the Haptic Feedback zone will record the participants touch interactions on their device as a series of on (touching) and off (not touching) durations.
Play Mode Settings
2) Use the (basic, beat, fade_in, fade_out or pwm) haptic type.
Setting (basic, beat, fade_in, fade_out or pwm): Type either basic, beat, fade_in, fade_out or pwm to choose the vibration type required. Default = none; a type must be set.
Basic: The basic type delivers a static, flat vibration Beat/Heartbeat: The beat type delivers a heartbeat-like pattern with a strong vibration followed by a lesser vibration. Fade In: The fade_in type delivers a vibration which slowly increase in intensity. Fade Out: The fade_out type delivers a vibration which slowly decreases in intensity. PWM/Pulse Width Modulation: The pwm type delivers a vibration at a variable strength. While device manufacturers only allows the Vibration API to either vibrate or not vibrate a device, it isn't possible to directly set the 'strength' of a vibration. The Haptics.js API resolves this by having the vibration pulse on and off in varying proportions, creating the feeling of a vibration of reduced strength.
3) Durations (number/numbers) all in ms
Setting (number/numbers): Type a duration in milliseconds (ms), or a comma-separated list of durations, for the vibration pattern Default = none; a duration/durations must be set
Entering a single duration play the selected vibration type for that length of time in ms. Entering a comma-separated list of durations will alternate between playing the vibration type and no vibration. e.g. entering 500,250,500 will make the vibration play for 500ms, followed by 250 ms without the vibration, followed by the vibration for 500ms.
All of the vibration types require at least one duration to function except pwm which requires at least three. The first two values represent the balance between the vibration being on and off. e.g. entering 30,10,500 will create a 500 ms length pulse-width-modulated vibration where the vibration is on for 30 ms and off for 10 ms.
The durations setting can also be populated from embedded data - enter an embedded data key in embedded data notation i.e. $${your_key}.
4) Delay before vibration (number) in ms
Setting(number): Enter a time, in ms, to wait upon screen start before starting the vibration pattern. Default = none/0 ms
5) Delay after vibration (number) in ms
Setting (number): Enter a time, in ms, to a wait after the vibration pattern has finished before advancing the screen. Default = none/ 0 ms. Only valid when the screen is set to advance after vibration end.
6) Advance the screen on vibration end: (text) (yes, no)
Setting (text): Enter yes if you want the screen to advance when the vibration pattern ends. Enter no if you do not want the screen to advance when the vibration pattern ends. Default = no
Record Mode Settings
7) Save durations to Embedded Data with key (text)
Setting (text): Enter a string to use as the embedded data key for the recorded 'vibration' pattern. Default = none; no recorded pattern is saved to embedded data
In the record mode, the participants touch interactions with their mobile/tablet device are recorded as a series of durations, starting from the first touch event. For example, if the participant touches the screen for 500 ms, stops touching for 500 ms and then touches again for 500 ms this will be recorded as 500, 250, 500.
By default, this is added to the metrics. It can additionally be added to embedded data so you can edit and/or replay the vibration pattern to the participant.
The demo and examples tasks for this zone are currently in development. They will be added here in the future.
You're viewing the support pages for our Legacy Tooling and, as such, the information may be outdated. Now is a great time to check out our new and improved tooling, and make the move to Questionnaire Builder 2 and Task Builder 2! Our updated onboarding workshop (live or on-demand) is a good place to start.
Note: This feature is currently in Closed-Beta, meaning it is still under development. If you would like to use this zone for your experiment, you can receive access via our contact form.
API Compatibility
This zone is reliant on the WebHID API and GoDirectJs which is only supported on Chromium-based desktop browsers.
There is nothing Gorilla can do to alter or workaround this. We are always limited by what functionality the different browser and device vendors choose to allow. We will keep a close eye on the development of this API and will update this message as new support is added by the browser/device vendors.
Device requirements
Additionally, the zone requires a Go Direct(R) Handdynamometer, connected via USB. While there is an option to connect via Bluetooth, our experience during development is that the Bluetooth connection was quite unreliable.
While initially built for a Handdynamometer, the zone could be adapted to connect with other Go Direct(R) devices.
The Vernier Go Direct(R) Handdynamometer zone allows you to link your task to a hand-held handdynamometer connected via USB. The zone handles opening and managing the connection to the handdynamometer, as well as collecting and storing force data from the device.
While the handdynamometer has several different sensors available, the zone currently connects to the force sensor only. The zone could be adapted to connect to multiple different sensors.
As per the requirements of the WebHID API and USB API, a connection to the handdynamometer can only be established following a participant interaction with the web page. Further, the participant must confirm the device to connect with via a browser-controlled modal.
However, following this initial connection, no further participant interactions with the web page should be required to maintain the connection to the handheld device.
The demo and example tasks for this zone are currently in development. They will be added here in the future.
1) Measurement interval: (number) in ms
Setting (number): Enter a number, in ms, for the preferred interval between measurements from the connected device. Default: Dependent on device; The zone will use the default, inbuilt measurement interval for the connected device.
2) Number of measurements: (number)
Setting (number): Enter the maximum number of measurements to be recorded from the connected device on the current screen. Default: none; The device will continue to record measurements until the screen ends.
3) Advance after measurements: (yes or no)
Setting (yes or no): Type yes if, after the maximum number of measurements (setting 2) are retrieved the screen should advance. Type no if the screen should not advance as a result of the maximum number of measurements being reached i.e. another zone on the screen will trigger the zone to advance. Default: no; the screen will be advanced by another zone on the screen
4) At end of screen, keep connection open: (yes or no)
Setting (yes or no): Type yes if, when the current screen ends, the connection to the connected device should be kept open. Type no if the connection to the device should be closed. Default: no; the connection to the device will be closed at the end of the current screen.
Use the yes option if you intend to continue using the connected device in the current task. Use the no option if the connected device will not be used again during the task (or will not be used for some time). Note that the connection will automatically close when moving on to the next task.
The demo and examples tasks for this zone are currently in development. They will be added here in the future.
You're viewing the support pages for our Legacy Tooling and, as such, the information may be outdated. Now is a great time to check out our new and improved tooling, and make the move to Questionnaire Builder 2 and Task Builder 2! Our updated onboarding workshop (live or on-demand) is a good place to start.
Note: This feature is currently in Closed-Beta, meaning it is still under development. If you would like to use this zone for your experiment, you can receive access via our contact form.
The Drag and Drop Main zone is the primary zone in Gorilla's Drag and Drop system in the Task Builder. It allows definition of an image that can be dragged and dropped anywhere on the screen. To limit users to dropping only on specific, predesignated areas of the screen, combine this zone with the Drag and Drop Scoring zone
The demo and examples tasks for this zone are currently in development. They will be added here in the future.
In this example, the Drag and Drop Main Zone is in 'free' mode. This allows the image to be dragged and dropped anywhere across the screen, without the use of the Drag and Drop Scoring Zone. Here, the participant will have a maximum of 3 drag and drop actions. Once the zone has been dragged & dropped 3 times, the screen will automatically advance.
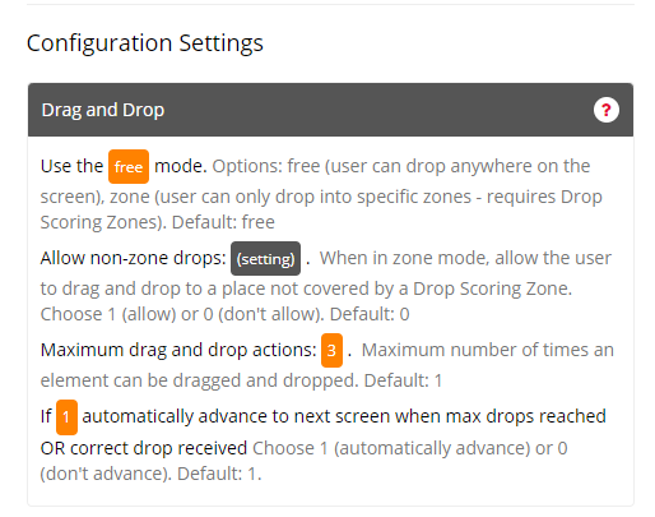
You can view an image example of the Drag and Drop Main Zone metrics below:

See below for more details about these metric columns:
| Column Name | Row Entry | Description |
|---|---|---|
| Zone Type | drag_and_drop_main | This is the Zone 'Type' identifier for the Drag & Drop Main Zone |
| Reaction Time | [Number] | This is the reaction time (in ms), as measured from the start of the screen, at which the participant dropped the Zone. |
| Response | [Number] px Top, [Number] px Left | This shows the number of pixels from the Top of the Gorilla window, and number of pixels from the Left of the Gorilla window that the zone was dropped at. When the maximum drag & drop actions have been met, as specified in the configuration settings, 'Max drops reached' will be shown here, too. |
Setting up the Drag And Drop Main zone:
After adding the Drag and Drop Main zone to the screen
Upload a stimuli file and then set that as the draggable stimuli, by clicking on the zone in the screen layout window (this is the same as how you would set the image for an Image zone)
Configure the settings, as described below, as appropriate for your task
1) Use the (settings) mode.
Setting (free or zone). Determines the operation mode for the Zone. Default = free; If no mode is set the zone will default to the free mode.
Free: In the free mode, the participant is free to drop the dragged image anywhere within the Gorilla window (a 4:3 window in the center of the screen).
Zone: In the zone mode, the participant can only drop the dragged image on top of a Drag and Drop Scoring zone. When used in this mode, one or more Drag and Drop Scoring zones must also be used.
2) Maximum drag and drop actions: (setting).
Setting (integer): Enter an integer to indicate the maximum number of times the image can be dragged and dropped.
Default = 1; If no value is set, the image can be dragged and dropped only once.
3) If (setting) automatically advance to next screen when max drops reached OR correct drop received.
Setting (integer, 1 or 0): Enter either 1 or 0 to indicate whether the task should advance to the next screen on the maximum drag and drop actions being reached, or a correct drop response being recorded.
Default: 1; If no value is set, the task will advance to the next screen on maximum drops being reached, or a correct drop response being received.
It is only possible to mark a drop response as being correct when used in the zone mode and combined with Drag and Drop Scoring zones.
The demo and examples tasks for this zone are currently in development. They will be added here in the future.
You're viewing the support pages for our Legacy Tooling and, as such, the information may be outdated. Now is a great time to check out our new and improved tooling, and make the move to Questionnaire Builder 2 and Task Builder 2! Our updated onboarding workshop (live or on-demand) is a good place to start.
Note: This feature is currently in Closed-Beta, meaning it is still under development. If you would like to use this zone for your experiment, you can receive access via our contact form.
The Drag and Drop Scoring zone is the companion zone to the Drag and Drop Main zone. It allows you to define areas of the screen where the participant can drop the dragged item. You can give drops in these zones a specific value and also mark a drop as correct or incorrect.
The demo and examples tasks for this zone are currently in development. They will be added here in the future.
In this example, the Drag and Drop Scoring Zone has been configured so that no border is shown by default, and when the Scoring Zone is dragged over the Zone will change colour to green. Also, when dropped the item will not snap to the centre.
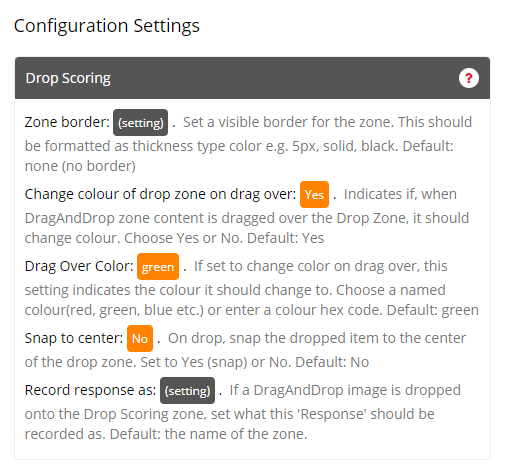
The metrics for this zone are produced by the Drag and Drop Main Zone, the companion zone to the Drag & Drop Scoring.
Setting up the Drag And DropScoring zone:
After adding the Drag and Drop Scoring zone to the screen
If you require it, upload a stimuli file and set that as the background for your drop zone. You can do this by clicking on the zone in the screen layout window (in the same manner as you would an image for an Image zone)
Configure the settings, as described below, as appropriate for your task
The Drag and Drop Scoring zone, when combined with the Drag and Drop Main zone set to zone mode, is an Active Response Zone.
1) Zone border: (setting).
Setting (text; pixel width, type, colour). Set a visible border for the zone.
Default: none; If no content is set, the zone will appear without a border.
The border can be used to help guide participants as to where on the screen the Drop Scoring zones are. You can define the borders thickness in pixels, its type and its color using the standard notation for borders in HTML5 style elements and CSS. For example, to define a border that is 5 pixels thick, solid (meaning an unbroken border) and black you would enter
5px, solid, black
into the setting box.
2) Change colour of drop zone on drag over: (setting).
Setting (text; yes or no). Enter either yes or no to indicate if the drop zone should change colour when the dragged element is over the drop zone.
Default = yes; If no value is set, the drop zone should change colour when the dragged element is over the drop zone.
3) Drag Over Colour: (setting).
Setting (text). Enter a name or hex code for the colour change of the Drop zone.
Default = green; If no value is set, the drop zone will change to a green background when the dragged element is over the drop zone. Note: this will only occur if the previous setting is set to yes.
4) Snap to center: (setting).
Setting(text; yes or no). Enter either yes or no to indicate if the dropped element should snap to the center of the Drop zone.
Default: no; If no value is set, the dragged element will drop to the same relative position as it was when dragged over the Drop zone.
Normally, the dragged element will be dropped exactly where the mouse cursor (or finger tip for touch moving) is. If instead, you want the dragged element to snap to the center of the Drop zone, change this setting to yes.
5) Record response as: (setting).
Setting (text). Enter the value that should be sent as the response, when a dragged element is dropped on this zone.
Default: the zone name; If no value is set, the name of the zone will be sent as a response.
When a participant drops a dragged element on to a Drop Scoring zone, a response will be sent to Gorilla which, in conjunction with the Active Response zones, can then be compared to the desired correct answer. This allows you to mark a specific Drop Scoring zone as being the correct one.
As a result, when using the Drag and Drop Scoring zone (and the Drag and Drop Main zone in zone mode) you can use Response Feedback zones as well as Screen Branching and automatic Embedded Data for correct answer counts.
The demo and examples tasks for this zone are currently in development. They will be added here in the future.
You're viewing the support pages for our Legacy Tooling and, as such, the information may be outdated. Now is a great time to check out our new and improved tooling, and make the move to Questionnaire Builder 2 and Task Builder 2! Our updated onboarding workshop (live or on-demand) is a good place to start.
This functionality is deprecated and will not appear unless previously set in a task.
Please use the new Timelimit (screen) Zone
Set a timelimit for the screen. When this timelimit expires the task will advance to the next screen.
Automatically advance to the next screen after number milliseconds
The task will automatically advance to the next screen after the set time.
You're viewing the support pages for our Legacy Tooling and, as such, the information may be outdated. Now is a great time to check out our new and improved tooling, and make the move to Questionnaire Builder 2 and Task Builder 2! Our updated onboarding workshop (live or on-demand) is a good place to start.
This functionality is deprecated and replaced with the updated Embedded YouTube Zone.
Please use the new Embedded YouTube Zone!
The Embedded YouTube Zone allows you to present a single YouTube video on your screen. You must first copy the link of the YouTube video you wish to Embed. Then paste link into the Embedded YouTube Zone or relevant spreadsheet column.
For the link you can use any of the following:
Use the Embedded YouTube Zone to contain the video media you wish to present. The Embedded YouTube Zone is typically used to present short YouTube video stimuli.
Embedded YouTube Zone Icon:
-- No Settings --
Click to view an Example of a Sample Task which makes use of the Embedded YouTube Zone.
You're viewing the support pages for our Legacy Tooling and, as such, the information may be outdated. Now is a great time to check out our new and improved tooling, and make the move to Questionnaire Builder 2 and Task Builder 2! Our updated onboarding workshop (live or on-demand) is a good place to start.
This functionality is deprecated as of 13th April 2021.
Please use the Web Audio Zone!
The standard Audio zone has been formally deprecated! It can no longer be added to tasks. It will continue to function as-is in existing tasks. Please use the Web Audio zone instead!
The Web Audio zone uses a modern API, with better timing performance and improved response in the event of Autoplay Restrictions. The Web Audio zone has all the same features as the original Audio zone and should be used in its place.
The Audio Zone allows you to add a single uploaded audio (sound) file to your screen.
Supported audio file types: .mp3, .ogg.
We recommend using the .mp3 format for audio files. This is the most widely supported audio file format and the de facto standard for audio on the web.
Please Note: .wav files are not widely supported for online use and we highly recommend you convert all .wav files to mp3 before uploading them as stimuli, in order to avoid issues and variation in browser playback performance. Upon uploading a .wav file a warning message will appear.
Use the Audio Zone to contain the audio media you wish to present. The Audio Zone is typically used to present audio stimuli.
If you are presented with a ‘Media error message’ when previewing your task view the Media Error Message troubleshooting guide for further help.
Audio Zone Icon:
In the example below, the Audio Zone has been set-up to be started manually by the participant (Setting1) and be played a total of 3 times (Setting2). This Audio Zone is not set to auto-advance (Setting3) and so a continue button (Response Zone) is needed to allow the participant to move the screen on manually.
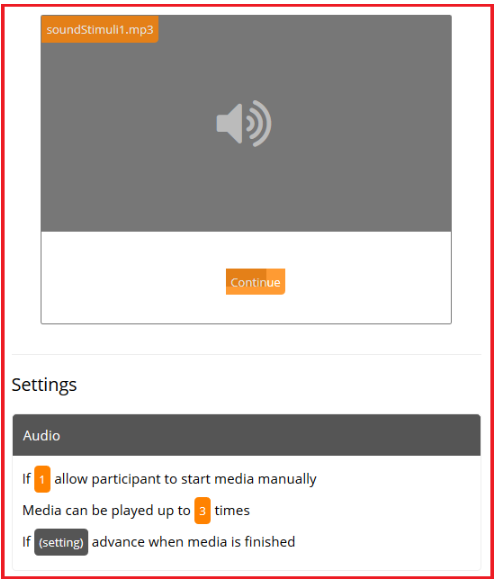
The Audio Zone produces specific metrics in 4 columns within your Data-Spreadsheet. If you opt to allow participants to start playing the media manually (or be able to repeat playing the media) you will also produce an additional row in your Data Spreadsheet for the time when the participant started the audio.
You can view an example of the metrics produced by the Audio Zone in the image below:
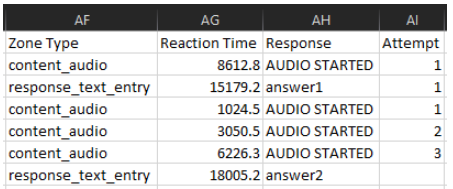
| Column Name | Row Entry | Description |
|---|---|---|
| Zone Type | content_audio | This is the Zone 'Type' identifier for the Audio Zone. |
| Reaction Time | [Number] | This is the reaction time in milliseconds (ms). 1. If the Audio Zone has been set up to play automatically and then also advance automatically this number represents the time, in ms, at which the zone finished playing and the screen advanced. 2. If the Audio Zone has been set up to be started manually (or the repeat functionality has been enabled) then this number will represent the reaction-time, in ms, at which the participant pressed the 'Play' media button. (see 'Response' column below) |
| Response | [Blank] or "AUDIO STARTED" | This indicates if the participant has pressed a 'Play' media button. 1. If the Audio Zone has been set up to be started manually (or the repeat functionality has been enabled) then you will gain an additional row entry with the response entry: 'AUDIO STARTED'. This indicates the reaction time (see above) at which the participant pressed the 'Play' media button. 2. This column will appear blank/empty otherwise. |
| Attempt | [Number] | This indicates the number of times the participant has pressed the 'Play' media button. 1. If the Audio Zone has been set up to be started manually (or the repeat functionality has been enabled) then this is the number of times the participant has opted to play the media. 2. This column will appear blank/empty otherwise. |
1) If (1 or 0) allow participant to start media manually
Setting (1 or 0): Type 1 to turn setting on, Type 0 to turn setting off.
Default = 1 (on); a play button will be shown allowing the participant to manually start the media playback.
If set to 0 (off) the audio will play automatically when the participant arrives at the screen of the Audio Zone.
Autoplay of audio in some browsers is no longer permitted! To learn more about these changes and how they may affect you, review this article: Autoplay Changes
2) Media can be played up to (number) times
Setting (number): Type the number of times you wish the media to be re-playable.
Default = 1; the audio will play once. Note: Setting-1 must be turned on (1) in order to use this setting.
Set any number (numerical value) to limit the participant to this many plays.
If they are allowed to replay the media, a Replay button will be shown once the media has finished playing fully.
If set to 0, the media will be infinitely replayable, i.e. there is no limit to the number of times a participant can repeat this media.
3) If (1 or 0) advance when media is finished
Setting (1 or 0): Type 1 to turn setting on, Type 0 to turn setting off.
If set to 1 (on), the screen will automatically advance once the media has finished playing.
This zone can be localised if you want to run your study in another language. For more information visit our Audio localisation guide.
Click to view an Example of a Sample Task which makes use of the Audio Zone.
You're viewing the support pages for our Legacy Tooling and, as such, the information may be outdated. Now is a great time to check out our new and improved tooling, and make the move to Questionnaire Builder 2 and Task Builder 2! Our updated onboarding workshop (live or on-demand) is a good place to start.
This functionality is deprecated and will not appear unless previously set in a task.
Please use the new Feedback Web Audio (Accuracy) Zone!
The Feedback Audio (Accuracy) zone has been formally deprecated! It can no longer be added to tasks. It will continue to function as-is in existing tasks. Please use the Feedback Web Audio (Accuracy) zone instead!
The Feedback Web Audio (Accuracy) zone uses a modern API, with better timing performance and improved response in the event of Autoplay Restrictions. The Feedback Web Audio (accuracy) zone has all the same features as the original Feedback Audio (Accuracy) zone and should be used in its place.
The Feedback Audio (Accuracy) Zone allows you to provide the participant with audio feedback about the accuracy of their response.
Edit the Zone content for the two sections of the Feedback Audio (Accuracy) Zone to select the audio to be played as feedback:
Note: Unlike the 'Feedback (Accuracy) Zone' this zone has no default audio feedback stimuli instead you must upload your own audio sound files to use within this zone.
To control which type of audio feedback is displayed and change feedback 'honesty':
The Feedback Audio (Accuracy) Zone is typically used when you wish to present your participants with instantaneous audio feedback about the accuracy of their answers or responses to your question.
Note: You do not need to use a feedback zone to provide participants with their score; to show participants their score based on multiple responses, instead use the 'Embedded data settings' of the Active Response Zone configuration settings. Read more about using embedded data in our Embedded Data guide.
Feedback Audio (Accuracy) Zone Icon:
In the example below, the Feedback Audio (Accuracy) Zone has been set-up to give feedback on both correct and incorrect responses (Setting 1 & 2). Audio files have been uploaded to the Stimuli page and the full file path is written in the Feedback Audio (Accuracy) zone as content for both 'correct' and 'incorrect' feedback options. Feedback is 100% honest as Feedback honesty settings are turned off (Setting 4 & 5). In this example a text response button called 'A' is set up to be the correct answer (Active Response config setting 1). If the participant selects this as their response, then the audio sound file 'YES.mp3' will play. Any other response selected by the participant will result in the audio sound file 'NO.mp3' being played.
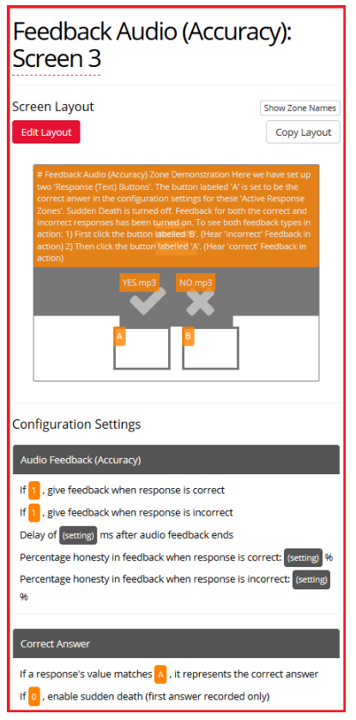
1) If (1 or 0) give feedback when response is correct
Setting (1 or 0): Type 1 to turn setting on, Type 0 to turn setting off.
Default = 'Off' (0); No feedback is displayed.
If set to 1, turns on feedback: displays feedback when a correct answer is selected by the participant.
Note: You must have set up a correct answer in the 'Active Response Correct Answer' configuration settings for this to work.
2) If 1 or 0 give feedback when response is incorrect
Setting (1 or 0): Type 1 to turn setting on, Type 0 to turn setting off.
Default = 'Off' (0). No feedback is displayed.
If set to 1, turns on feedback: displays feedback when an incorrect answer is selected by the participant.
Note: You must have set up a correct answer in the 'Active Response Correct Answer' configuration settings for this to work.
3) Delay of (number) ms after audio feedback ends
Setting (number): Type a numerical value for the amount of time, in milliseconds (ms), you wish to delay after the audio feedback has ended.
Default = 0; No delay after feedback has finished playing, if the screen would advance it does so immediately.
When set if the screen would normally advance once the response has been entered; there will be a delay of this amount of time, after the audio feedback has finished playing, before the screen is advanced. **i.e. Active Response Setting 'Sudden death' is turned on (set to 1)
Advanced Settings
4) Percentage honesty in feedback when a response is correct (number)%
Setting (number): Type a numerical value between 0 and 100 to set the percentage of honesty for 'correct' answer feedback.
Default = 100; feedback is always (100%) honest. If the participant gives a correct answer, then the correct answer feedback will be presented 100% of the time.
If set to any value between 0 and 100 then the percentage of 'correct answer' feedback presented, upon a correct answer being recorded, will be honest the specified % of time.
In the metrics: A correct response will always be recorded as correct. The column 'dishonest' will have a 1 if the participant received dishonest feedback - and a 0 if the participant received honest feedback.
Note 1: If you wish to use Feedback Honesty setting, you MUST turn on Sudden Death in your Active Response Settings. i.e. Active Response Setting-2 (sudden death) must be turned on (set to 1).
Note 2: Feedback Honest will not work correctly with unlimited responses - although feedback provided to participants will be dishonest (if sudden death is turned on) the dishonesty will not be recorded in the metrics.
5) Percentage honesty in feedback when response is incorrect (number)%
Setting (number): Type a numerical value between 0 and 100 to set the percentage of honesty for 'incorrect' answer feedback.
Default = 100; feedback is always (100%) honest. If the participant gives an incorrect answer, then the incorrect answer feedback will be presented 100% of the time.
If set to any value between 0 and 100 then the percentage of 'incorrect answer' feedback presented, upon a incorrect answer being recorded, will be honest the specified % of time.
In the metrics: A incorrect response will always be recorded as incorrect. The column 'dishonest' will have a 1 if the participant received dishonest feedback - and a 0 if the participant received honest feedback.
Note 1: If you wish to use Feedback Honesty setting, you MUST turn on Sudden Death in your Active Response Settings. i.e. Active Response Setting-2 (sudden death) must be turned on (set to 1).
Note 2: Feedback Honest will not work correctly with unlimited responses - although feedback provided to participants will be dishonest (if sudden death is turned on) the dishonesty will not be recorded in the metrics.
Click to view an Example of the Feedback Audio (Accuracy) Zone.
You're viewing the support pages for our Legacy Tooling and, as such, the information may be outdated. Now is a great time to check out our new and improved tooling, and make the move to Questionnaire Builder 2 and Task Builder 2! Our updated onboarding workshop (live or on-demand) is a good place to start.
This functionality is deprecated and will not appear unless previously set in a task.
Please use the new Go/No-Go Web Audio Zone!
The Go/No-Go (Audio) zone has been formally deprecated! It can no longer be added to tasks. It will continue to function as-is in existing tasks. Please use the Go/No-Go (Web Audio) zone instead!
The Go/No-Go (Web Audio) zone uses a modern API, with better timing performance and improved response in the event of Autoplay Restrictions. The Go/No-Go (Web Audio) zone has all the same features as the original Go/No-Go (Audio) zone and should be used in its place.
Go / No-Go Audio Zone Icon:
The Go/No-Go (Audio) Zone is specialised for implementing audio go/no-go style experimental paradigms. This specialised Zone allows you to present an audio stimuli, while allowing the recording of a 'NoGo' response or an 'inhibited' response as a named response.
The Go/No-Go (Audio) Zone differs from other response zones, which record all 'non-responses' as both 'incorrect' and 'timed-out'. Once the requisite times have elapsed and no other response has been detected, the Go/No-Go (Audio) Zone will record a 'No Go' response. You can use any Active Response Zone - e.g. response button or keyboard response - to detect the 'Go' response.
Setting up the Go/No-Go Zone: There are three main steps to setting up an Audio Go / No-Go Zone:
Supported audio file types: .mp3, .ogg.
Note: If you wish to use Image Stimuli instead of Audio stimuli you will need to use the Go/No-Go Zone.
Use Case:
The Go/No-Go (Audio) Zone is primarily used for implementing go/no-go experimental paradigms. However this Zone is also highly applicable to Auditory search and Stimulus-Response compatibility tasks.
1) Record response as (text) for No Go
Setting (text): Type a name which will be used to record a 'No-Go' response.
Default = none; The participants No-Go response will not be recorded.
If set to any text value: When the participant inhibits responding during a trial, the response will be recorded in the 'Response' column of your metrics as your text.
For example, if you wish to mark your participants 'No-Go' response as correct for a particular trial, then in this instance you would use 'nogo' as your correct answer value in your 'ANSWER' Column for the trial in your spreadsheet. Check out the image examples above for a demonstration of this set-up.
2) If (1 or 0) continue to end of audio stimuli after user input
Setting (1 or 0): Type 1 to turn setting on, Type 0 to turn setting off.
Default = 1 (on); A users response will not instantly end the trial, instead the audio file durations are honoured in full. i.e. Regardless of whether the participant responds or not, the audio file stimuli will play to their full durations.
If set to 0; then a users response will instantly end the trial and they will be advanced to the next screen within your task.
Click to view an Example of a Sample Task which makes use of the Go/No-Go (Audio) Zone.