You're viewing the support pages for our Legacy Tooling and, as such, the information may be outdated. Now is a great time to check out our new and improved tooling, and make the move to Questionnaire Builder 2 and Task Builder 2! Our updated onboarding workshop (live or on-demand) is a good place to start.
Here you can learn about the basic features of building questionnaires in Gorilla by exploring the list of questions on the left.
Not sure where to start? Try one of these quick-start shortcuts:
Looking for more information on a specific Questionnaire Widget? - Check out the Questionnaire Builder 1 Widget Tooling Reference Guide.
If you can't find an answer to your question here please get in touch with us via our contact form. We are always happy to help you, simply tell us a little about what you are trying to achieve and where you are getting stuck.
You're viewing the support pages for our Legacy Tooling and, as such, the information may be outdated. Now is a great time to check out our new and improved tooling, and make the move to Questionnaire Builder 2 and Task Builder 2! Our updated onboarding workshop (live or on-demand) is a good place to start.
Questionnaires allow you to gather information from your participants without reaction time data.
Questionnaires consist of blocks of Rich Text content (which can be a mixture of Markdown and/or HTML) and Response widgets, which offer a range of ways for participants to be asked questions.
Questionnaires can be used to collect demographic information or information about your participants that is specific to your study or the task itself.
Questionnaires can also just be used to display text, images and videos to participants, and so can be used to provide additional direction within an experiment.
For advanced users; information from a questionnaire can be used in conjunction with a 'Branch' Tree Node to change which path a participant takes through your Experiment Tree.
A question about a participants' first language could be used to give them a version of the task in their first language. Alternatively, you might exclude someone entirely if a particular language is not their first language.
You're viewing the support pages for our Legacy Tooling and, as such, the information may be outdated. Now is a great time to check out our new and improved tooling, and make the move to Questionnaire Builder 2 and Task Builder 2! Our updated onboarding workshop (live or on-demand) is a good place to start.
A new Gorilla Questionnaire can be created within a Project by pressing the 'Create' button and selecting 'Questionnaire Builder 1' from the dropdown menu.
In the create menu that appears, enter a name for your new Questionnaire and then press 'OK'.
You will then be redirected to the Questionnaire Builder for your newly created questionnaire.
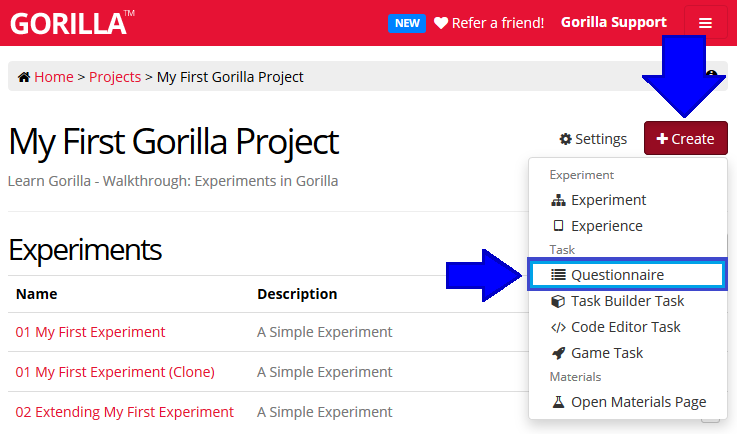
Create Dropdown Menu: Selecting Questionnaire from the create Menu Dropdown. Selection highlighted by the blue box in the image above.
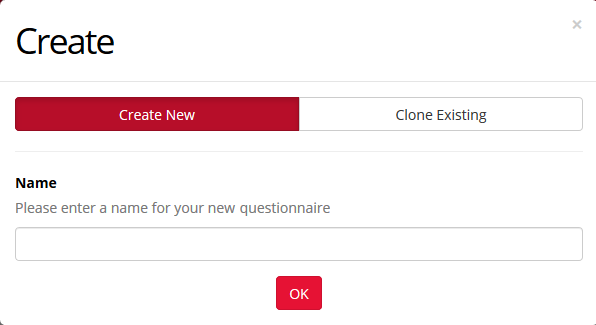
Create menu: With the 'Create New' option selected; Enter a name for your new Questionnaire and press OK.
When choosing a name for your Questionnaire, try to make it something unique and memorable - a name you would easily associate with the Questionnaire contents.
You will use this name to identify your Questionnaire in your project. It is also the name people will see if you collaborate or send your Questionnaire with someone, so its important that they would be able to recognise it easily too!
Add descriptions to your Questionnaire via the 'description' option in the Settings menu. This description will then be visible from the project overview screen. You can use this feature to add a short reminder of what your Questionnaire is about or leave a progress message to yourself or collaborators.
You're viewing the support pages for our Legacy Tooling and, as such, the information may be outdated. Now is a great time to check out our new and improved tooling, and make the move to Questionnaire Builder 2 and Task Builder 2! Our updated onboarding workshop (live or on-demand) is a good place to start.
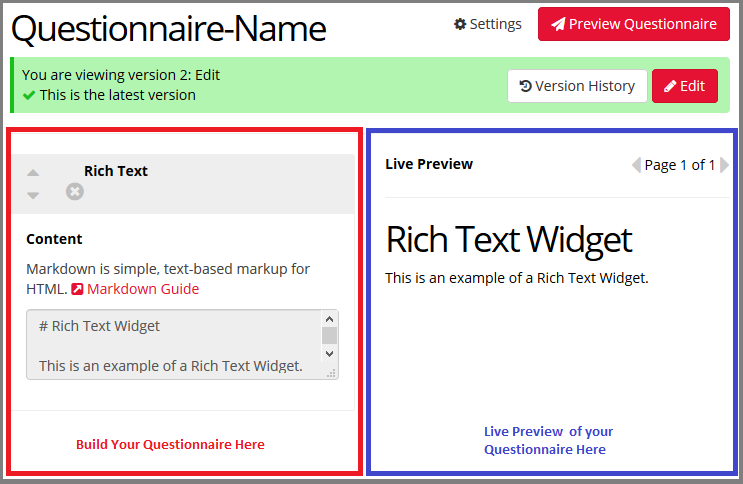
In Gorilla you create questionnaires using the Questionnaire Builder.
The Questionnaire Builder interface is divided into two major sections:
The image below shows the positions of the Questionnaire Builder and Live Preview sections of the Interface:
You're viewing the support pages for our Legacy Tooling and, as such, the information may be outdated. Now is a great time to check out our new and improved tooling, and make the move to Questionnaire Builder 2 and Task Builder 2! Our updated onboarding workshop (live or on-demand) is a good place to start.
A Questionnaire is built in a similar way to creating a task with the task builder, though the interface is much simpler..
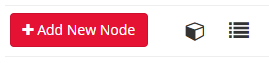
When building a new questionnaire the first step is to add a Questionnaire Widget, here's how:
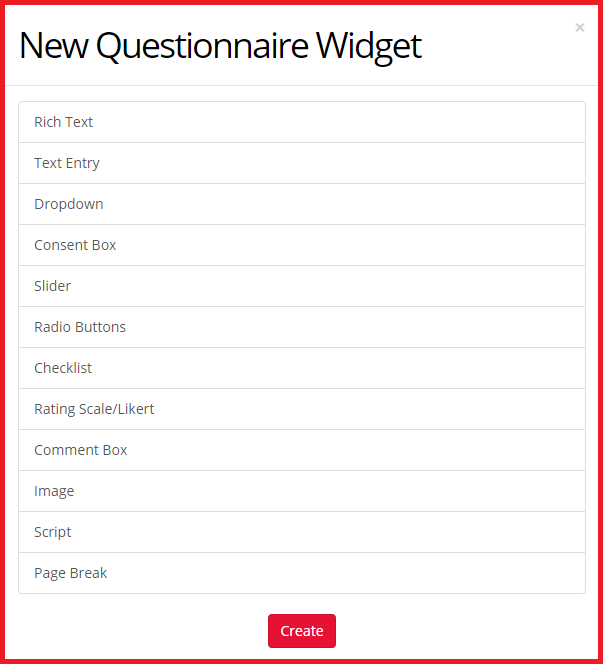
There are over 20 different Questionnaire Widgets to choose from, allowing you to present and/or gather data from your participants in a variety of different ways.
Once you've added a Questionnaire Widgets to your Questionnaire, it will appear on the left-hand side. The Widget will appear with a title bar displaying the name of the widget type, and a list of options beneath it. Enter content for your Widget and you will see it displayed automatically on the right-hand side.
When you have added a few widgets modifying your questionnaire is straightforward:
On the title bar of a widget, there are two arrows, which can be used to reorder your questionnaire widget. There is also a cross, which allows you to delete the selected widget from your questionnaire entirely.
When you are happy with your questionnaire, or wish to save your progress, press the green 'Commit Version' button. You will then be able to use your Questionnaire in your experiments.
Go through to the next page of this guide to find out more about Questionnaire Widgets. If you have a specific question about a particular Questionnaire Widget the best place to look is in the Questionnaire Widget Tooling Reference Guide.
You're viewing the support pages for our Legacy Tooling and, as such, the information may be outdated. Now is a great time to check out our new and improved tooling, and make the move to Questionnaire Builder 2 and Task Builder 2! Our updated onboarding workshop (live or on-demand) is a good place to start.
Questionnaire Widgets are the building blocks of questionnaire creation.
There are currently over 20 different Questionnaire Widgets for you to choose from, allowing you to present and/or gather data from your participants in a variety of ways.
You can create any questionnaire you wish by simply combining Questionnaire Widgets in different orders. Learn how to add Questionnaire Widgets into your questionnaires.
Broadly speaking the Questionnaire Widgets fall into three categories: Content Widgets, Response Widgets and Layout Widgets.
There is also the Script Widget which is a stand-alone widget useful for all questionnaire related coding, and the Switch Widget.
The Switch Widget combines with a Switch Node in the Experiment Tree, and either a Task containing a Switch Zone, or another Questionnaire containing a Switch Widget, to allow participants to switch between two tasks.
Below are the some of the Questionnaire Widgets you will find in Gorilla's Questionnaire Builder:
| Rich Text | Consent Box | Dropbox | Date Entry | Email Entry |
|---|---|---|---|---|
| Image | Text Entry | Checklist | Time Entry | Slider |
| Page Break | Comment Box | Radio Buttons | Height Entry | Rating Scale/Likert |
| Script | Switch | Mixed Entry | Weight Entry | Ranking |
You can find out more detailed information about each Questionnaire Widget in the Tooling Reference Guide.
You're viewing the support pages for our Legacy Tooling and, as such, the information may be outdated. Now is a great time to check out our new and improved tooling, and make the move to Questionnaire Builder 2 and Task Builder 2! Our updated onboarding workshop (live or on-demand) is a good place to start.
Content Widgets allow you to add content to your questionnaire in the form of, text, images, links etc. For example, you may wish to add text content such as a title for your questionnaire or a set of instructions for your participant.
Here is an example of a content widget - the Rich Text Widget:
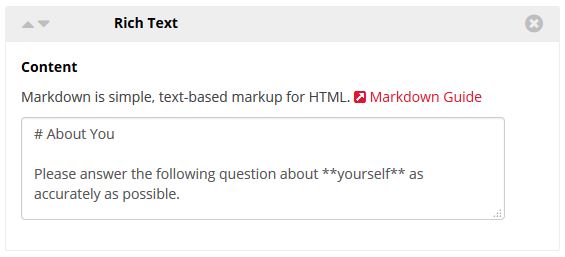
In the content box of the widget you add the text you wish to be displayed. In the example above you can see that the content has been modified using Markdown. All text content can be formatted and stylised using Markdown and/or HTML, this means you can easily make your questionnaire look exactly how you wish!
Learn more about text formatting using our Markdown and HTML guides.
You're viewing the support pages for our Legacy Tooling and, as such, the information may be outdated. Now is a great time to check out our new and improved tooling, and make the move to Questionnaire Builder 2 and Task Builder 2! Our updated onboarding workshop (live or on-demand) is a good place to start.
Response Widgets allow you to ask questions and record the responses of your participants. You can always recognise response widgets because they are the only widgets which have a 'Key' configuration setting.
Here is an example of a response widget - the Dropdown Widget:

In the example above you can see that below the response widget title there is a list of configuration settings. While most settings may be self-explanatory, you can always find out more about each and every widget in the Questionnaire Widget Tooling Reference Guide.
Other than the 'Key' there are two other configuration settings, pictured in the example above, which the majority of response widgets share: 'Allow Missing' and 'Write to Embedded Data'.
It is always a good idea to rename your keys from their default values, to something more relevant. You will see these keys as headings when viewing the downloaded data from the questionnaire. Thus they will be most useful to you if they are easily recognisable.
As space is a premium in Excel, it is a good idea to use 'camelCase' or 'PascalCase' to remove the white space from your key names:
This is what camelCase looks like: hereIsAnExample. This is what PascalCase looks like: HereIsAnotherExample.
You're viewing the support pages for our Legacy Tooling and, as such, the information may be outdated. Now is a great time to check out our new and improved tooling, and make the move to Questionnaire Builder 2 and Task Builder 2! Our updated onboarding workshop (live or on-demand) is a good place to start.
Layout Widgets allow you to customise how your questionnaire is presented to a participant.
Here is an example of a layout widget - the Page Break Widget:

Notice you can now move between pages in the Live Preview:

The Page Break Widget is used to separate out your questions across multiple pages.
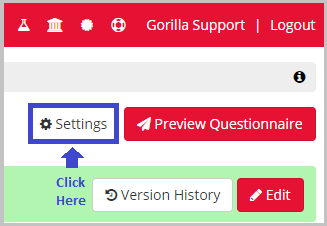
Notice how in the above example there are no configuration settings or content inputs in this Layout Widget. That because all Layout Widgets are controlled in the Options menu found under Settings which is located next to the 'Preview Questionnaire' button on the top-right of the Questionnaire Builder.
Locating the Settings Menu:
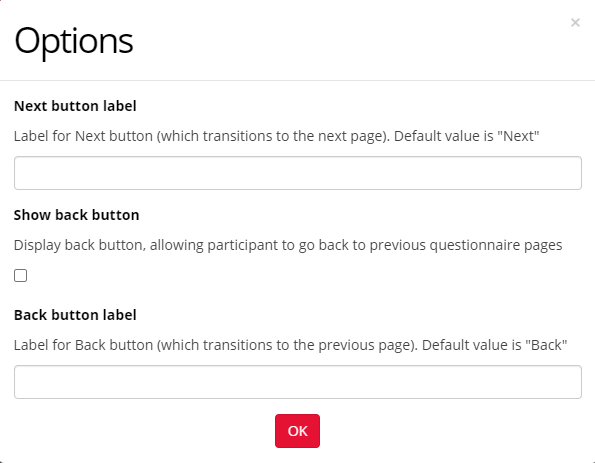
Where you can change additional layout options such as the Next and Back buttons:
You're viewing the support pages for our Legacy Tooling and, as such, the information may be outdated. Now is a great time to check out our new and improved tooling, and make the move to Questionnaire Builder 2 and Task Builder 2! Our updated onboarding workshop (live or on-demand) is a good place to start.
The Script Widget allows you to add some customised code to your questionnaire in order to do post-processing of your questionnaire data.
Here is an example of the Script Widget:
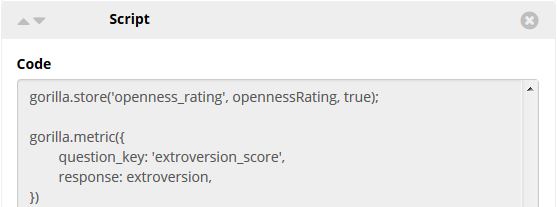
The Script Widget can be useful if you wish to create your own scoring system for your questionnaire responses, or else alter the standard scoring of the Widgets. You may also wish to calculate overall scores for a participant which you later use to branch participants in your experiment. You can view a demonstration of this in our script widget tutorial.
The Script Widget will accept code written in either javascript or Typescript. Learn more about the Script Widget from the Scripting in the Questionnaire Builder section below.
You're viewing the support pages for our Legacy Tooling and, as such, the information may be outdated. Now is a great time to check out our new and improved tooling, and make the move to Questionnaire Builder 2 and Task Builder 2! Our updated onboarding workshop (live or on-demand) is a good place to start.
To send a Questionnaire to participants, you need to add it to an Experiment.
The Experiment Tree forms a framework around your Questionnaire that allows participants to enter the Questionnaire. From the Experiment Builder Recruitment Tab, you can control entry of participants into your Experiment. From the Participants tab, you can manage your list of participants, and from the Data tab, you can download the responses to your Questionnaire.
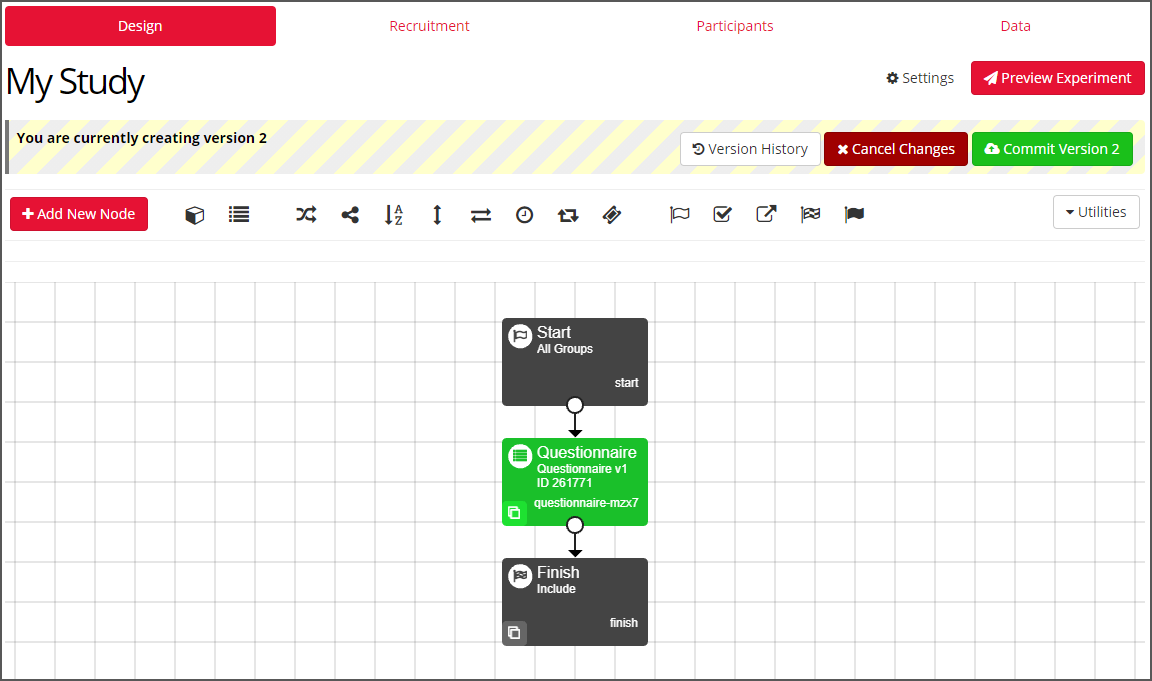
Check out the next page for more information about Experiments, and how to add your Questionnaire to an Experiment!
You're viewing the support pages for our Legacy Tooling and, as such, the information may be outdated. Now is a great time to check out our new and improved tooling, and make the move to Questionnaire Builder 2 and Task Builder 2! Our updated onboarding workshop (live or on-demand) is a good place to start.
To use a Questionnaire as part of an Experiment:
If you would like more detailed information on adding Nodes to your Experiment Tree read the How To: Experiment Tree guide.
As well as gathering data on your participants, a questionnaire can be used in conjunction with a Branch Node to influence the progression of other tasks or your experiment as a whole. For example, you could end an experiment early or make a following task harder or easier depending on a participant's answers.
To do this you must check the 'write to embedded data' option in your response widgets. Find out more about embedded data and how to use it in our Embedded Data walkthrough.
You're viewing the support pages for our Legacy Tooling and, as such, the information may be outdated. Now is a great time to check out our new and improved tooling, and make the move to Questionnaire Builder 2 and Task Builder 2! Our updated onboarding workshop (live or on-demand) is a good place to start.
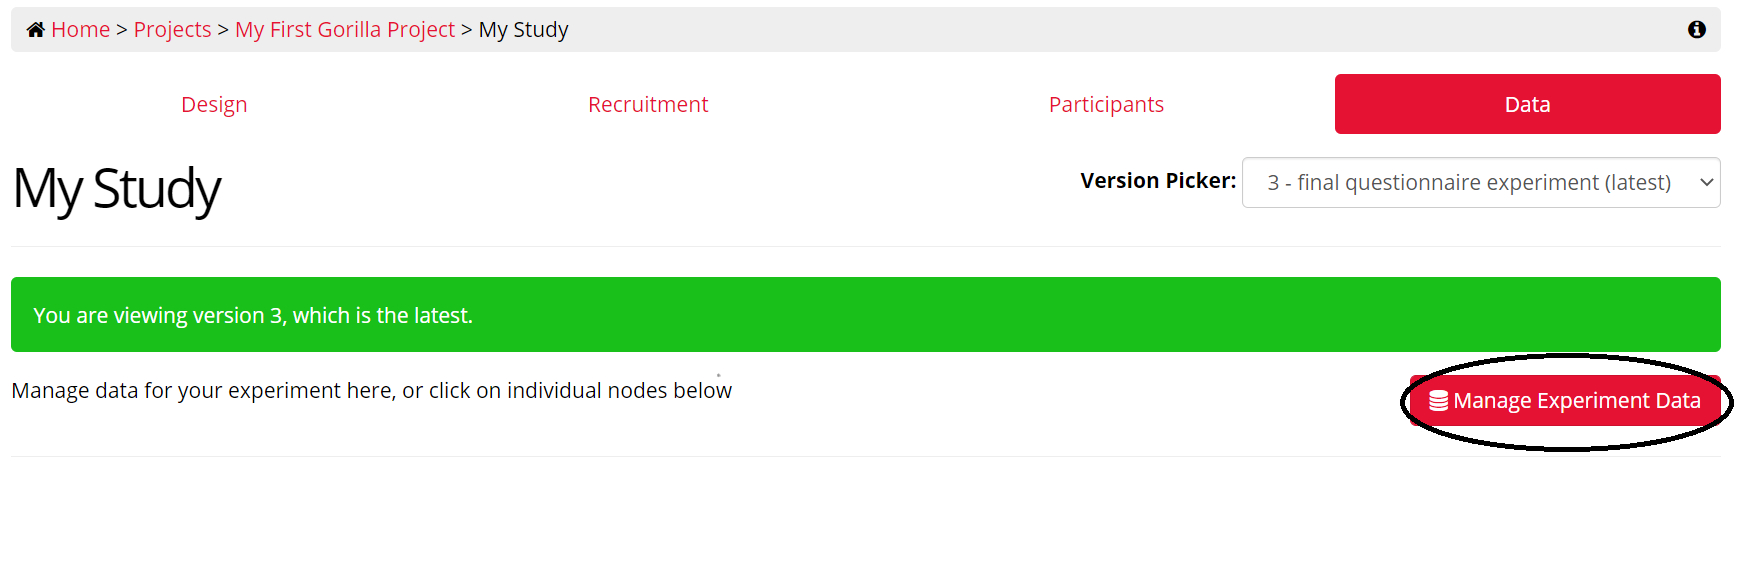
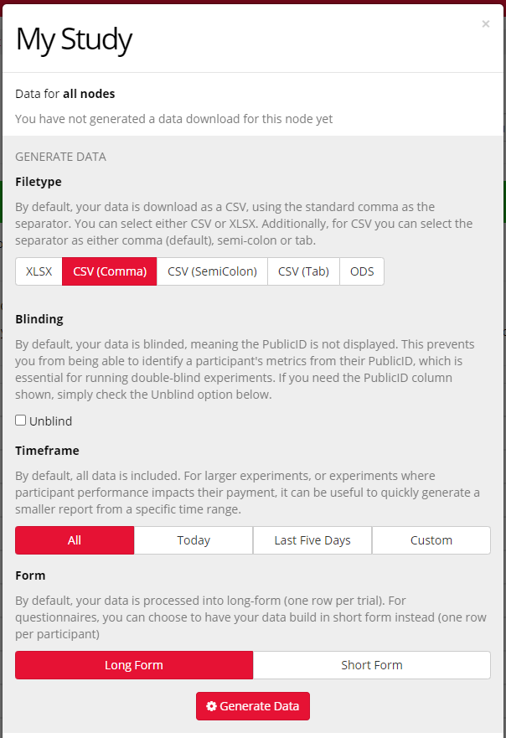
When participants have completed your Questionnaire, you can download data in the form of a metrics spreadsheet. You can download your participant data from the Data tab of your Experiment tree. Here, you should click on the red Manage Experiment Data button.
You will be presented with a pop-up window that will ask you to generate your data. This window allows you to choose the filetype you wish to download your data in, and select the timeframe for collected data.
For Questionnaire data, you also have the choice of either Long-Form data (one row for each trial) or Short-Form data (one row per participant).
Once you have selected the settings appropriate for your data, select Generate Data.
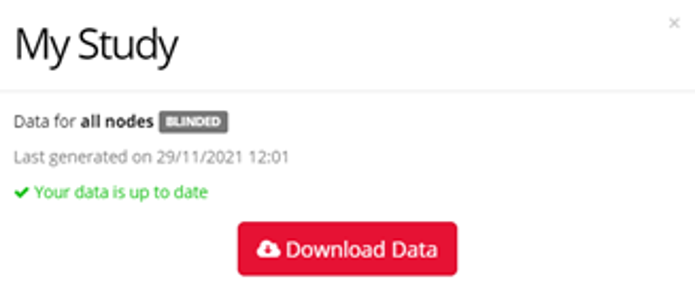
This can often take up to a few hours to generate, depending on the size of your experiment tree. There is an option to receive email updates once your data have finished generating. If this takes longer than 24 hours, we recommend you get in touch with our support team via the contact form.
Once data generation is complete, you are able to download the spreadsheet(s) and view the data metrics.
You're viewing the support pages for our Legacy Tooling and, as such, the information may be outdated. Now is a great time to check out our new and improved tooling, and make the move to Questionnaire Builder 2 and Task Builder 2! Our updated onboarding workshop (live or on-demand) is a good place to start.
Markdown is used throughout Gorilla in the Task Builder and Questionnaire Builder to add styling and to format text.
It is a very simple 'markup' language that can be used to format sections of text, providing a similar set of functionality to text editors such as Word. For example, you can create titles, embolden or italicise text or create numbered/bullet-pointed lists, among many other things.
The other key feature of Markdown is that you can include regular HTML code.
Below is a guide for common formatting in Markdown:
| Markdown Syntax: | What it looks like when displayed: |
| Creating Titles | |
|---|---|
|
# My Title |
My Title |
|
## My Subtitle |
My Subtitle |
|
### My Subtitle |
My Subtitle |
|
#### My Subtitle |
My Subtitle |
|
This is a my paragraph of text. |
This is a my paragraph of text. |
| Styling and formatting Text | |
|
You can also make text **bold** |
You can also make text bold |
|
and use *italics* |
and use italics |
| Inserting Line Breaks (Task Builder 2/Questionnaire Builder 2) | |
|
You can easily create separate paragraphs. <br><br>Just insert two <br> tags between the lines! |
You can easily create separate paragraphs. Just insert two <br> tags between the lines! |
| Inserting Line Breaks (Task Builder 1/Questionnaire Builder 1) | |
|
You can easily create separate paragraphs. Just press return and leave a clear new line! |
You can easily create separate paragraphs. Just press return and leave a clear new line! |
| Adding in Links to other web-pages | |
|
Adding in a [Link](https://gorilla.sc/support) is nice and neat! |
Adding in a Link is nice and neat! |
| Creating Lists | |
|
You can use bullet points:
|
You can use lists, which will be numbered automatically
|
|
You can use bullet points:
|
And lists, which will be numbered automatically:
|
| Using HTML within Markdown | |
|
You can use HTML within markdown and it will usually work pretty well: <img src='/support/images/gorilla_logo_red.png'> Just be sure to use single ' quotation marks within your html code. If you use double quotation marks in your html it may not always work! |
You can use HTML within markdown and it will usually work pretty well:
Just be sure to use single ' quotation marks within your html code. If you use double quotation marks in your html it may not always work! |
You're viewing the support pages for our Legacy Tooling and, as such, the information may be outdated. Now is a great time to check out our new and improved tooling, and make the move to Questionnaire Builder 2 and Task Builder 2! Our updated onboarding workshop (live or on-demand) is a good place to start.
HTML, like Markdown, can be used to format sections of text within your Questionnaires or Tasks. HTML, or HyperText Markup Language, is an 'extensive language' which is used by all websites to communicate how information on a web page should be displayed within a browser.
In Gorilla HTML can be used instead of markdown to add styling to text, such as to embolden, italicise, colour or text alignment. Create titles, numbered/bullet-pointed lists and tables. It can also be used to link to external pages or embed images or videos.
When writing HTML 'elements' we must always use what is known as an opening tag (e.g. <p>) and a closing tag (e.g. </p>).
Markdown is a simpler language for formatting text content. However, you may wish to use HTML if you are more familiar with it, or if you need more flexibility in formatting things in a way Markdown can’t, such as adding colour to text.
Below is a guide to basic formatting in HTML:
| HTML code elements: | What it looks like when displayed: | |||||||||
| Creating Titles and Text Blocks | ||||||||||
|---|---|---|---|---|---|---|---|---|---|---|
|
<h1>My Title</h1> |
My Title |
|||||||||
|
<h2>My Subtitle</h2> |
My Subtitle |
|||||||||
|
<h3>My Subtitle</h3> |
My Subtitle |
|||||||||
|
<h4>My Subtitle</h4> |
My Subtitle |
|||||||||
|
<p>My paragraph would go here if I were writing one</p> |
My paragraph would go here if I were writing one. |
|||||||||
| Styling and formatting Text | ||||||||||
|
<p>You can create <strong>bold</strong> text.</p> |
You can create bold text. |
|||||||||
|
<p>Using <em>Italics</em> text is fun!</p> |
Using italics is fun! |
|||||||||
|
<p>Sometimes you will want to <u>underline</u> you text.</p> |
Sometimes you will want to underline your text. |
|||||||||
|
<p style="color: blue;">You can change the colour of your text by naming colours</p> <p>Or specify the colour using
<p>Alternatively you can use <span style="color: #1b9513;">
|
You can change the colour of all your text by naming colours Or specify the colour using 'decimal code' (R,G,B). Alternatively you can use Hex Code to pick a colour. |
|||||||||
|
<p style="font-size: 150%;">You can change the font size by %</p> <p style="font-size: 16px;">Or specify the number of pixels (px) for your new font size.</p> |
You can change the font size by % Or specify the number of pixels (px) for your new font size. |
|||||||||
|
<p style="font-family: courier, sans-serif;">
|
You can also change the font style. Note: If you use a font that the participant’s browser/operating system does not support, the text will not appear. Its good practice to add in a backup after your first font style. Separate this back-up font from the first by using a comma. Sans-serif usually works. |
|||||||||
|
<p>You can combine different formatting e.g.
|
You can combine different formatting e.g. colour, font size and style by listing your formatting elements one after another, separated by semi-colons. | |||||||||
| Aligning Text | ||||||||||
|
<p style="text-align: left;">
|
This text is aligned to the left. |
|||||||||
|
<p style="text-align: center;"> This text is centre aligned.</p> |
This text is centre aligned. |
|||||||||
|
<p style="text-align: right;">
|
This text is aligned to the right. |
|||||||||
|
<p style="text-align: justify;"> This text is justified.
|
This text is justified. You may wish to use this when writing longer paragraphs. |
|||||||||
| Adding in Links to other web-pages | ||||||||||
|
<a href="https://gorilla.sc/support/">My Link</a> |
My Link | |||||||||
|
<a href="https://gorilla.sc/support/" target="_blank">
|
Open My Link in a New Tab | |||||||||
| Inserting Line Breaks | ||||||||||
|
<h4>This is how to insert a line break</h4>
|
This is how to insert a line breakbetween other html elements. |
|||||||||
|
<p>Sometimes you want to separate text with a horizontal rule</p>
|
Sometimes you need to separate text with a horizontal rule like this! |
|||||||||
| Creating Lists and Tables | ||||||||||
|
<ul>
|
|
|||||||||
|
<ol>
|
|
|||||||||
|
<h4>This is how to create a score table:</h4> <table class="table table-bordered"> <thead> <tr> <th>My Heading</th> <th>Score1</th> <th>Score2</th> </tr> </thead> <tbody> <tr> <th>My Row Label</th> <td>value 1</td> <td>value 2</td> </tr> <tr> <th>My Next Row Label</th> <td>value 3</td> <td>value 4</td> </tr> </tbody> </table> |
This is how to create a score table:
|
|||||||||
You're viewing the support pages for our Legacy Tooling and, as such, the information may be outdated. Now is a great time to check out our new and improved tooling, and make the move to Questionnaire Builder 2 and Task Builder 2! Our updated onboarding workshop (live or on-demand) is a good place to start.
Embedded data is data collected about a participant's responses that can be used to alter the experiment (in real time) depending on their response. Essentially, embedded data is information you can ’carry’ from one part of your task or questionnaire to others within the same experiment.
Here are some examples of when to use embedded data:
Learn how you can manipulate your experiment using Embedded Data through our Embedded Data Guide.
You're viewing the support pages for our Legacy Tooling and, as such, the information may be outdated. Now is a great time to check out our new and improved tooling, and make the move to Questionnaire Builder 2 and Task Builder 2! Our updated onboarding workshop (live or on-demand) is a good place to start.
The best place to learn about the Script Widget is our Walkthrough: Scripting in Questionnaire Builder 1 which gives a thorough step-by-step on how to use the Script Widget in the Questionnaire Builder.
Alternatively, if you already know how to code, you may prefer to learn about the Script Widget via this Classic Example: Big 5 Personality TIPI
When you are ready to start coding your own scripts be sure to also check out the [Gorilla API]/support/tools/legacy-tools/task-builder-1/gorilla-api#overview).
You're viewing the support pages for our Legacy Tooling and, as such, the information may be outdated. Now is a great time to check out our new and improved tooling, and make the move to Questionnaire Builder 2 and Task Builder 2! Our updated onboarding workshop (live or on-demand) is a good place to start.
For general troubleshooting advice visit our troubleshooting page.
If you don't find an answer to your question reach out to our friendly support team via the contact form - we are happy to help!